Status

Grains and Gains

cheese danish from farmer's market

Recently I talked about how I was going to start adding in some whole grains back into my diet to see how I handle them.  I’ve been focusing on old fashioned oatmeal and whole grain breads.  So far things have been going well with that.  Those grains aren’t causing me any sleep or digestive issues.  This means I can get back to eating oatmeal (I do love it!) and having a sandwich on occasion.

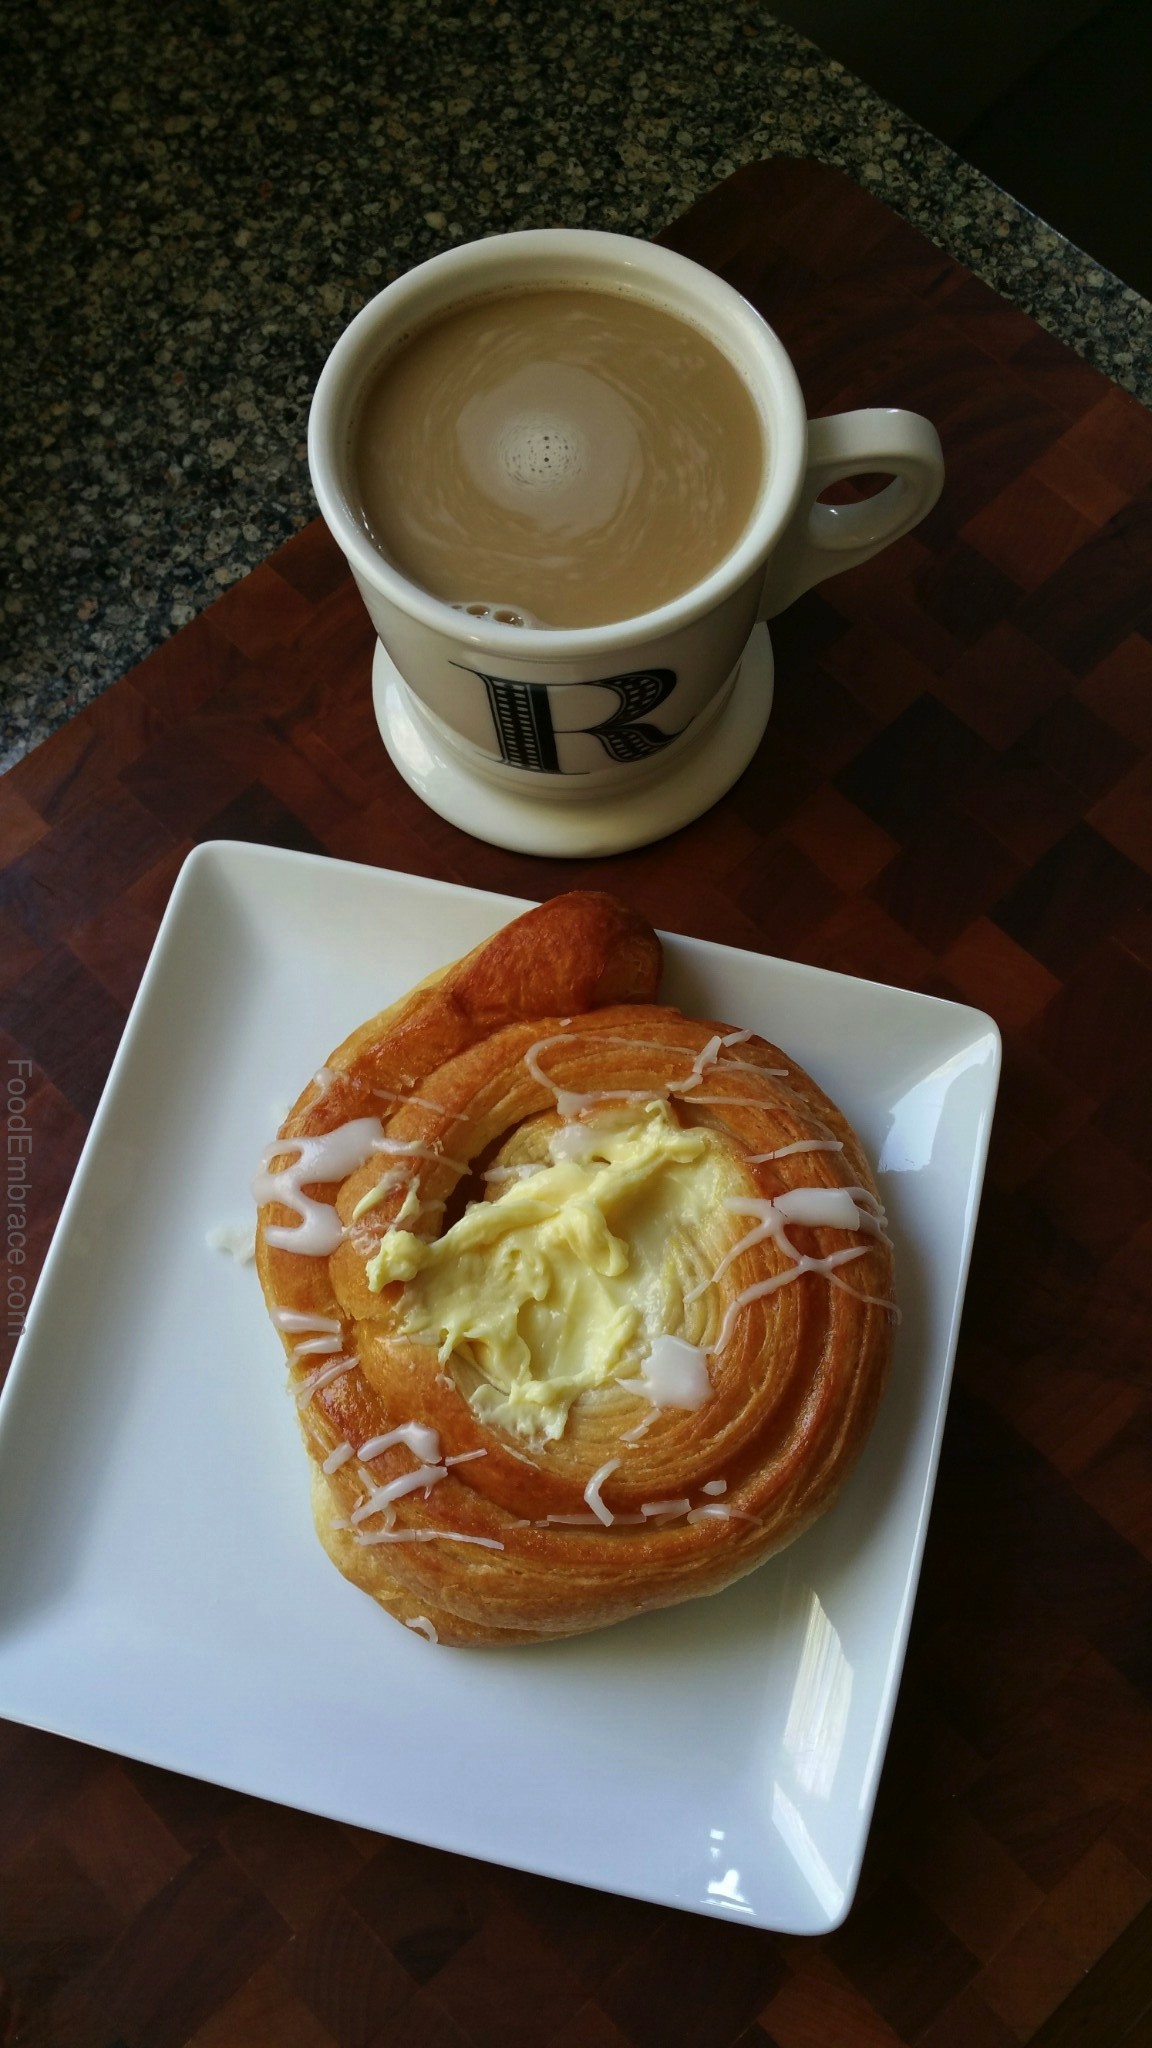
I pressed my luck and splurged a bit.  I got a cheese danish from the farmer’s market last week and had that for breakfast with coffee.  It was delicious and decadent.  And it caused me a lot of problems.  Booo

It left me feeling bloated and crappy.  Plus I couldn’t sleep that night.  The bloaty feeling stuck around for two days after eating that danish.  Bleck!  So while delicious, I know that those are the types of things I need to stay away from.  I can have a few bites if I really want it but otherwise, white flour based treats are out.  Which is fine because I typically don’t gravitate towards that stuff anyway.

My gains are with running and this makes my heart sing!  I took some time off running since it was starting to bother my hip.  Instead I started focusing more on HIIT workouts (Insanity Max 30) and weight workouts with 21 Day Fix Extreme (21FX). Both of these have helped me get back on track and being able to start running again.

Max 30 helped me keep my endurance and cardio levels up.  21DFX helped me strengthen my core and work on my leg strength.  That program has a lot of one legged exercises (think one legged squats) that helped me with balance and to make my legs and hips stronger.

I started running again last week and it went well.  My hips were only a little sore after the run but the soreness didn’t last. It did not linger through the next day and I could walk up stairs without limping.

Score!  This is amazing!  Running is so much my jam and we have so many amazing places to run here.  I love getting up early in the mornings and knocking out a run.  Nothing makes me feel as amazing as a run does.  It always puts me in a good mood and starts the day off on the right foot.  I love it.  I can’t go run every day but right now I’ll take something over nothing.

Where do I go from here?  Still going to focus on eating whole grains on occasion and keeping that in check.  Along with adding running back in a few days a week.  I’m also getting ready to start a new workout routine called CIZE.  I have a challenge group that starts next Monday and it’s not too late to join in.  CIZE is a hip-hop dance focused workout routine.  No burpees and no weights.  Just shakin’ the booty and getting exercise at the same time.  There’s still time to join the challenge group if you want in.  Give me a shout and I’ll send you all the details!

How are your workouts going lately?


Banana Nut Pancakes

Me: What kind of pancakes do you want this week?

Him: Something with nuts!

Me: What kind of nuts, pecans or walnuts?

Him: What did we just have with the coffee cake?

Me: Pecans.

Him: Then we should have walnuts.

Me: Done

And this is how Banana Nut or what I lovingly call, my favorite pancakes ever, were born.

Andrea’s Banana Nut Pancakes 

  • 1C Unbleached All-Purpose Flour
  • 1C Buckwheat Flour
  • 1tsp Baking Soda
  • 1tsp Cinnamon
  • 2TBSP Sugar
  • 1C Walnuts, crushed
  • 1 Large banana
  • 1C Unsweetened Coconut Milk (the kind in the dairy section, not from a can)
  • 1C Water
  • 2tsp Vanilla Extract
  • 1/2tsp Apple Cider Vinegar

Preheat grilled over medium heat.  In a large mixing bowl combine the flours, baking soda, cinnamon, and walnuts and whisk together.  In a medium sized mixing bowl combine the water, coconut milk, vinegar, extract, and banana.  Mash the banana in the liquids as much as possible.

Add the liquid ingredients to the dry and stir until everything is combined.  Grease your griddle with a little oil and drop batter by spoonfuls.  The size is up to you!  Cook for about three minutes on the first side or until you start seeing several bubbles pop up in the center.  Flip and cook for another minute to two minutes.  Remove from heat and continue until all the batter has been used.

Serve warm and enjoy!

Most favorite pancakes to date.  These are slightly sweet, completely fluffy and full of flavor.  The banana keeps the pancake moist and the crushed walnuts add a little bit of crunch and texture.

Toppings are your choice, but clearly I used maple syrup for mine.

Leftovers can be frozen and reheated either in a toaster or toaster oven.

Two things are true, I’ve got leftovers and they will be eaten this weekend.

Have fun guys, and remember, always play with your food! Enjoy!

Oatmeal Mask

I’m still washing my face with honey everyday.  I am not about to give that up, no way.  I have found my new routine, hooray!

While the honey is great, I do like to give my face a little bit of a scrubbing one or twice a week. I wanted to keep things simple and still homemade so I pondered what I could use as a natural scrub.

I found a lot of recipes for an oatmeal scrub and decided to quick put together one for a little pampering.

In my scrub I used:

  • Old Fashioned Oats
  • Raw Apple Cider Vinegar
  • Unsweetened Coconut Milk

I put all of these ingredients into my mini food processor and processed until the oats broke down and the mixture got thick.  I tried to keep the portions small but still ended up with a ton of scrub!

The oatmeal for scrubbing purposes, and coconut milk along with the oats for skin softening purposes.  The apple cider vinegar is used as a mild astringent and to help tighten and unclog pores.

I took my concoction upstairs and applied it to my face.

I put the mixture on my face in small circles to start the scrubbing process.  Then I applied more and created a mask.  I let this mask sit and tighten on my face for about half an hour.

I rinsed it off in the shower.

The mask worked really well!  My skin was soft, glowing, and felt amazingly clean!

Since then I’ve changed tactics a bit.  I’m using ACV as a toner/astringent after all my face washings now so I skip that ingredient when creating a scrub.

I combine oats and a small amount of coconut milk in the food processor and process as much as I can to break up the oats.  Then I add in a few scoops of coffee grounds.

That’s right.

It’s already ground up and it’s just going to be tossed out anyway, so I might as well use it, right?

It’s a perfect scrub and caffeine helps to tighten up pores and skin.

If you have sensitive skin or gentle skin on your face, use the grounds sparingly and be extra gentle as you scrub your face.

If you have really sensitive skin, stick with just the oats.

Tone and moisturize as usual after using the scrub.

Things to keep in mind:

  • Use unsweetened coconut milk or make your own because you don’t want additives on your beautiful face.
  • Use plain coffee and not a coffee that has been flavored (like Irish Cream coffee for example), because again, you don’t know exactly what is in that, so it’s best to avoid all together.
  • If you make the scrub ahead of time and keep in the fridge, it will gel and thicken up just a bit more.
  • Make sure you apply over a sink because the mixture will fall off and you don’t want that to go splattering all over your floor.

Have you been sticking with a more natural approach to your beauty routine? Have you made your own scrub before?

Stuffed Zucchini

We are in full swing with the summer season around here and one thing that is abundant at the farmer’s markets is zucchini.

Not just any zucchini, but HUGE ones, longer than the length of my forearm.

Those kinds of zucchini demand the need for stuffing.  A lot of people stuff zucchini with ground meat, and this was highly typical where I grew up.  Ground beef was usually the meat of choice stuffed into the zucchini along with maybe some tomato sauce.

I like the flavor of cooked tomato along with zucchini but I wanted to do a meatless version of stuffed zucchini.  Instead of meat, I used my favorite grain, millet.

Andrea’s Stuffed Zucchini

  • 1 HUGE zucchini, (literally like a foot in length, or as big as you can find)
  • 1/2C Uncooked Millet
  • 1 1/2C Chicken Stock (or veggie broth)
  • 2-3 Green onions, chopped (both white and green parts)
  • 1/2C Shredded Carrot
  • 1C Cherry Tomatoes, quartered
  • 1tsp Garlic Powder
  • 1tsp Italian Seasoning
  • Shredded mozzarella or provolone (optional)
  • Olive Oil for sauteeing

Preheat oven to 400 degrees and grease a baking dish by rubbing some olive oil around it. In a small sauce pan, heat over medium high heat and add about a teaspoon of olive oil to it.  Add in the uncooked millet and brown for about 2 minutes.  Add in the chicken stock and bring to a boil then reduce to a simmer.  Simmer until the millet is cooked and has absorbed the liquid.

Trim the edges of the zucchini and cut in half lengthwise.  Scoop out the insides being careful not to scoop down too far.  You want to create a long dent in the zucchini so you can stuff it with millet later.  Place zucchinis in the baking dish once they have been fully scooped out.

Once the millet has cooked, place in a medium sized glass mixing bowl.  Add in the tomatoes, carrot, and green onions. Add in the seasonings as well.  Mix until well combined.  Stuff the millet mixture into the zucchinis, packing them tightly.  If you have leftover stuffing, sprinkle that along the bottom of the baking dish.

Place in oven uncovered and bake until you hear the stuffing sizzling and the top is a golden brown color. The zucchinis should be cooked through by this point.  About 15 minutes.

Remove from oven and top with shredded cheese.

Because the zucchinis are so large, this can easily be a meal on it’s own.  If you want more, you can supplement with a side salad or maybe some sauteed greens.

This is a perfect make ahead dish as well.  You can prep everything in the morning before work (or even the night before) and bake it when you get home.  I would still bake at 400 but it will take a tad longer since the dish would be cold.  I would bake covered for about 15 minutes, and then uncovered for another 10-15.

I love millet and it works perfectly as a stuffing.  If you’ve never had millet before but have been curious (millet is also a great grain for those that have wheat intolerances), this would be a good way to get familiar with it.  The texture is like rice but it has a taste similar to polenta.

You could easily add some beans to the stuffing, if you wanted some extra protein kick.  Black beans or a white bean would work well with it.

Stuffed zucchini is a great way to use up some of abundance of veggies that are around this time of year.

Do you like zucchini? Have you ever had stuffed zucchini?

Have fun guys, and remember, always play with your food!  Enjoy!

Roasted Veggie and Wheatberry Salad

Roasting veggies and adding it to a grain is one of the simplest ways to make a salad.  This could be a side dish or a main dish.  It can be made ahead of time for a quick meal or for party prep.

Using veggies that have a lot of moisture in them, like tomatoes and squash will provide you with automatic dressing.  No need to make extra sauce or dressing, it’s already built right in!

I love making dishes like this in the summer because they are so versatile. You can use whatever veggies are in season or what you happen to have on hand.  You can make a huge portion or a small amount. The dish can be served hot or cold.

As you prep the veggies, you can’t help but be amazed by their gorgeous color.  Something that looks that good and also smells good, before you even do anything to it, you know will turn out super tasty.

I recently made a roasted veggie and wheatberry salad which is perfect for summer meals.  Once you learn a concept, you can apply it to so many different dishes! Remember, this dish is open to preferences. Use what veggies you like and/or what you happen to have on hand.

Andrea’s Roasted Veggie and Wheatberry Salad

  • 1C Hard Wheat Berries
  • 1 Pint Cherry Tomatoes, cut in half
  • 1 Small Zucchini, chopped
  • 1 Small Yellow Squash, chopped
  • 1/2 Red Onion, chopped
  • 1/2lb Asparagus, chopped
  • Olive Oil
  • Garlic Powder
  • Italian Seasoning
  • Red Pepper Flakes

Preheat oven to 400 degrees.  In a medium sized sauce pan, add wheatberries and cover with water.  Bring to a boil and reduce to a simmer.  Simmer until wheatberries are cooked, about 15 minutes.  They will be soft but very chewy when done.  Drain wheatberries and set aside.

In a large bowl, add vegetables and toss with olive oil.  Use enough olive oil to coat all the veggies.  Add seasoning to taste and toss to combine.  I used probably about a tsp for the garlic powder and Italian seasoning, along with a huge pinch of red pepper flakes.

Line a baking sheet with foil and spray with olive oil or nonstick spray.  Spread the veggies out onto the cookie sheet and place in oven.  Roast for about 10 minutes or until all the veggies are soft.

Place cooked wheatberries in the previously used veggie bowl.  When the veggies are done, add veggies to wheatberries making sure to include all the juice on the baking sheet as well.  Combine all the veggies with the wheatberries.  Serve and enjoy!

Really simple right?  This is a great dish to take to a potluck or BBQ picnic because it can be served chilled or room temperature.  There’s nothing in it that will spoil if it sits out for a while.  Since it can be made ahead not only is it great for parties, but it’s perfect for weekday lunches or a quick dinner.

You could even add some spinach to this by adding fresh spinach to the wheatberries and adding the hot veggies on top of that.  The heat from the veggies will help wilt the spinach as you combine the dish.  Sprinkle with a bit of grated parm and enjoy your gorgeous masterpiece!

Have fun guys, and remember, always play with your food! Enjoy!

Pina Colda Pancakes

Earlier this week, I discussed how a recent kitchen flop then lead me to create one of the best pancake flavors to date. Happy day!

I had been toying around with making a summery-themed pancake one that tasted like the sun and reminds you of the beach and drinks with little umbrellas in them.

Or tasted like the sun and reminded you of being pool-side with drinks that had little umbrellas in them.

I’m flexible.

Once I trashed the failed pancakes, I got busy making some Pina Colada inspired pancakes.  While I don’t like an actual pina colada, the flavors that make one up are fantastic and can be used in other applications (like smoothies!).

I knew that I could use those flavors in a pancake as well!

Andrea’s Pina Colada Pancakes

  • 1C Spelt Flour
  • 1C Buckwheat Flour
  • Pinch Ground Cinnamon
  • 1/2C Unsweetened Shredded Coconut
  • 2TBSP Cane Sugar
  • 1/2tsp Baking Soda
  • 1C Pineapple Juice
  • 1/2C SO Delicious Unsweetened Coconut Milk
  • 1/2C Water
  • 1tsp Vanilla Extract

Preheat griddle over medium heat.  In a large mixing bowl, combine all dry ingredients and whisk.  In a medium sized mixing bowl, combine all liquid ingredients and stir.  The coconut milk will curdle in the pineapple juice, this is OK. Acid mixing with a cream will create this reaction. It’s not bad or sour, so don’t freak out.  Slowly add the liquid mixture to the dry ingredients, gently stir until everything is well combined.

Grease the griddle (I brush on olive oil) with your choice of oil or butter, and then spoon some of the batter onto the griddle.  The size of pancakes you want is up to you. Cook on one side until you start to see bubbles popping in the middle of the pancake, about 2-3 minutes. Flip and continue to cook until done, about 1-2 minutes.  Remove from griddle and repeat with remaining batter.  Serve warm!

Light and sweet pancakes that taste like summertime fun. The pineapple and coconut come out in full force in these pancakes but not so much as to be overwhelming. Both Scott and I enjoyed these a great deal and I’m happy to have found another way to use pineapple juice.

I like keeping the coconut milk to a small amount because I don’t want it to weight down the pancakes. By only using 1/2 a cup, the pineapple juice and water make up the rest of the liquid and help to keep the pancakes fluffy.

Have fun guys, and remember, always play with your food! Enjoy!

Grainola

You all know that I love granola. I make my own a lot and have even branched out making some with quinoa. I also love grains especially when I can chew and crunch my way through a meal.

Then I wondered, “Could I make granola with multiple grains?”

The answer friends is, yes, yes I can.  Because I tried it and it worked!  Three grains go into this dish that I’m calling Grainola!

Andrea’s Grainola

  • 1C Buckwheat Groats
  • 1C Cooked Wheatberries
  • 1C Cooked Quinoa
  • 3TBSP Maple Syrup
  • 3TBSP Light Olive Oil
  • 1tsp Cinnamon

Preheat oven to 350. On a baking sheet, line it with foil and spray with some nonstick spray or olive oil. You can also use parchment paper if you have that.  In a medium sized mixing bowl, combine all ingredients until they are coated.  Spread on a the baking sheet and bake for about 20 to 30 minutes stirring about every 10 minutes.  Keep an eye on them so that they don’t burn.

Remove from oven once they are browned and slightly crisp.  Allow to cool, store in glass container in your fridge.

Crunchy, sweet, and chewy this makes the perfect granola!  Feel free to add some crushed nuts and seeds after the gainola has cooled down.

It is pretty intense so be aware that you will be crunching and chewing your way through a bowl of it.

It’s great with yogurt or with a splash of milk (your choice) on top. I’m not sure if I can actually make granola now without some kind of grain to go with it!

Have fun guys, and remember, always play with your food! Enjoy!

Chocolate Coconut Oats

Most times I’m just a regular old fashioned oats girl with no frills. I used to make all kinds of combos but then I moved away from that and became more old school.  Or plain. However you want to label it. I found comfort in regular oats.

But some days we just need something fun. Some days we need a little pick-me-up.

Some days we just need some dang chocolate.

And on those days, I get a little sassy with my oats and make something super yummy.  Nothing too terribly fancy and I’m sure others have been doing this for a while but this is my take on a classic flavor combo.

Chocolate and coconut!

Andrea’s Chocolate Coconut Oats

  • 1C Old Fashioned Oats
  • 1.5C Plain Soymilk (or liquid of your choice)
  • 1 Ripe banana
  • 1TBSP Wheat Germ
  • 1TBSP Ground Flax
  • 1TBSP Coconut Butter
  • 1TBSP Unsweetened Cocoa powder
  • 2TBSP Dried Unsweetened Coconut
  • Extra coconut and dark chocolate chips for garnish

In a small pot, add in the soymilk and the banana. Mash the banana around and then add in the cocoa and coconut butter.  Heat over medium-high heat until the soymilk just begins to bubble. Add in the oats and reduce heat to medium-low.  Also add in the ground flax, wheat germ, and dried coconut. Stir and allow to cook for about 5-7 minutes until the oats soften and the mixture starts to thicken up.  Remove from heat, spoon into bowls, and top with chocolate chips and coconut for garnish. Makes enough for two bowls of oats.

Everything before you hit the coconut butter, is how I make my typical morning oats just adding in a sprinkle of cinnamon for some flavor and warmth. Whenever I try and make a fancier bowl of oats, I start with the basic and build up from there. It makes things easier plus I know if the oats don’t turn out, it’s because of the new ingredients since nothing else is different.

This is a lovely bowl of oats when you want something a little different. It’s not too sweet and the chocolate isn’t overpowering. The flavor is subtle and you can appreciate taking a little trip down chocolate lane as you eat it.

Just because it’s chocolate doesn’t mean you can’t have it for breakfast!

Have fun guys, and remember, always play with your food! Enjoy!

Burrito Bowl

Shaking off yesterday’s heavy topic let’s talk about something fun! And let’s make it about fun food!

Scott and I have a favorite diner that just happens to be very close to us and they have the best veggie burritos.  The. BEST.  The burrito is gigantic and stuffed with beans, cheese, and all manner of veggies.  They won my heart because they actually use a variety of real veggies in their burritos.

Listen, I tend to eat mostly veggie when I’m dining out.  I’ve gotten veggie burritos and such at many places and the “veggies” that restaurants tend to give you are as follows:

  • Onion
  • Green Peppers
  • Mushrooms

That’s it.  Maybe if it’s your lucky day, there will be a sad basement tasting carrot tossed in the mix.  But usually “veggies” are those three things and if we’re being truthful, mushrooms aren’t even a veggie.

Please leave them off my veggie meals!

Anyway, at our favorite diner the veggie burritos are full of:

  • Onion
  • Carrots
  • Peppers
  • Zucchini
  • Squash
  • Broccoli
  • Cauliflower

Ah! Be still my beating heart! Add in that it is fantastically delicious and I’m your newest loyal customer.

I wanted to make something similar at home but I didn’t have big burrito wraps so instead I decided to make a burrito bowl with loads of veggies on top of brown rice.  This bowl is loaded up too!

This is more of a concept than an actual recipe because the veggies are up to you!  Here’s what goes in OHC’s burrito bowls:

Andrea’s Burrito Bowls

  • 1C Brown rice (short or long grain, up to you)
  • Black Beans (I made my own but you can use canned. Drained and rinsed if you do!)
  • 2 Carrots, chopped on a bias
  • 1 Head of cauliflower, chopped and blanched
  • 1 yellow squash, chopped
  • 1 Red pepper, chopped
  • 1 Green pepper, chopped
  • 1 jalapeno pepper, seeded and chopped
  • Salt, pepper to taste
  • Huge pinch of red pepper flakes
  • Garlic powder, to taste
  • Chili powder, to taste
  • Smoked paprika, about 1tsp
  • Your favorite salsa, about 1C

Toppings:

  • Quick and Dirty Guacamole
  • 2% Greek Yogurt (or sour cream)
  • Shredded Pepperjack Cheese
  • Chopped Green Onions
  • Hot sauce of choice (Cholula all the way)

Cook your rice and set aside. In a saute pan, add in some olive oil and heat over medium heat.  Add in all veggies except for the cauliflower.  Stir, and add in all the seasonings.  Stir again.  Sautee until the veggies start to soften, then add in the cauliflower and beans. Stir and add in the salsa.  Stir and allow to cook for about another two minutes.

To serve spoon rice into the bottom of a bowl, add veggie mix on top, and then garish with your choice of seasonings.  Eat and enjoy!

Just so you know, this makes A LOT of food.  I wanted plenty for leftovers and to freeze for later.  You will have to make more rice though when you have this as leftovers.

This is completely open to interruption because you can use whatever veggies you want.  Feel free to add more to the “toppings bar” like shredded lettuce, crushed tortilla chips, and extra salsa for example.  Having a “toppings bar” helps those that are picky take a little control over the dish and customize it to suit their tastes.

I’m so happy that we have leftovers!

Have fun guys, and remember, always play with your food! Enjoy!

Sunrise Cookies

When I tell you about these cookies, I’m pretty sure that you are going to think that I have crossed over into crazy land.  Let me assure you that I have not.

I have been dreaming of a cookie that I could eat for breakfast for a long time now.  Something that I could make ahead and keep in the freezer where I could pull out one or two, heat up quick in the microwave and eat.  With my hands and not a fork or spoon.

I wanted a cookie that would make a great on-the-go snack that was low in sugar but loaded with flavor and good stuff.

I wanted something that could be legitimately called a cookie because they were made and eaten just like a regular cookie.

I wanted it to have whole grains and veggies in it.

Stay with me, remember I promised you I wasn’t crazy.

I’m calling these Sunrise Cookies because you can have them first thing in the morning and feel good about starting you day off with a cookie.

Andrea’s Sunrise Cookies

  • 1C Carrot Juice
  • 1Small Handful of Spinach or 1C Packed Spinach
  • 1 Large ripe banana
  • 1 1/2C Oats
  • 1 1/2C White Whole Wheat Flour + 4TBSP
  • 2TBSP Ground Flax Seed
  • 2TBSP Wheat Germ
  • 2TBSP Packed Brown Sugar
  • 1/2tsp Baking Powder
  • 1/2tsp Baking Soda
  • 1tsp Cinnamon

Preheat oven to 350. In a blender, combine the carrot juice, spinach, and banana. Blend until smooth.  In a large mixing bowl, combine all other ingredients EXCEPT for the 4TBSP of flour. Whisk ingredients together. Slowly add the liquid mixture to the dry and gently combine with a mixing spoon.  Sprinkle in the remaining 4TBSP of flour and stir again.

On a lined baking sheet (either parchment or silpat) drop the mixture by large spoonfuls.  Place in oven and bake for about 10-12 minutes.  They are large cookies and the dough is thick so they will take some time to cook.  They are down when a toothpick inserted comes out clean.  Remove from oven and allow to cool.

Now when you’re making these, I realize you might have some doubts especially when you smell the spinach and carrot juice mixture. But remember my promise! If you click and make this picture bigger, you’ll be able to see some flecks of spinach in the cookies.

I love that! Green flecks in a cookie are fantastic!

I admit I had my doubts too but then I nibbled on one and all doubts went out the window. These cookies totally delivered! Even Scott loves them so they passed the guy test as well!  I did in fact have them for breakfast not that long ago and was so happy. A great little cookie packed with tons of yummy things and very low on sugar.

Next time I’ll probably add in some vanilla extract, 1tsp, I got so excited as I was making these that I forgot.


UPDATE, January 2014:

I recently made this again with a few adjustments.

Added:

  • 1tsp Vanilla Extract
  • 1/2tsp Cinnamon
  • 2TBSP Coconut Sugar

Left Out:

  • Baking Powder
  • Flax Seed
  • Wheat Germ
  • Brown Sugar
  • 4TBSP White Whole Wheat Flour

I didn’t have the flax or wheat germ on hand and since that got reduced I left out the remaining flour. I also don’t use brown sugar much anymore and subbed coconut sugar instead.  Adding the cinnamon and vanilla gave it a little extra sweetness and depth.

Since I now live at a higher altitude, I baked these at 400 degrees also for about 10-15 minutes.

They came out beautifully!  I will be making a large batch of these to keep in the freezer for quick breakfasts or snacks.


I buy large bottles of carrot juice at the store, or you certainly can juice your own carrots. Add some of the pulp back into the cookies!  You could also add an egg for extra protein or some raisins for some extra sweetness.  Play around and see what combo you like!

I wanted these for breakfast so I made them huge, the size of my palm but you can make them whatever size you like.  Maybe you want small ones for a snack (which I’m also going to do!), if so, just make a bunch of little babies. They also won’t take nearly as long to cook.

I cannot wait to make more of these, that’s how much I love them. In fact I would eat them as a dessert as well, that’s how tasty I think they are.  See what happens you when experiment, fun things!

Have fun guys, and remember, always play with your food! Enjoy!