Ham Hock Bean Soup

Bean SoupGrowing up I didn’t really like beans.  The only beans I really willingly ate were green beans.

My mom and dad loved bean soup and they would eat it often for lunch during the winter months.  As a kid, I couldn’t wrap my head around the concept of bean soup.

Who wants to eat a huge bowl of only beans?

The answer now is me! I love beans as an adult and make up big batches of them to have on hand.  Cooking beans in a slow cooker is a breeze and it’s much cheaper to buy dried beans over canned beans.

Since the weather is turning colder, I decided to tackle making some bean soup from scratch starting with cooking up the beans.

I recently saw this recipe from Lori over at Fake Food Free where she used a wheat beer while cooking her beans.  This sparked the idea to use some beer while cooking up the beans for this soup.

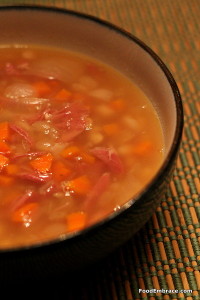
Andrea’s Ham Hock Bean Soup

For The Beans

  • 1lb Navy Beans
  • 1 Large Smoked Ham Hock (or 2 if you want more ham)
  • 1/2 Large Onion, cut into chunks
  • 1 Bottle Dark Beer, (I used New Belgium’s 1554)
  • 10C Water
  • 3 Cloves of garlic

The day before you make this soup, soak the beans in water for 24 hours.  Drain, remove any debris and add the beans to the slow cooker.  Add in the ham hock and the remaining ingredients.  Cook on high for about 6-8 hours or until the beans are soft to the bite.

Remove the ham hock and drain the beans.  Be sure to save the liquid from the beans, you’ll need this for the soup (plus you just made awesome ham hock stock).

Once the ham hock cools, shred and set the meat aside.

For The Soup

  • 1/2 Large Onion, chopped
  • 3 Large Carrots, peeled and chopped
  • 4C Navy Beans
  • 4C Ham Hock Stock
  • 4C Chicken Stock
  • Pinch of salt and ground black pepper
  • 2tsp Ground Garlic
  • 1/2tsp Worcestershire Sauce
  • 1TBSP Olive Oil for sauteeing

In a large soup pot, heat oil over medium heat and add in the onions and carrots.  Sautee for about 5-7 minutes until everything starts to soften.  Add in the seasonings and stir.  Add in the stocks, the beans, and the ham. Stir and then add in the Worcestershire sauce.  Bring to a simmer and simmer for about an hour or until the carrots are cooked through.  Stirring occasionally.

Once the soup is ready serve with cornbread or biscuits and enjoy!

Bean SoupThis soup was everything I hoped it would be.  The dark smokey beer paired perfectly with the ham hock.  If you want, you can sub out some of the stock in the soup with another bottle of the beer.

Yes this took all day but it was totally worth it.  You can break this up and cook the beans one day and the soup the next.  Or you can freeze the cooked beans and shredded ham hock so that they are ready when you would like to make this soup.

I think the addition of maybe some greens would be great in this soup and I might do that next time.  Perfect soup for a chilly fall day.

You’ll have more ham hock stock then you’ll need for the soup so keep the leftovers for other uses or freeze to save for later.  And keep that bone so you can make more stock with it later!

Have fun guys, and remember, always play with your food! Enjoy!

American Heart Association’s Healthy Slow Cooker Cookbook

I love my slow cooker and use it all the time.

Fall and winter mean soups, stews, chilis, and roasts! And that means it’s the busy season for my slow cooker.

It has already seen a ton of action and we are only a month in to fall!

When I was approached by Crown Publishing to review their newest cookbook for the slow cooker, I jumped at the chance!

The American Heart Association’s Healthy Slow Cooker Cookbook is featured with 200 recipes that are geared towards a healthy lifestyle and diet.  They are easy to put together with ingredients that you’ll already have on hand.  Everything from roasts to shrimp and grits are featured in this cookbook.

Since we’re right smack in the middle of fall, I went with a soup recipe to try out.

Jamaican Bean and Vegetable Soup

Recipe from AHA’s Healthy Slow Cooker Cookbook

Reprinted with permission

  • 2 1/2 cups Fat-Free, low-sodium vegetable broth
  • 1 15.5oz Can No-Salt-Added Red Kidney or Black Beans, rinsed and drained
  • 1 14.5oz Can No-Salt-Added Diced Tomatoes, undrained
  • 1 Medium Sweet Potato, peeled and cut into 1 inch cubes
  • 2 Medium Carrots, cut crosswise into 1/4-1/2 inche pieces
  • 1/2 Medium Red Bell Pepper, chopped
  • 1/2 Medium Onion, chopped
  • 2 Medium Garlic Cloves, minced
  • 1 teaspoon Ground Cumin
  • 1/2 teaspoon Salt
  • 1/8 teaspoon Crushed Red Pepper Flakes

In the slow cooker, stir together all the ingredients.  Cook, covered, on low for 5-6 hours or on high for 2 1/2 to 3 hours.

I put this soup together in the morning to let it cook while Scott and I headed out for a nice hike.  We were gone all afternoon and came home to dinner ready and the house smelling amazing!

The soup was flavorful and full of warm spices to heat us right back up!

One thing that I loved about this cookbook is that the recipes can be easily adapted to what you have on hand.  I didn’t have plain diced tomatoes but I did have some with green chilis added.  That gave a nice little extra kick to the soup.

Some of the recipes do take some extra prep work or some extra work to finish them off (like making a gravy or sauce) but all of the recipes are easy to assemble and will help you learn how to utilize your slow cooker even more!

Disclaimer: I was provided this cookbook from Crown Publishing to review.  All opinions are my own.

Crab Chili

I’m not sure what I was doing when I thought of it, but the idea of crab chili popped into my head and I knew I had to run with it.

When I experiment either things turn out like I had envisioned or they go the complete opposite.  Still tasty just not what the original image in my head looked like.  This crab chili is the perfect example.  I’m still tinkering with it and plan on trying to make the version that I had in my head, but for now this is a winner.

It’s spicy with a good heat and mellow sweet crab to balance it out.

Andrea’s Crab Chili

  • 16oz Lump Crab Meat, rinsed and checked over for shell
  • 1 Green pepper, chunked
  • 1/2 Large Onion, chunked
  • 1 Jalapeno, chunked
  • 1 Fresno pepper, chunked
  • 2 Cloves Garlic
  • 4 1/4C Chicken Stock
  • 2 15oz Cans of Pinto Beans, drained and rinsed
  • 1 14.5oz Can of Diced Tomatoes with Chilies
  • 1 6oz Can of Tomato Paste
  • Big pinch of Salt and Pepper
  • 2tsp Chili Powder
  • 1/2tsp Smoked Paprika
  • 2TBSP Olive Oil for Sauteeing

In a food processor, add in the peppers, onion, and garlic and pulse until they are broken down and finely chopped.

In a large soup pan, add in the oil and heat over medium heat.  Add in the veggies and season with salt and pepper.  Satuee for about 5 minutes stirring occasionally.  Add in the chili powder and the smoked paprika and stir.

Add in the tomato paste and stir.  Allow that to cook for about two minutes and then add in the diced tomatoes.  Stir and add in the chicken stock, slowly.  Now add in the beans and bring the mixture up to a simmer.

Simmer for half and hour to 45 minutes.  Add in the crab and continue to simmer for about 10 minutes.  Remove from heat and serve!

I didn’t remove the seeds from the fresno and jalapeno chili, and whew it was hot!

Keep in mind my heat tolerance is low so this to me was over the top hot.  Scott thought it was fine, so it’s up to you and how spicy you like your chili.

This kind of took us by surprise.  Crab chili? We weren’t sure how it was going to work out but it tasted amazing.  Spicy tomato based chili which is a familiar taste paired with sweet crab stops and makes you think for a minute.

Does this go together?

Yes it does!

Add in a cold beer (A hoppy one would be great, or Dortmunder Gold by Great Lakes would be a good choice as well), and some oyster crackers and you’ve got a party.

Have fun guys, and remember, always play with your food! Enjoy!

Try New Combinations

There’s a little diner here that serves the best black beans I have ever had. I dream about these black beans.

Scott and I went one day for breakfast and I got a side order of beans.  Yeah, beans for breakfast, don’t knock it!  I had eggs with my breakfast and decided to just plop the beans right on top.  With a little hot sauce on top, I was a very happy lady.

Had I not ordered beans with my breakfast, it probably never would have occurred to me to try mixing them with eggs.

Once I did, I couldn’t figure out why this hadn’t done this before!  Now black beans over eggs is one of my very favorite combinations.

I scramble up eggs and season them with garlic and chili powder.  Then I top with:

  • Black Beans
  • Cheese
  • Salsa
  • Hot Sauce

You can even add in some sour cream as well!

It’s an easy dish to put together and is also very budget friendly.  Eggs and beans are inexpensive and pantry staples.

With summer in full swing, tomatoes are in season so they are inexpensive, allowing you to make your own salsa.

So don’t be afraid to try different combinations with your food.  Play around with textures and tastes.  You just might surprise yourself and find something that you really enjoy.

Burrito Bowl

Shaking off yesterday’s heavy topic let’s talk about something fun! And let’s make it about fun food!

Scott and I have a favorite diner that just happens to be very close to us and they have the best veggie burritos.  The. BEST.  The burrito is gigantic and stuffed with beans, cheese, and all manner of veggies.  They won my heart because they actually use a variety of real veggies in their burritos.

Listen, I tend to eat mostly veggie when I’m dining out.  I’ve gotten veggie burritos and such at many places and the “veggies” that restaurants tend to give you are as follows:

  • Onion
  • Green Peppers
  • Mushrooms

That’s it.  Maybe if it’s your lucky day, there will be a sad basement tasting carrot tossed in the mix.  But usually “veggies” are those three things and if we’re being truthful, mushrooms aren’t even a veggie.

Please leave them off my veggie meals!

Anyway, at our favorite diner the veggie burritos are full of:

  • Onion
  • Carrots
  • Peppers
  • Zucchini
  • Squash
  • Broccoli
  • Cauliflower

Ah! Be still my beating heart! Add in that it is fantastically delicious and I’m your newest loyal customer.

I wanted to make something similar at home but I didn’t have big burrito wraps so instead I decided to make a burrito bowl with loads of veggies on top of brown rice.  This bowl is loaded up too!

This is more of a concept than an actual recipe because the veggies are up to you!  Here’s what goes in OHC’s burrito bowls:

Andrea’s Burrito Bowls

  • 1C Brown rice (short or long grain, up to you)
  • Black Beans (I made my own but you can use canned. Drained and rinsed if you do!)
  • 2 Carrots, chopped on a bias
  • 1 Head of cauliflower, chopped and blanched
  • 1 yellow squash, chopped
  • 1 Red pepper, chopped
  • 1 Green pepper, chopped
  • 1 jalapeno pepper, seeded and chopped
  • Salt, pepper to taste
  • Huge pinch of red pepper flakes
  • Garlic powder, to taste
  • Chili powder, to taste
  • Smoked paprika, about 1tsp
  • Your favorite salsa, about 1C

Toppings:

  • Quick and Dirty Guacamole
  • 2% Greek Yogurt (or sour cream)
  • Shredded Pepperjack Cheese
  • Chopped Green Onions
  • Hot sauce of choice (Cholula all the way)

Cook your rice and set aside. In a saute pan, add in some olive oil and heat over medium heat.  Add in all veggies except for the cauliflower.  Stir, and add in all the seasonings.  Stir again.  Sautee until the veggies start to soften, then add in the cauliflower and beans. Stir and add in the salsa.  Stir and allow to cook for about another two minutes.

To serve spoon rice into the bottom of a bowl, add veggie mix on top, and then garish with your choice of seasonings.  Eat and enjoy!

Just so you know, this makes A LOT of food.  I wanted plenty for leftovers and to freeze for later.  You will have to make more rice though when you have this as leftovers.

This is completely open to interruption because you can use whatever veggies you want.  Feel free to add more to the “toppings bar” like shredded lettuce, crushed tortilla chips, and extra salsa for example.  Having a “toppings bar” helps those that are picky take a little control over the dish and customize it to suit their tastes.

I’m so happy that we have leftovers!

Have fun guys, and remember, always play with your food! Enjoy!

Nachos OHC Style

Not long ago we talked about nachos here on OHC. I contend that most everything can be made healthier and you don’t have to give up fun stuff in the name of “diet” or “eating healthy”.

For the record I hate the word “diet”. No one wants to be on a “diet”, we all just want to eat. Am I right?

So let’s just eat! But be more aware of what we are eating and how we choose to nourish our bodies. Deal?

Good, now let’s get started on nachos.

Nachos are fun, you can load them up, AND they can still be healthy. This is the OHC approach to making nachos at home.

Start with making a quick guacamole and setting it aside.

Preheat your oven to 400 degrees.

Next line a baking sheet with foil and spray with olive oil or nonstick spray.

Add your tortilla chips to the baking sheet. Try to keep the layers minimal so that there is more room for toppings on each chip!

Pick your tortilla chips wisely, read ingredients and go with a chip you trust. We like 365 Brand or FoodShouldTasteGood Brand.

Start layering up your veggies on top of the chips. OHC Faves Are:

  • Shredded Carrot
  • Chopped Red Onion
  • Chopped Green and Red Pepper
  • Chopped Tomatoes
  • Corn
  • Pinto or Black Beans

If you wanted, you could add in some cooked ground meat of choice or some shredded meat. We personally just stick with veggies but do what you like!

How pretty does that look?! And it’s not even finished yet! Don’t you just want to dive in?

Top with shredded cheese, however much you like but try not to go over board. Considering you’re going to also have condiments for dipping and topping, you don’t need a ton of cheese.

We like pepperjack and cheddar. Make sure to use good quality cheese, it tastes better and is better for you!

Place in oven and bake until the cheese is melty and the toppings are heated through.

While the nachos are heating up, set up your Nacho Station! Make sure there is:

  • Hot Sauce of Choice
  • Sour Cream (we use 2% Greek Yogurt)
  • Guacamole
  • Salsa
  • Plates, napkins, forks, and drinks!

You want everything ready to go so you can start eating right away. If you’re eating on something other than your dining table, have some hot pads on hand to put the hot baking sheet on.

Now your nachos are done and ready to serve up! And since you already prepped your eating station, it’s time to get your grub on!

Don’t waste time, start prepping up your plate!

Eat!

And enjoy! Because now you’re eating some kickbutt food that is yummy and good for you!

Do you like nachos? Do you ever make them at home?

Have fun guys, and remember, always play with your food! Enjoy!

Chili Cheese Fries

Like Paula Deen, I love potatoes.  LOVE them. Probably a little inappropriately.  Unlike Paula Deen, I don’t think they need to be slathered in butter and cream.  Cheese is always welcome.  So is bacon but he is not invited to this party today.

Ever since I saw Chili Cheese Fries over at White On Rice Couple, I have been chewing at the bit to make them myself.

OHC style.

We recently had chili for a meal but I was unable to use the leftovers for chili cheese fries only because time was against me and I didn’t get around to it.  This week we decided that in order to keep my sanity (we were out of fresh fruit and the veggie count was in the single digits), we made a last minute decision to hit the grocery store.  We were there forever (as is typical) and I picked up a bunch of produce.  Among those were some russet potatoes and some red peppers (5 for $5, heck yes!).

When we got home, Scott was starving and I was seriously hungry myself.  It was a game night (Hello Penguins Hockey, you are awesome!) and we might as well have some game food to comfort us on a very cold snowy evening.

It was the perfect time for some Chili Cheese Fries!

Andrea’s Chili Cheese Fries

  • Leftover Chili
  • 2 Medium to Large Russet Potatoes
  • Olive Oil (about 1.5 TBSP)
  • Garlic Powder
  • Salt and Pepper
  • Chili Powder
  • Greek Yogurt (2% Fage being my choice)
  • Shredded Extra Sharp Cheddar
  • Green onions, chopped
  • Handful of cilantro, chopped

Preheat oven to 425. Line a large baking sheet with foil and spray with nonstick spray.  Wash potatoes and slice into thick slices, like above.  These are steak fry style. In a storage bag (or large mixing bowl) place the sliced potatoes, coat with olive oil and season with garlic, S&P, and chili powder to taste.

In a single layer, place fries on baking sheet and bake for about 25 minutes until potatoes are nice and crispy.

Heat up leftover chili.

When potatoes are done, place on a plate, top with chili, cheese, yogurt, green onions, and cilantro.  Serve and enjoy!

Serves 2 Hungry People.

Since I didn’t have leftover chili, I turned to my good friend, Lentil Tacos.  I made that filling, substituting pinto beans for the lentils and no chicken stock was used.  Basically I made a quick and dirty skillet chili.  It worked perfectly!

These fries are just amazing.  I seriously stuffed myself silly eating them.  You’re going to want to make extra fries for this, trust me.  Scott was in game food heaven.

I ate mine with a fork and knife like a dignified lady (ahem), and Scott ate his man-style, with his hands using the fries to scoop everything up.

Of course you can use actual sour cream instead of Greek yogurt if that’s your preference.  You can use a meat based chili, toss some bacon on there, or even some guacamole.

I want to have these again already and am trying to plot a way to make that happen!  Next time you’re watching the game, make some to nosh on.  Or heck, make them just because!

I love when food tastes amazing, indulgent, and yet is completely made with whole real foods.  Nothing bad about these chili cheese fries!

Have fun kids, and remember, always play with your food!  Enjoy!

Black Bean and Corn Salsa

The last installment of Salsa Week and this one just happens to be in a close running to winning the title of my favorite salsa!

Whenever I look at jarred salsa, the one kind I always search out is a black bean and corn salsa.  I love those!  The beans and corn add such a nice texture to the salsa.  It even allows me to handle a more spicier salsa because somehow the beans and corn seem to tame down the assertive peppers.

Eventually I wondered to myself if one could make salsa with black beans and corn as the main ingredient instead of them being added into a tomato based salsa.

You’re never going to know the answer to your question until you try it, right?  So that’s exactly what I set out to do and now I cannot get enough of this salsa.  I could pretty much consume the entire batch myself without giving it a second thought!   This salsa is super easy to make and takes maybe 10 minutes at most to prepare.

Andrea’s Black Bean and Corn Salsa

  • 1 15oz Can of Black Beans (drained and rinsed)
  • 2C of Fresh Summer Corn
  • 1/4-1/2 Red Onion, finely chopped
  • 1 Jalapeno, seeded and finely chopped
  • The Juice of 1/2-1 Whole Lime
  • Sprinkle of Salt and Black Pepper, (about 1/2tsp each)
  • 1/2-1tsp Chili Powder
  • 1/2tsp Garlic Powder
  • Cilantro, to taste, finely chopped

In a large glass mixing bowl, combine all ingredients and allow to sit for about 10 minutes before serving.

This salsa smells good even before you add the seasonings to it!  It is so fresh and crisp tasting that it screams summer and backyard relaxing.  I add a bunch of cilantro because I love it but again, you can add as much or as little as you like.

This salsa also will easily take on additional veggies if you want to toss some in there.  This batch, I actually added in about half a diced red pepper for added color and crunch.

You want to cut the corn off the cob while it’s raw.  I have a handy tip about cutting corn off the cob to help you with that task!  If you don’t really want to eat raw corn, you can sautee the kernels for about two minutes in some olive oil.  Raw corn is so good in this dish though!  It’s sweet and crunchy and almost delicate tasting.

If you don’t have fresh corn because maybe it’s dead of winter, you can sub in 2C of frozen corn easily.  Just thaw them a bit first and drain off some of the excess water.

The reason I have “The Juice of 1/2-1 Whole Lime” is because the lime and your taste preference will determine the amount needed. If you have a super juicy lime, you may only need 1/2 of it or you might think a whole lime is too much of a good thing.  Start with 1/2 and see where that takes you.  I normally use a whole lime though.

Fresh black beans that you made is totally acceptable!  I would guess around 2C of those would be a good starting point.

This salsa has been a huge staple for us this summer!  It’s been so hot and humid this year that eating a hot dinner isn’t always that appealing, so we’ve been eating this in all kinds of different ways.  It’s perfect for just snacking with tortilla chips as well!  I probably already told you this smells fantastic, right?  A typical Scott comment is, “I don’t know what you’re doing, but it smells amazing over there!”

If you love beans and corn, make yourself some of this salsa!  It’s summer in a bowl!

Have fun guys, and remember, always play with your food!  Enjoy!

Sweet Potato and Squash Chili

One of the things that I wanted to do last fall was make chili with pumpkin.  Ever since I discovered my love for cooking with pumpkin puree, chili was tops on my “to-make” list.  Fall came and went without me having a chance to make some.  Thankfully I live in an area that sees a good amount of winter which provides nice chili-makin’ and chili-eatin’ weather.

One of my vegan cookbooks, Eat, Drink, and Be Vegan, has a recipe for chili using cocoa powder in it.  This intrigued me greatly!  I have used cocoa in a savory recipe before (Cocoa Chili Rubbed Chicken) but haven’t used it as a savory spice since then.  I wanted to rectify that quickly.  Could I combine my desire for using pumpkin in chili with the addition of cocoa powder without it tasting like a pudding gone wrong?

Last week I decided to experiment and find out!

Andrea’s Sweet Potato and Squash Chili

  • 1 large green pepper, chopped
  • 1/2 a medium onion, chopped
  • 3 medium sweet potatoes, peeled and chopped (small pieces)
  • 2 medium yellow squash, chopped
  • 3 medium carrots, peeled and chopped
  • 1 chipotle pepper, chopped + spoonful of adobo sauce
  • 3C Pumpkin puree (heaping)
  • 1 14.5oz can of diced tomatoes with green chilies
  • 1 14.5oz can of diced tomatoes
  • 1 Box of organic chicken stock
  • 1 15oz can of black beans (drained and rinsed)
  • 1 15oz can of kidney beans (drained and rinsed)
  • 3TBSP (heaping) of unsweetened cocoa powder
  • 3tsp Garlic powder
  • 3tsp Chili powder
  • 1tsp Smoked Paprika
  • Salt and pepper to taste
  • Olive oil for sauteeing

In a very large soup pot (or dutch oven) drizzle in a little olive oil (1/2 -1 TBSP) and heat over medium heat.  Add in the onion, carrot, and green pepper.  Sautee for about two minutes until they just start to soften, then add in the sweet potato and squash.  Add in all seasonings, except for the cocoa, and continue to sautee for about 3 minutes.  Add in the diced tomatoes and scrape up any brown bits on the bottom of the pot at this point.  Now add in the cocoa powder and stir.  Add in the chicken stock, chipotle pepper + sauce, and then gradually add in the pumpkin and combine.  Add in the beans and stir.  Simmer over medium heat for about an hour, stirring occasionally.  Taste test and check the level of seasonings, adjust if necessary.  May need more garlic and chili powder added.

Serve in large soup bowls topped with cheese and enjoy!

I will tell you right off the bat that this makes a lot of chili.  A LOT.  Because when I make soups and chili, my rule of thumb is go big or go home.  I make sure I have plenty for leftovers for immediate eating and also for freezer storage.  This was almost too much for my big soup pot!

After the cocoa amount, my seasonings are approximate measurements because I forgot to write those down.  Shame on me!  So make sure to taste and adjust to your preference.

This chili exceeded all of my expectations because I admit I was a little nervous about the combo but it was fantastic!  Probably my most favorite chili I’ve made so far.  Normally I try to cram as many veggies in chili as possible, so this version was a bit different in that it had large amounts of a few types.  It worked out wonderfully though!  The pumpkin keeps the chili thick and creamy while the cocoa adds a depth that you will not get from anything else.  It also pairs great with chili powder making it more complex tasting.  The smell is so so good!  Unless you know it has cocoa powder in it, you can’t tell.  When I listed off the ingredients for Scott he was pretty surprised by them.  He also loved this chili!

This would be a great for a slow cooker as well and I would have done that but I got started late in the day.  Next time for sure!

Since the pumpkin does make it very thick, keep an eye on it just in case you have to add more liquid.  Naturally you can use veggie stock if you prefer.  This chili reheats well but you will have to add a bit more liquid to it.  It tastes even better once it has had a day to sit around and be lazy.

This was just the right spicy heat level for me but if you love super spicy, add in some jalapeno and more chipotles to kick it up a bit!

I have to say that I’m really glad I made so much because I’m looking forward to eating it again!  This made enough for immediate leftovers plus 3 more containers in my freezer!  Woo!

Pairs well with Cheddar Beer Bread!

Have fun guys and remember, always play with your food!  Enjoy!

Tuesday Tip: Roast Chickpeas

Change up chickpeas

Change up chickpeas

I believe it was Rachael Ray who sort of introduced this concept to me.  I watched her sautee up some chickpeas in olive oil and seasonings to put out as a munchie item.  At first I thought it was odd, who wants to sit down and just chomp on some beans?

Weird.

Then I acquired a new found love for beans and now I’m perfectly happy chomping on some beans.  I changed the concept a bit by taking it out of the skillet and into the oven to make roast chickpeas. I have never looked back!

Roast chickpeas are one of my favorite snacks to make because they just taste freaking awesome.  However, you do have to actually like beans to appreciate this twist.

They are so easy to make and quick that you’ll be snacking in no time.  Ready?

All you have to do is open a can of chickpeas, drain and rinse them.  Preheat your oven to 400 degrees.  In a storage bag, place the beans.  Now this is where the seasonings come in.  You can use as much as you like and whatever you like.  I made some today and here’s what I used:

  • Olive oil (about 1/2 a TBSP)
  • Soy sauce (about 1.tsp)
  • Honey (about 1/2 tsp)
  • Lime juice (1/2 tsp)
  • Garlic powder
  • Chili powder
  • Smoked paprika
  • Cayenne pepper
  • Red pepper flakes

All the seasonings to taste. Dump into the storage bag and shake to coat.  Place chickpeas on a cookie sheet (either spray with nonstick spray or line with foil and spray) and roast in the oven for about 10-15 minutes.  Pull them out, allow to cool for 2 minutes and eat!

When I need something a bit salty and I’m looking for a snack, I’ll make these.  I ate some in my salad today as they make great salad toppers.  You can indeed put this out for guests to munch on instead of nuts or mix with nuts!  It’s up to you!  Seasonings and flavors are up to you as well.  I’ve coated the chickpeas in buffalo sauce and roasted them that way.  I bet covered in some BBQ sauce would be just as awesome!

Roasted chickpeas

Roasted chickpeas

I’m sure this technique would be great with other harder types of beans, like limas for example.  If you like beans give this a try!  You might just find yourself sitting down to chomp on some beans too! :D