Potato Nests

Potato NestsI am not much of a fan of hash browns. For whatever reason restaurants do not like to cook hash browns fully to make them crispy and delicious.

Instead I often receive a gluey grey pile of potatoes that aren’t seasoned and are always undercooked.  It’s gross. Recently out to breakfast with a friend at a very popular place here in town, her order came with a side of hash browns.  On her plate arrived exactly what I just described.  Oh they tried to make it pretty by putting it in a round pile similiar to how some places plate rice.

Yeah, it was still a gluey undercooked pile of potatoes.  She didn’t eat it.  I couldn’t blame her.

Why do restaurants insist on serving this mess?  Give me home fries or fried potatoes any day over hash browns.

But there has to be something that can be done with hash browns.  Maybe the restaurants never get it right but that doesn’t mean we have to eat the same thing at home, right?

So my stance has been changed.  If I’m in charge of the hash browns then I’ll eat them.

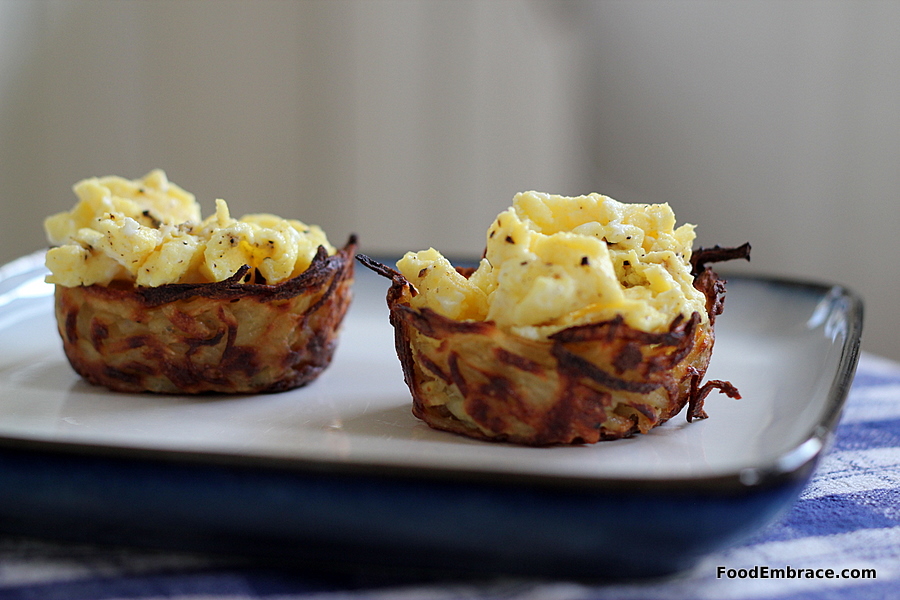
I wanted to make hash browns fun and also wanted to make a batch that could be frozen or reheated through out the week.  That’s when I came up with making potato nests.  Oh I have no delusions that I’ve created something new.  I’m sure there are other recipes out there but this is my version.  Crispy potatoes with lots of garlic!

Andrea’s Potato Nests

  • 1 1/2 Pounds of Russet Potatoes, peeled, shredded, and drained** (about 3 medium potatoes)
  • 1 egg + 1tsp water, scrambled
  • 1/2tsp salt
  • 1/2tsp ground black pepper
  • 1/2tsp garlic powder
  • 1/2tsp onion powder
  • Fat for greasing the pan (Lard, butter, or olive oil)

Preheat oven to 400 degrees.

**Make sure that you remove as much water from the potatoes as possible.  It easiest to lay the shredded potatoes on a dish towel and squeeze out as much of the water out as possible.

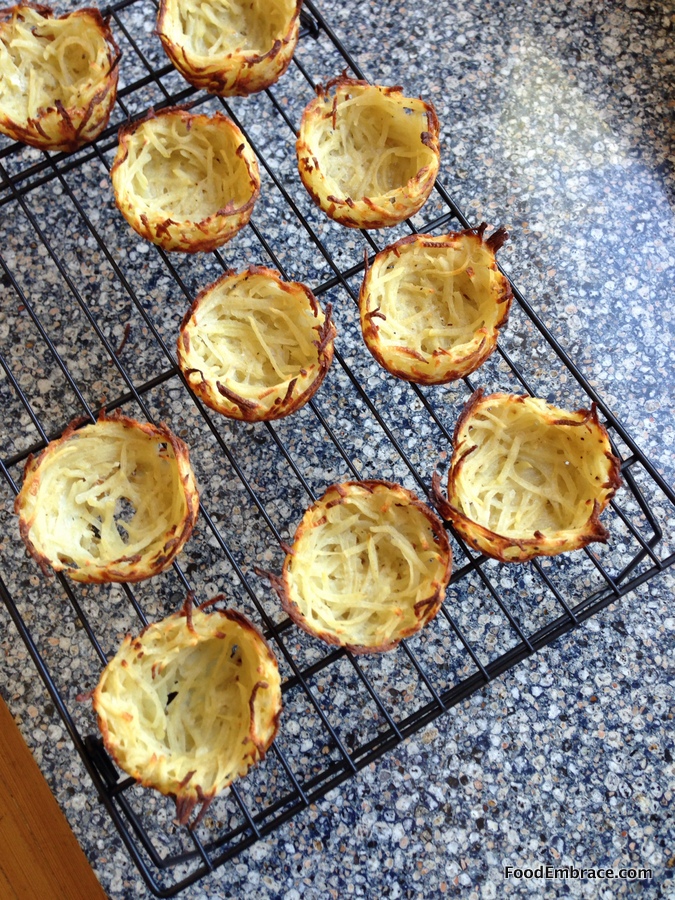
Grease a muffin pan with your choice of fat.  In a large mixing bowl combine the potatoes and the seasonings, gently mix.  Then add the egg mixture and mix until the potatoes are completely covered.  Scoop up a small handful and start to line the muffin tin.  You will have to play around a bit with the amount so that you have enough for each section.  Line it much like you would line a pie pan with pie dough.

This will make enough for 12 nests.

Place muffin tin in the oven and bake for 30 minutes or until the potatoes are crispy and the nests are holding their shape.  Remove from oven and cool for about 3 minutes before trying to remove the nests from the pan.  Remove them gently so the bottoms don’t stick.  Serve immediately or allow to cool to room temperature before storing.

Potato nests with scrambled eggsI used a lot of seasoning on these and they are potent.  If you feel that might be too much for you, reduce the garlic and onion powder to 1/4 tsp each.

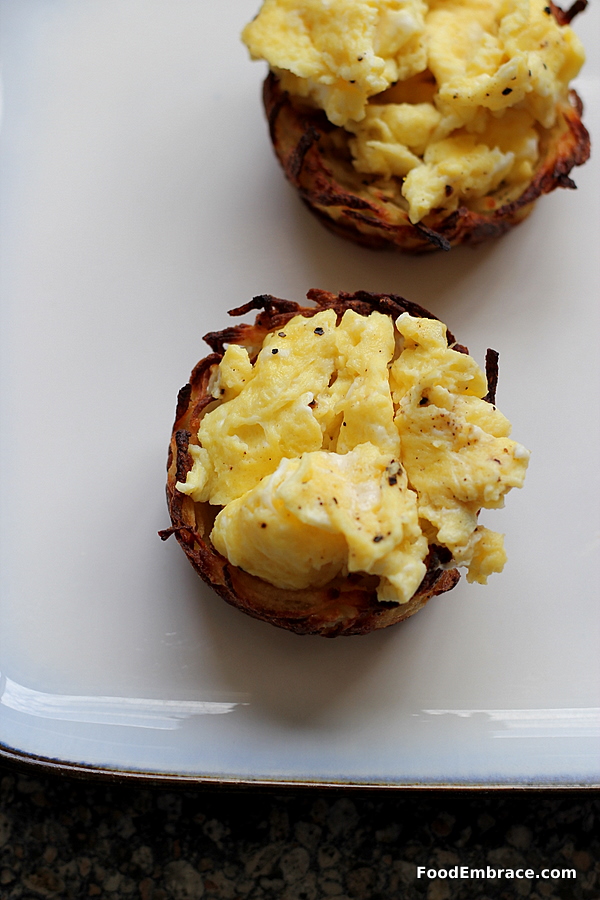
I filled the nests with scrambled eggs just to give you and idea of shape and size.  But they can be filled with whatever you like!  You could even make a frittata filling and pour it in the nests and bake them.  It will take longer but would make a great dish for brunch.

Potato nests and scrambled eggs

Also the nests don’t just have to be for breakfast.  Fill it with sausage bites and sauerkraut for dinner.  Or lunch!  You could even make this bigger by lining a pie pan with the potato mixture and then adding a frittata filling and baking.  Really, this is a blank slate that is open to possibilities.

I kept these in the fridge and reheated them in my toaster oven.  They could be reheated in the oven as well, at 350 for a few minutes.  They kept all week just fine.

Now go do something fun with potatoes!

Have fun guys, and remember, always play with your food! Enjoy!


Asian Inspired Minced Pork Bowls

Asian Inspired Pork BowlsScott’s mom makes the best egg rolls hands down.  The wrapper is thin so it becomes super crispy when fried.  The filling is full of fresh ingredients in equal balance.  And there’s ground pork!  Gloriously seasoned ground pork mixed with some vegetables. It’s a welcome change from what usually passes for egg rolls here in the States.

Getting her to talk about and share the recipe is like pulling teeth.  She doesn’t know specifics, she just does it.  We do not live close by so sadly we do not have a fresh supply of egg rolls.

I have tried my best to work through the flavors and to come up with something that is similar.  Because let’s face it, I’ll never figure out the exact recipe and I will never be able to make it nearly as well.

Instead of official egg rolls, we have deconstructed egg rolls.  All of the yummy insides plus some extras thrown in because we like them.  Sometimes I serve this over some rice and sometimes I add in even more veggies so that we have a huge bowl of egg roll goodness.

It’s a favorite dish of ours and it’s super easy to make!

Andrea’s Asian Inspired Minced Pork Bowls

  • 1 Pound Ground Pork
  • 1/2 A Medium Cabbage, shredded
  • 2 Large Carrots, peeled and chopped
  • 1 Medium Crown Of Broccoli, florets removed and chopped
  • 1 Red or Green Pepper, thinly sliced
  • 5 Green Onions, thinly sliced

For The Pork:

  • 1/2tsp Ground Onion
  • 1tsp Ground Garlic
  • 1tsp Curry Powder
  • 1tsp Soy Sauce
  • 3 Dashes of Fish Oil
  • 1/2TBSP Lard or Ghee

In a cast iron skillet or large sautee pan, heat the lard over medium heat.  Add in the ground pork and season with the remaining ingredients.  Stir to combine and continue to cook until the pork is cooked through.  Line a glass bowl with some paper towels, remove the pork from the skillet and place in the glass bowl.

For the Veggies:

  • 1/2tsp Curry Powder
  • 1/2tsp Garlic Powder
  • 1/4tsp Kosher salt
  • 1/4tsp Ground Black Pepper
  • 1/2TBSP Lard or Ghee

In the same skillet the pork was cooked in, heat lard or ghee over medium heat.  Add in all of the veggies except the green onion, stir to coat with the fat, and sautee for about 5 minutes until the veggies start to soften.  Add in the seasonings and stir.  Continue to cook until the veggies are cooked through, about 10 minutes.  Add the pork back to the skillet and combine with the veggies.  Cook for another 3 minutes.  Turn off heat and serve.

Curry Pork Bowl

It’s perfect to eat as is, or you can serve over rice or rice noodles.  This dish also freezes well which means you can increase the amount to have portions to freeze.  The veggies can also be prepped ahead of time so that when it’s time to make dinner, you just have to heat and serve!

It has become a weeknight go-to meal since it’s so simple to make.  And there’s only like two dirty dishes at the end that Scott has to wash, so everyone wins!

Have fun guys, and remember, always play with your food! Enjoy!

Sweet Tater Smoothie from Paleo Smoothies

Paleo Smoothies by Mariel Lewis We are in love with smoothies here at the HQ. We try to have a smoothie everyday with our lunch or if we’re not too hungry, it will be lunch.

Having a smoothie jam packed with fruits and veggies makes me feel amazing.  It also helps us to get in more portions of fruits and veggies throughout the day.

We have our favorites though and are guilty of falling into a rut.  Having the same smoothie over and over again, it happens.  Some days I am not feeling inspired to experiment.

This is why I was thrilled to be able to review the new Paleo Smoothies recipe book by Mariel Lewis.  It’s packed full of recipes that are unique and utilizing ingredients that I never thought of adding to a smoothie (hard boiled egg anyone?).

The book is broken down into 10 categories, such as Cleansing Smoothies and Recovery Smoothies.  Mariel gives a brief run down of the Paleo Diet and goes over what foods are included in the diet.  She also discusses how smoothies are beneficial to over all health and even gives you a guide to kitchen tools that you should have on hand.

I couldn’t wait to start making smoothies!  Since I have never had a sweet potato in a smoothie before, I made the Sweet Tater Smoothie.

Sweet Tater Smoothie from Paleo Smoothies

Sweet Tater Smoothie from Paleo Smoothies by Mariel Lewis

Republished with permission from Adams Media, © 2014 Mariel Lewis

  • 1 Frozen Banana
  • 1 Baked Medium Sweet Potato, skin removed
  • 1 1/4 Cups Unsweetened Vanilla Almond Milk
  • 1TBSP Maple Syrup
  • 1/4 tsp Cinnamon
  • 1/4 tsp Nutmeg
  • 1/8 tsp Ground Cloves (to garnish)

1. Place all ingredients in a blender, except for the ground cloves, and blend on high until smooth.

2. Pour smoothie in a glass and garnish with half of the ground cloves.  Enjoy!

This smoothie was rich and delicious!  It tasted like a pumpkin pie.  The sweet potato produced that gorgeous orange color and made the smoothie extra thick, like a well made milkshake.

I might start keeping sweet potatoes on hand just for smoothies!  Each recipe in the book also has nutritional information so that you know exactly how many calories, carbs, and so on you are consuming.

Whether you are on a Paleo Diet or not, this recipe book has some amazing smoothies that will please all tastes!

Disclaimer: I was sent this cookbook for review.  All opinions are my own. I was not required to write about it and was not compensated for this review.

Grain Free Chicken Enchiladas With Roasted Green Chili Sauce

Grain Free Chicken EnchiladasThe first thing that I made with my batch of grain free tortillas, was some chicken enchiladas.  I wanted to see how the tortillas handled being rolled and how well they stood up to baking.

They worked beautifully!

I will admit that I didn’t bake them covered in sauce. Since this was my first time working with grain free tortillas, I wasn’t sure how they were going to stand up to baking and I didn’t want to risk making them soggy with sauce.

Instead I heated up the sauce on the side and we were able to use as much sauce as we wanted to top our portions.

I do think that if the tortillas were covered in sauce and baked that they might fall apart so stick with keeping the sauce warm on the side.

Andrea’s Grain Free Enchiladas with Roasted Green Chili Sauce

**For the Filling:

  • 4 Chicken leg quarters, cooked, and shredded
  • 2C Shredded Carrot
  • 1 Bunch Kale, stems removed
  • 1/2TBSP Ghee
  • 1tsp Salt
  • 1tsp Garlic Powder
  • 2tsp Chili Powder
  • 6 Grain Free Tortillas

Place the kale in a food processor and pulse until the kale is finely chopped.  In a medium sized saute pan, heat the ghee over medium heat.  Add in the kale and the carrots.  Saute for about 2-3 minutes then add in the shredded chicken.  Season with salt, garlic powder, and chili powder.  Add in 1/2C of the sauce (see recipe below).  Stir and cook for about 3 minutes. Remove from heat.

For The Sauce:

  • 1 Medium Sized Onion, chopped
  • 1 Green Pepper, seeded and chopped
  • 4 Roasted Green Chilies (your choice, I used anaheim)
  • 1 14.5oz can of Diced Tomatoes with Green Chilies
  • 1TBSP Ghee
  • 1tsp Salt
  • 2TBSP Coconut Sugar

In a medium sized sauce pot, heat the ghee over medium heat.  Add in the onion and peppers and sauté for about 5 minutes until the peppers and onions start to soften.  Add in the diced tomatoes, salt, and coconut sugar.  Bring to a simmer and simmer for about 10 minutes.  Remove sauce from heat and pour into a blender.  Blend until the sauce becomes smooth and free of lumps.  Pour sauce back into sauce pot and keep warm over low heat.

Assembly and Baking

Preheat an oven to 4oo degrees.  In a 9×12 casserole dish, pour in 1/2C of the sauce.  Spread it around so it coats the bottom.  Place 1/2C of filling in each tortilla.  Roll and place in the casserole dish.  Cover dish with foil and bake for about 15 minutes.

Remove from oven.  Portion out onto plates and top with sauce.  Makes 6 portions.

Please see notes at the bottom.

Grain Free Chicken Enchiladas

**Notes: 

This dish can be prepped ahead of time.  Once the enchiladas are made, cover with foil and store in fridge until you’re ready to heat them up.  Place in a 400 degree oven and bake, covered, for about 1/2 an hour or until the enchiladas are heated through.  While they are baking, the sauce can be simmering on the stove.

The filling makes enough for two batches of enchiladas.  You can make two batches right away if you’re feeding more than two people.  Or you can freeze the remaining filling and use it another time.  Since the tortillas and the filling freezes well, that’s already another meal you have prepped and ready to go!   The filling is also great as a topping for salads, mixed with scrambled eggs, or eaten on it’s own.

I added the coconut sugar to help tone down the heat from the chilies.  If you love spicy foods feel free to omit the sugar.


We topped our enchiladas with chopped tomato, green onion, and cheddar.  Some sour cream and chopped cilantro would also be great as well!

This dish is really easy to make despite what might seem like a lot of steps.  Perfect way to use up some leftover roast chicken and turn a weeknight meal into something a little more exciting.

Have fun guys, and remember, always play with your food! Enjoy!


Grain Free Tortilla Wraps

Grain Free Tortillas This tortilla recipe was born out of frustration and desire.

During the Spring Clean Eats challenge limiting carbs was one of the goals.  I also used this as a way to challenge myself in the kitchen and develop new skills (grain free cooking isn’t such a mystery anymore!).  Because I was reducing carbs, I had to come up with alternatives.

I wanted a tortilla or wrap that fit the guidelines of the challenge so off to the interwebs I went.  All the recipes I found didn’t really appeal to me for two reasons.

Either they used a ridiculous amount of eggs (I’m talking like 18 eggs for one batch) and/or the recipe only resulted in like 6 tortillas.

If you think I’m using close to 2 dozen eggs to make 6 wraps, you have lost your damn mind.

I decided to take matter into my own hands and create my own tortillas.  One that would use an acceptable amount of eggs and also made more than 1/2 dozen wraps.

Andrea’s Grain Free Tortillas

  • 1C Almond Meal
  • 1/2C Coconut Flour
  • 1/2C Tapicoa Starch
  • 4 Eggs
  • 1 1/2C Almond Milk
  • Pinch of salt
  • Ghee or lard for frying

In a large mixing bowl, combine the flours and the salt.  Whisk so that all the flours combine.  In a medium sized mixing bowl, combine the almond milk and the eggs.  Whisk until the eggs and almond milk combine.

Slowly add the egg mixture to the flours and stir until everything is mixed and a batter has formed.

Heat a medium sized nonstick skillet** over medium (to medium low) heat.  Add in just a small amount of lard or ghee (no more than half a teaspoon), let the fat melt and brush it around the pan.  Pour in 1/3C of batter and spread around with a spatula.  Making the tortilla as thin as possible.  Cook for 2-3 minutes and then flip cooking for another 2-3 minutes.

Remove tortilla from heat and set aside.

Repeat until you have used all the batter.

Makes about 13 tortillas.

**Please see notes at bottom.

Grain Free TortillasNOTES:

Some things to keep in mind as you make these tortillas.  They are a work of love, they will take you some time to make.  But you’ll be left with a big batch of tortillas that work great as wraps, or for things like enchiladas, or even crepes.  They also freeze and reheat well.

A nonstick skillet is key, I would not recommend cooking these with stainless steel.  If you have a very well seasoned cast iron, you could probably use that.

You need to use as little fat as possible per tortilla.  I was able to get thinner and larger tortillas but making sure the fat in the pan was minimal.  The picture above, the tortillas on the right are noticeably larger than the ones on the left.  The ones on the right were cooked with barely any fat in the skillet where the ones on the left were cooked with a teaspoon of fat.  This is why a nonstick skillet is key because it makes it easier to make these wraps.

Coconut flour tastes sweet and has a vanilla flavor to it.  If you are going to use these for a Mexican inspired dish, some lime zest and a squeeze of some lime juice would go nicely.  I would also recommend using lard for cooking, it will provide a more savory flavor.

Grain Free tortilla with beans and eggsI’ve made enchiladas with these wraps as they fold and roll really nicely without breaking.  I’ve also topped them with beans and eggs to have at breakfast.

Since these tortillas freeze really well that makes them perfect when you want to make a quick sandwich or use for taco night.  Reheat them easily in a toaster oven or in a 300 degree oven for only a couple of minutes.


Grain Free Granola

Paleo granola, coconut cream, blueberries After getting a little tired of eating animal protein at breakfast for several days in a row, I needed something else. Something that was going to provide me with the same nutritional punch and keep me full and satisfied.

But I wanted it to be a little lighter and something I could mix with fruit.

Granola came to mind and I looked around at several paleo granola recipes.  They all featured nuts in some way and some coconut.

Normally I have granola with yogurt but I was nixing yogurt during the course of the Spring Clean Eats challenge so I needed something else.

Coconut milk was challenge friendly and I used that to make a nice little sauce to go with the granola. Maple Kissed Coconut Cream Sauce goes perfectly with the granola.

Now I had a balanced breakfast! Full of protein, fresh fruit, and hefty enough to keep me full for several hours.

Andrea’s Grain-Free Granola 

  • 2C Whole Almonds, raw
  • 1 1/2C Pecan Halves, raw
  • 1C Walnuts, raw
  • 1C Shredded Unsweetened Coconut
  • 1/4C Raw Honey
  • 1/4C Ghee

Preheat oven to 325 and line a baking sheet with foil or parchment paper.  In a small sauce pan, combine honey and ghee and heat over low heat until the ghee is melted.  Stir to make sure the honey is incorporated with the ghee.  Remove from heat and set aside.  In a food processor, add all the nuts and pulse (about 7 times) until the nuts are much smaller pieces.  Pour nut mixture into a large mixing bowl.  Add in the ghee and honey mixture and stir until all the nuts are covered.

Pour mixture onto baking sheet, making sure to spread the mixture out.  Bake at 325, stirring every few minutes, for about 20 minutes.  The last 5 minutes of baking, add in the shredded coconut and stir.  Once the nuts have browned and the coconut is toasted, remove from heat.

Allow to cool for about 5 minutes and then serve!  Store in an airtight container in fridge.  Keeps for several weeks.

Grain free granola, blueberries, coconut creamDelicious easy breakfast! Perfect to highlight all the new summer fruits that will be arriving!

Maple Kissed Coconut Cream Sauce

Banana, paleo scone, coconut cream Coconut Cream sauce came about because I needed a substitute for yogurt during the Spring Clean Eats challenge.

I really wanted some kind of accompaniment to go with granola.  Using coconut milk to create a sauce seemed like the natural solution.

This sauce is delicious, super simple to make, and only contains 3 ingredients.  All you need is a blender and then an airtight container for storage.

Easy!

Andrea’s Maple Kissed Coconut Cream Sauce

  • 1 13.5oz Can Full Fat Coconut Milk (365 brand is budget friendly)
  • 1TBSP Pure Maple Syrup
  • 2tsp Vanilla Extract

In a blender, add in all the ingredients.  Make sure to scrape out as much of the coconut milk fat from the can as possible.  Blend all ingredients for about 3 minutes.  You want the mixture to be creamy and fluffy.

Pour into airtight container.  Keeps for about a week to a week and a half.

Grain free scones and baconThis sauce can be used to top granola, poured over a scone or pancakes.  You can even use it as a coffee creamer if you like!  Or you can eat it straight from the jar like I have been known to do.

Once blended the sauce will stay pourable even after being refrigerated.  No need to worry about it solidifying on you.  It’s best to always have some on hand because it goes with so many things!


Breakfast Soup

Breakfast SoupOne of the first things I made when doing the Spring Clean Eats challenge, was Breakfast Soup.  I’ve seen some other paleo folks have soup for breakfast and the idea intrigued me.

I didn’t want anything too heavy, like a stew, and I didn’t want anything that was going to be loaded down with protein and veggie.

I wanted a light soup with some protein, a little veg, and lots of flavor.  I started thinking about how to approach this and decided that egg drop style soup seemed like it fit the bill.

I played around with the recipe and now have a new favorite way to eat some eggs and veggies in the morning.

Breakfast Soup is quick to make and perfect for those mornings when you might be feeling a little sluggish or chilly days when you don’t want to get out of your PJs.

If you like savory breakfasts, this soup will hit the spot!

Andrea’s Breakfast Soup

  • 4C Chicken Stock
  • 1/4-1/2 tsp Soy Sauce**
  • 1/2tsp Garlic Powder
  • Large Handful (or about 2C) of Spinach, finally chopped
  • 3 Green Onions, thinly sliced
  • 2 Eggs, Whisked

In a large sauce pan, bring the stock up to a simmer.  Add in the soy sauce and the garlic powder.  Then add in the spinach and allow to cook until the spinach is fully wilted.  Start whisking the soup with a fork and slowly drizzle in the eggs.  The eggs will puff and cook immediately.  Continue until all the eggs are in the soup. Bring soup back up to a simmer.  Remove from heat and ladle into soup bowls.  Garnish with green onions and serve immediately.

Serves two.

**If you want to make this completely paleo, substitute coconut amnios for the soy sauce.

You decide how much soy sauce or coconut amnios you want to add.  I usually do 1/4 tsp but you can do up to 1/2 tsp without overpowering the soup too much.  Feel free to add in a few drops of fish sauce as well!  Or toss on some chopped cilantro as a garnish for extra kick.

We love this soup, it has a comforting quality to it and makes us feel energized.  It’s a soup that will stick with you and not leave you feeling hungry after an hour.

If you’re looking for something new to try for breakfast, go for soup!

Slow Cooker Collards

CollardsWe eat greens a lot over here at the HQ.  They are one of my favorite side dishes to make!  Greens are pretty budget friendly, full of flavor, and you can make a lot at one time very easily.

Collards are my favorite.  They take on flavor so well and become tender with long slow cooking. Plus they are one of the few cooked veggies that taste better the next day.

I used to make them on the stove in a big stock pot and then one day it occurred to me that using a slow cooker would be even better.

I don’t think I’ll go back to the stove top method again unless I absolutely have to.  The slow cooker is the perfect vessel for collards!

Prepping collards for the slow cooker is simple and doesn’t take much time at all. Can easily be done in the morning before work or early on a Sunday morning to have ready in time for Sunday Supper.  I love having the collards with some ham hock for some extra smokey goodness.

Andrea’s Slow Cooker Collards with Ham Hock

  • 4 Bunches of Collards, rinsed, stemmed, and chopped
  • 1-2 Ham Hocks (depending on how much you want)
  • 1 Large Onion, Sliced
  • 2tsp Kosher Salt
  • 2tsp Black Pepper
  • 2TBSP Apple Cider Vinegar
  • Water, enough to fill the slow cooker to the top (about 8C or slightly more)
  • 3tsp Hot Sauce
  • 1TBSP Maple Syrup

In a large crock pot add in the ham hocks, collards, and onion.  Then add in the apple cider vinegar, salt, and pepper.  Add in water, enough to fill the slow cooker to just about the top.  Give the collards a good stir and set the slow cooker to low.

Cook for about 6-8 hours.

When collards are done, remove the ham hocks and set aside.  Using a colander, strain the collards as much as possible.   Place the collards back into the slow cooker and turn the slow cooker off.  Shred the meat off the ham hocks and add that back in with the collards.  Add in the hot sauce and maple syrup.  Toss until everything is well combined.

Serve up immediately and enjoy!

CollardsThis makes a lot because we love having leftovers.  I’ve been known to eat the leftovers for breakfast the next day.  Also?  Collards on top of a waffle with a little more maple syrup is an amazing breakfast.  Promise.

This can be a hearty side dish or you can make it a main dish by adding in some more veggies (carrots, zucchini?) and some beans.  I think white beans paired with collards is a tasty combo.

Of course you can make this a completely vegetarian side dish by removing the ham hocks.

When straining the collards, you can reserve the broth to use for another time.  Perhaps as a base for some soup?  Or you can freeze the broth in ice cube trays and use them when you want to add a little more flavor to another dish.

Even during the warmer months, a big pile of collards will make just about everyone happy!

Have fun guys, and remember, always play with your food!  Enjoy!

Fry Sauce

Fry SauceFrench fries from Common Link are my favorite in town!  Especially if you get them from the food truck because you have the option of getting some cajun fries.  Which are crispy and slightly spicy.

And if you are getting them from the food truck then you’re probably at Odell Brewing which means you are having a great weekend.

The offer several sauces for the fries but my favorite is their club sauce. Creamy and tangy, it goes perfect with their fries.

I wanted to create a similar sauce for when we are eating fries at home so I got busy experimenting.

This Fry Sauce is a good substitute when you can’t get your hands on some of the best in town.

Andrea’s Fry Sauce

  • 1/4C Mayo
  • 1TBSP Ketchup
  • 1TBSP Yellow Mustard (not dijon, must be yellow)
  • 2TBSP Prepared Horseradish
  • 1/2tsp Garlic Powder
  • 1/2tsp Onion Powder
  • 1/8tsp (dash) Worcestershire Sauce
  • Pinch of salt and black pepper

Mix everything together in a small bowl and store in the fridge for about an hour before serving.  Serve with your favorite fries!

Fry SauceThis makes enough for two people to have some dipping sauce with their homemade fries.  It was perfect!  Some slight heat from the horseradish with just enough tang from the mustard and Worcestershire sauce to keep you coming back for more.

Don’t just stop at fries though! Put this sauce on a burger with some relish or use it as a dip for chicken tenders.

This sauce comes together easily and can be adjusted to make more if you need to feed a crowd.

I’m turning to this fry sauce to fulfill the craving when I can’t get the original stuff!

Have fun guys, and remember, always play with your food! Enjoy!