Status

Homemade Latte

Homemade latte

For me, the weekends are made for relaxing and for little indulgences. Waffles for breakfast, fresh squeezed juice, and for foamy lattes.

I love lattes and since I’m not always able to go out for one, sometimes I’ll make a version at home.  I will make these for Scott and I to slowly sip on while enjoying the more relaxed pace of a weekend morning.

They are super simple and easy to customize however you want!  This is my basic latte:

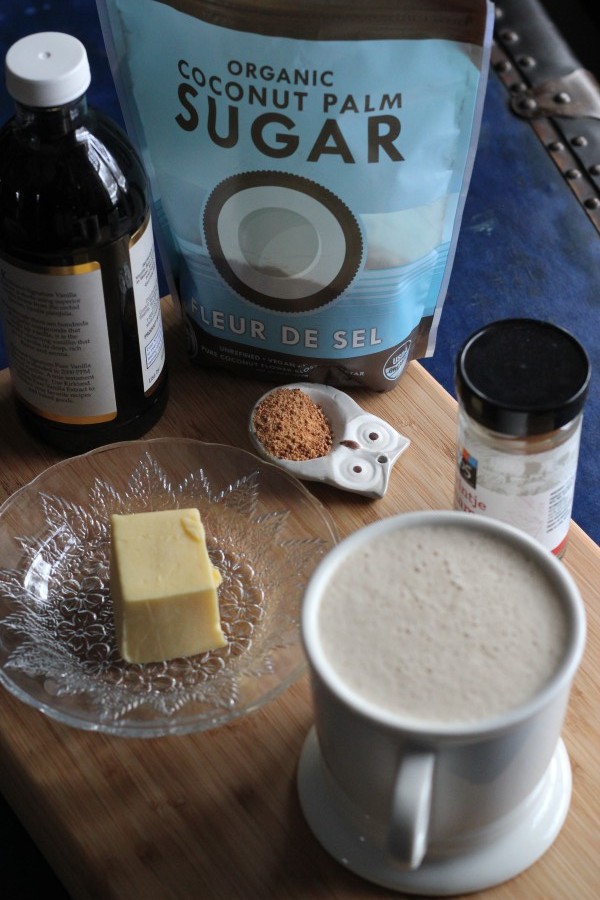
Andrea’s Homemade Latte

  • 3oz Vanilla Almond Milk or Grassfed Milk
  • 8-10oz Fresh Brewed Coffee
  • 1/2-1TBSP Grassfed Butter
  • 1tsp Coconut Sugar
  • 2tsp Vanilla Extract
  • Pinch of Ground Cinnamon

In a blender add in the butter, sugar, vanilla, and cinnamon.  Lightly heat up the almond milk or milk, just enough to take the chill off.  Pour into a mug and add the coffee.  DO NOT fill up the mug the whole way, leave a bit of space at the top.

Pour the coffee milk mixture into the blender.  Blend on medium for about a minute.  Pour mixture back into the mug and enjoy!

This will be frothy and foamy which is why you need to leave room when you first pour out the coffee.  That space is needed to make room for all the foam!  These are also just rough measurements, feel free to play around and create a combo that suits your taste.

I use butter because that is what I prefer but you can use coconut oil instead.  Two teaspoons of oil should be plenty.

Yes you can use regular sugar instead of coconut sugar, but reduce to 1/2tsp.

Feel free to customize it!  Want peppermint mocha?  Add in 1/2TBSP Unsweetened Cocoa and 1/2tsp of peppermint extract to the above mix.  Boom!  Peppermint Mocha Latte at home!

We all need treats in life and when we can make them at home to enjoy while hanging out in our PJs, all the better!

Status

Pomegranate Bourbon Highball

Pomegranate Bourbon Highball

The last in the pomegranate juice drink series and it happens to be my favorite of the batch because it features bourbon!  This is the drink that started us on our journey to experiment with pomegranate juice cocktails.  Thanksgiving day we were sipping on juice and seltzer when we got curious and added a little bourbon to the mix. It was delicious! I played around with the ingredients a bit to make it a little more festive.

This cocktail uses the least ingredients and comes together really quickly.

Andrea’s Pomegranate Bourbon Highball

  • 1/3C Pomegranate Juice
  • 2 oz Bourbon
  • 2 Dashes Whiskey Bitters
  • 1 Cinnamon Stick
  • Few cubes of ice
  • 8 oz Seltzer

Place all ingredients into a shaker except for the seltzer.  Shake for a minute and pour into a large glass.  Top with seltzer, stir and enjoy!

Your guests will love all of these festive drinks for the holiday season!  Or make one for yourself, kickback on the couch and watch your favorite holiday movie!

Don’t forget to check out PomBerry Martini and Pomegranate Margarita.

Happy Holidays!

Status

Pomegranate Margarita

Pomegranate Margarita

As Scott and I were experimenting making drinks with pomegranate juice, he decided to bust out the tequila.  I was highly skeptical about this because for whatever reason, tequila + pomegranate juice did not seem like they would match up well.

I was wrong.  So, so wrong.

This drink has enough kick to let you know it’s a cocktail but mild enough that no one will end up with a lampshade on their head by the end of the evening.

Feel free to rim the glass with a little salt or a little sugar mix.

Andrea’s Pomegranate Margarita

  • 2 oz Reposado or Anjeo Tequila (You can use Silver if you prefer)
  • 1 oz Cointreau
  • 3 oz Pomegranate Juice
  • Juice of half a lime
  • 2 Dashes of Orange Bitters
  • 2 Dashes of Peychaud’s Bitters
  • Ice for the shaker
  • 6-8 oz Seltzer or Club Soda, optional

In a shaker combine all ingredients except the seltzer or club soda.  Shake for about a minute and pour into a glass.  Add the seltzer or club soda at this time and stir.  Serve and enjoy!

Now you’re ready with another cocktail recipe for your #BoozeyHoliday party!  I have one more pomegranate recipe coming up for you on Wednesday, stay tuned!

Status

PomBerry Martini

POMBerry Martini

With my new habit of doing most of my grocery shopping at Costco (more details on that in the new year), I rediscovered pomegranate juice.  It can totally be a pricey juice to purchase but Costco has the best prices for it and I’ve reintroduced it back into our lives.  Usually Scott and I end the day with some juice + seltzer.  It provides a nice break from water that we’ve been drinking all day.  I talked more about that in this post and bonus you get an old school picture before I developed my photo skillz.

One weekend Scott and I were wondering how well pomegranate juice would play in a mixed drink and we started experimenting.  We came up with three drinks that we love.  This first one uses gin along with some chambord to kick up the berry flavor.

Andrea’s PomBerry Martini

  • 2 oz Gin
  • 1 oz Cointreau
  • 1 oz Juice of an Orange (or clementine or mandarine, whatever you have on hand)
  • 3 oz Pomegranate Juice
  • 1/4 oz Chambord
  • 6-8 oz Seltzer or Club Soda (optional)

Place all ingredients except seltzer or club soda, in a shaker along with some ice and shake for about a minute.  Pour into a glass and add the seltzer or club soda.  Stir and serve!

In all of the drinks I’ll be sharing with you, the seltzer and club soda is always optional.  The drinks are great on their own, I personally like the addition of the fizz.  It extends the drink and also helps to cut the alcohol burn a bit.  Totally personal preference so do what you like!

All pictures of the drinks are before the addition of seltzer.

Make sure to add this to your #BoozyHoliday menu!  I have two more drinks to share and those will be posted next week so make sure you check back!

Status

Buttermilk Spice Cake

Buttermilk Spice Cake

Buttermilk has been on sale at the store recently and I’ve been on a cooking spree using it in different dishes.  I had just a little bit left and wondered if I could make a cake with it.  I mean, if it can be used in pancakes and waffles, why not cake, right?

I wanted something a little more spicy since it’s the holidays and went with flavors similiar to gingerbread cake.  This cake turned out just how I was hoping and it’s even better drizzled with some Caramel Sauce.

Andrea’s Buttermilk Spice Cake

Wet Ingredients:

  • 1C Buttermilk
  • 1/4C Blackstrap Molasses
  • 3 Eggs
  • 3tsp Vanilla

Dry Ingredients:

  • 1C White Whole Wheat Flour
  • 1 1/2 C Unbleached All Purpose Flour
  • 1/2C Cane Sugar
  • 2tsp Baking Soda
  • 1tsp Cinnamon
  • 1/2tsp Allspice
  • 1/2tsp Ground Ginger
  • 1/4tsp Ground Clove

1/2 TBSP Butter to grease the pan

Preheat oven to 400 degrees and lightly grease a pan with the butter.  In a stand mixer, combine the wet ingredients and mix until everything is incorporated.  In a large mixing bowl, add the dry ingredients and whisk.   Turn the stand mixer on slow and slowly add the dry ingredients to the wet.  Do this until all the dry has been added.  Increase the speed on the mixer just a bit and mix for about 2 minutes.

Add this mixture to the bundt pan, make sure the the batter is even in the pan.  Place in oven and bake for about 20 minutes or until a toothpick inserted comes out clean.  Remove from oven and allow to cool completely before removing from pan.

Slice and serve!

NOTES:

If you live at sea level or below, reduce the heat on the oven to 375.  This may affect the time it takes for the cake to bake so make sure to keep an eye on it.

This cake also freezes and reheats very well!  Allow to thaw at room temperature and then gently heat in a low temp oven or toaster oven.

This is also goes great with coffee or tea in the morning, you know, if you’re one to have cake for breakfast.  No judging from me, it’s the holidays!

Have fun guys, and remember, always play with your food!  Enjoy!

Status

Bourbon Coconut Caramel Sauce

Bourbon Coconut Caramel Sauce

I have a love affair with caramel.  Rolos and Twix bars were a favorite when I was a kid.  I loved the Cadbury caramel eggs and when I got sundaes, I preferred caramel sauce over chocolate sauce.

Caramel is rich and buttery and like the liquid version of toffee, which I also love.  I have never tried making my own caramel sauce though because I figured it was too difficult.

Phsaw.

Spoiler alert: It isn’t.

It does take time and yes you do have to baby this but it’s worth it because in the end you have a delicious caramel sauce that can be added to just about anything you can think of.  Cake? YES! Coffee? YES!  Pancakes and waffles! Drizzle it into some brownie mix to make caramel brownies.  Drizzle it over some coffee cake.  Add it to ice cream? The list is endless!

You can see that I put this on top of some cake.  Some Buttermilk Spice Cake!

Since I’m cutting down on my dairy intake, I made this with full fat coconut milk instead of cream.  You won’t notice the difference because it tastes amazing.

Also, since it’s #BoozeyHoliday, I added bourbon at the end.  You’re welcome.

Andrea’s Bourbon Coconut Caramel Sauce

  • 1 Can Full Fat Coconut Milk
  • 1/2C Maple Syrup
  • 1TBSP Butter
  • 2tsp Vanilla
  • 2TBSP Bourbon

In a medium sized heavy sauce pan add in the coconut milk, maple syrup, and butter.  Heat over medium heat and whisk until the butter is melted and everything is incorporated.  Bring the mixture up to a boil and boil for two minutes. Then reduce the heat to low and continue to cook for 60 minutes.  Whisking every few minutes. The mixture should just be slightly bubbling.

Yes 60 minutes is a long time, but this needs to reduce down and thicken up.  You’ll know it’s ready when the sauce coats a spoon and has a slow drizzle to it.  It should be thick.  At this point, turn off the heat, add in the vanilla and bourbon and whisk.

Put the sauce into a heat proof container (I used a mason jar) and allow to cool.  Either use right away or store in the fridge.  If it’s cold, gently heat the sauce by adding some of the caramel to a sauce pan and heating over low heat.  Just until the sauce can be drizzled.

Yeah it takes some time but it lasts for two weeks in the fridge!  Honestly, I doubt it will last you that long because you’ll be eating it by the spoonful.


Status

Chilled Mulled Beer

I working on a lot of cocktail recipes for this holiday season so prepare yourself for #BoozeyHoliday! I’ve got three more cocktails in the works after this one!

For the holiday season I wanted to create a beer drink that was festive while still being light to drink and super easy to put together.  No one wants to fuss at holiday parties mixing a bunch of drinks.

I started thinking about festive drinks at the holidays and naturally eggnog and mulled wine came to mind.  But mixing those with beer?  Heavy cream and beer just sounds gross.  A hot steaming mug of beer doesn’t sound appealing at all.  The idea of a mulled beer drink intrigued me though and I put my thinking cap on to try to come up with a way to make it work.

It would be served cold and instead of red wine I used unsweetened cranberry juice that I spiced up using spices that are familiar to us this time of year.

And the Chilled Mulled Beer drink was born!

Chilled Mulled Beer


Andrea’s Chilled Mulled Beer

For the Mulled Cranberry Juice:

  • 4C Unsweetened Cranberry Juice
  • 1 Orange, quartered
  • 1 Cinnamon Stick
  • 4 Star Anise
  • 1TBSP Whole Cloves

Combine all ingredients in a medium sized sauce pot and bring to a boil.  Then cover and immediately reduce to a low simmer.  Simmer for 30 minutes.  Turn off heat and allow to cool for another 30 minutes.  Squeeze the orange quarters into the mixture, then remove.  Strain the cranberry juice into a heat proof container and place in fridge.  Makes 1 quart of mulled cranberry juice.  Allow to chill in the fridge for at least 2 hours before serving.

For the Mulled Beer:

In a glass add 1/2C Mulled Cranberry Juice then add 6oz of Beer.  A pale ale or a lighter brown ale is perfect for this drink.  I used Odell’s 5 Barrel Pale Ale and their seasonal, Isolation ale with this drink and both worked out well.  You want a beer that is light in flavor so I would avoid something really hoppy as that would clash with the cranberry juice.

You can garnish with more star anise or frozen cranberries!  Serve and enjoy!

The cranberry juice can be made ahead of time and will keep for up to a week in the fridge. Store in an air tight glass container.  I used a mason jar.  Feel free to make a huge batch, just remember you’ll have to up the spices a little as well.  Give the cranberry juice a good shake before pouring it out so the spice redistributes.

Perfect for the holidays and something a little different to serve your guests!

Status

Shaved Brussels Sprouts and Sweet Potato Salad

Salads.  It’s one of those dishes that when I hear it, a few things come to mind.  I automatically assume it’s either lettuce or grain based.  Unless it’s at a summer gathering, then I think it’s either going to be potato or macaroni salad.  I’m trying to change my perception of what makes a salad so that I can experiement a little more.  Salads don’t have to be lettuce or grain based!  This might not be some amazing revelation to you but for me it opened up a lot more possibilities.

I was looking for something that I could create that would yield leftovers.  I wanted something to have at lunch that was veggie packed but not your standard boring mixed greens salad.

Since it was fall, I decided to incorporate a bunch of traditional fall ingredients like sweet potatoes and cranberries to create a salad that is great for lunch or as a side dish.  It’s also perfect for traveling so it can be taken to work (mason jar salad!) or to a party or picnic.  It’s grain free, it’s vegan, it’s Paleo.  It’s all the buzz words.

Shaved Brussels Sprouts and Sweet Potato Salad


Andrea’s Shaved Brussel Sprouts and Sweet Potato Salad

For the salad:

  • 2 Medium Sweet Potatoes, peeled and chopped
  • 1 1/2lb Brussels Sprouts, trimmed
  • 1/2 Red Onion, finely chopped
  • 1C Dried Cranberries
  • 1 tsp of Olive Oil for cooking

For The Dressing:

  • 2TBSP Dijon Mustard
  • 2TBSP Maple Syrup
  • 1/4C Balsamic Vinegar
  • 1/4C Light Olive Oil
  • 1/2tsp Salt
  • 1/2tsp Ground Black Pepper


In a small glass bowl, whisk together all the ingredients for the dressing and set aside.  Bring a large pot of water to a boil and add in the cubed sweet potatoes.  Boil until the sweet potato is just fully cooked through so that a knife pierces it easily but the sweet potato isn’t mushy.  About five – 10 minutes.  Drain the sweet potatoes making sure to remove as much water as possible.  Add to a large mixing bowl.

Using the fine grate or thin slice blade for your food processor, shred or shave (either works here) the Brussels Sprouts.  In a large skillet add in 1 tsp of light olive oil and heat over medium heat.  Add in the sprouts and cook for about 3 minutes.  Remove and add to the sweet potatoes.

Add in the cranberries and the red onion, toss to combine.  Pour the dressing over top of the salad and gently mix until everything has been coated in dressing.

Serve immediately or cover and place in fridge until ready to serve.  Serves 4 meal size portions or 8 as a side dish.

A couple of notes:

I slightly cooked the sprouts to help bring out more flavor and reduce their bitterness a bit.  This is a taste preference.  If you like raw sprouts then it’s OK to skip this step.  If you allow the salad to sit for several hours before serving, that will help breakdown the sprouts a bit.

This dish gets better the longer it has time to marinade in the dressing.

It does make for a big salad and this served two people as a meal for two lunches.

Leftovers are great but make sure to eat this in at least three days, otherwise the sprouts start getting a little funky.

Adding in some nuts, seeds, or even a little feta or goat cheese on top would make great additions to this salad!  A little twist on the traditional veggie side makes it perfect for holiday gatherings.

Have fun guys, and remember, always play with your food!  Enjoy!

Curry Chicken Salad

Curry Chicken Salad

The first time I had a curry chicken salad was at a Whole Foods in North Carolina.  It kind of blew my mind.  It was my first experience with anything “curry” and was a whole new flavor sensation to me.  I immediately wanted to recreate it and I have finally succeeded!

It’s an easy recipe and the amounts can be adjusted to however much chicken you have.  There are always leftovers when I roast a chicken and this is my go-to recipe to transform those leftovers into something tasty.

I’m going to provide rough estimates for the amounts I use for leftovers but definitely play around with this recipe to fit your tastes and for how much you want to make.

Andrea’s Curry Chicken Salad

  • 1 Large Chicken Breast, cooked and shredded
  • 3 Green Onions, chopped
  • 1 Green Pepper, sliced thin
  • 1/2C Raisins
  • 3/4C Mayo
  • 1TBSP Curry Powder (I like Simply Organic)

In large bowl combine all ingredients.  Make sure to mix well so the mayo and curry covers everything.  It can be served immediately but is best when left to sit for an hour or more.

Eat it on a sandwich, in a wrap, on top of a salad!  Or just out of the bowl, like I sometimes do. A little different than your standard chicken salad, curry brings some warmth while that little bit of raisin keeps things sweet.   It’s great for lunch during the week or for dinner on a hot summer day.  Heck, or even breakfast! No judging here.

Have fun, and remember, always play with your food!  Enjoy!

Cowboy Burgers

Cowboy BurgerI’ve been on a big burger kick lately, it’s all that I really want to eat and I’m going with the flow.  If that’s what my body wants, so be it! Burgers all around!

I wanted to make a burger that had a nice punch of flavor to it.  It’s getting to be about that time here in Northern Colorado, when roasted green chilies are going to be popping up at the farmer’s markets.  I love roasted green chilies!  You can get any spice level you like, the chilies are roasted fresh while you wait, and the smell is amazing.

I still had some roasted chilies in the freezer so I pulled those out and got to work creating this burger.  It’s super easy to prepare and tastes delicious!


Andrea’s Cowboy Burgers

  • 1 pound Grassfed Ground Beef
  • 2 Roasted Green Chilies, seeded and chopped
  • 1/4 Small Red Onion, finely chopped
  • 2 Slices Cooked Bacon, chopped
  • 1/2TBSP Worcestershire Sauce
  • 1tsp Chili Powder
  • 1/2tsp Salt
  • 1/2tsp Pepper
  • 1/2tsp Garlic Powder
  • 1TBSP Oil for cooking (I recommend Lard or Ghee)

Add all ingredients to a mixing bowl and gently combine.  Quarter the mixture, and make a patty out of each quarter.  In a large skillet, heat oil over medium heat.  Place patties in skillet and cook on each side for about 4-5 minutes.  Remove from heat and serve!

Makes 4 patties

Cowboy Burger

You can serve these however you like!  Top with cheese and maybe some caramelized onions.  I topped ours with guacamole and served them on lettuce wraps.

The roasted chilies bring a nice heat to the burgers while the bacon highlights the smokiness.  The spice level of the chilies used will determine how spicy the burgers turn out.  If you love heat, use spicier chilies!

These would also be great grilled!  Leftovers can be used right away or frozen.  To reheat, gently warm them up in a toaster oven or in a regular oven at 375 for about 10 minutes.

Have fun guys, and remember, always play with your food!  Enjoy!