Superbowl 2013 Snackies

Braised Pork Ribs Someone said that there was a big athletic event this weekend. All I know is that hockey is back and the Pens play the Capitals (I can’t stand the Capitals and their website looks horrible. Ahem.)  on Sunday, so I’ll be focused on that.

If you’re having a big event on Sunday for the game of your choice, I’ve got some great ideas for you that will power you through the afternoon.

Braised Ribs are easy to make and the perfect “messy” game day food.  They can be served hot or room temperature and will keep you and your guests satisfied during the big day.

Pair it with some bourbon or green chili barbecue sauce for some extra kick!

If you’re looking for something a little less messy, then this honey mustard chicken salad is where you should turn.

Honey Mustard Chicken SaladThere’s no mayo so it can sit out without a problem.  Everyone can make their own sandwiches or wraps, or even put it on top of a mixed salad.

Chips and dips are always a must on game day.  Make your own horseradish onion dip the day before and it will be ready for when your guests arrive! Can be served with chips or veggies!

Horseradish Onion Dip If you’re looking for a different cocktail to serve, my friend Lori has a great one using sriracha! Head over to check it out!

Have fun this weekend and get your snacking on!


Making Stock Better

Stock simmeringOne of my goals that I had last year was to make more stock at home.  I use a ridiculous amount of stock each week for cooking.  Everything from soups to rice.  Because of that I wanted to rely less on store bought stock and more on homemade stock.

Since our move here I’m happy to say that I have been using homemade stock exclusively! Since local meats are super abundant and because I bought a meat share this year, bones have been plentiful for stock making.

I’ve also found two things to take my stock from average to perfection.  Before my homemade stocks, while tasty, were missing something.  I had no idea what but they didn’t seem to have the depth and rich flavor that I expected from homemade stock.

Trick 1:

Reading different homesteading blogs and food blogs I noticed that most people add some sort of acid, usually in the form of cider vinegar to their pot of stock.

I found this really interesting and did a quick search to see why folks were adding vinegar. Westin A. Price says that adding vinegar to the stock helps to extract calcium from the bones. Several other sites merely said that adding vinegar helps pull out more minerals and nutrients from the bones and meat.

Curious, I decided to try it out.

My preference is Bragg’s Unfiltered Apple Cider Vinegar so that’s what I’ve been using. I add anywhere from 1/4 to 1/3C of it to the stock pot.

Trick 2:

Salt and lots of it. Previously I did not season the stock as it simmered.  It would eventually get seasoned when I cooked with it so in my mind, seasoning it as it simmered seemed unnecessary.

Oh how wrong I was.  Salt is a must!

By “lots of it”, I’m referring to a good 2 to 3 big pinches of kosher salt adding to the stock water.

These two tricks have elevated my homemade stock from alright to dazzling.  Perhaps this is all common knowledge? If so I missed that memo.

homemade stock

Adding the vinegar provides depth and richness in flavor that I was looking for but wasn’t getting before.  It also helps the stock become a lovely golden brown in color for poultry and pork stocks.  For beef stocks it ensures a glistening dark brown stock.

The salt basically just makes things more tasty. It’s a lot easier to pick up the meat and veggie flavors of the stock when the stock is salted.  It makes the stock standout instead of just being a background ingredient.

I definitely won’t be making stock without these two ingredients again!

Do you make stock at home? Any tips or tricks to share?

Embracing Lard

Pig Fat Last fall I purchased a half hog meat share.

This has easily been one of the best decisions I have made!  One, albeit large, payment and my freezer is stocked with pork cuts.  Enough to keep us in pork until summer.

It’s been a learning experience and one of the new things that came along with with purchasing a half hog is learning how to render lard.

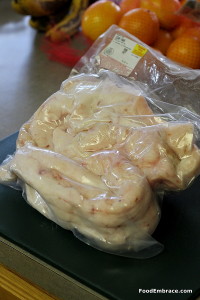
I got the fat from the pig as well as the meat cuts and to be truthful, this was what I was looking forward to the most.

Lard from pasture raised (meaning properly raised pigs) is a great source of fat and good for the body.  Lard from the grocery stores is hydrogenated making it full of transfat and very bad for the body.

Fresh lard = great for you

Grocery store lard = stay away from

While lard is fat from the pig, you have to do some work to get it.  Lard doesn’t just happen, it takes a little bit of time.  The process requires rendering down the fat to separate it from anything else that might be in the fat.  The little resulting bits leftover from rendering are referred to as cracklings.  You can fry them up and eat them!

I looked up resources and found a great tutorial over on A Little Bit of Spain in Iowa.

I always get nervous when trying new kitchen techniques   I was completely nervous about rendering lard.  Would it take forever?  Would it smell?  What if I messed up?

As with most new experiences in the kitchen, you just have to suck it up and try.  So I did.

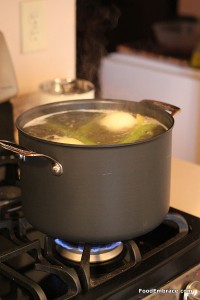
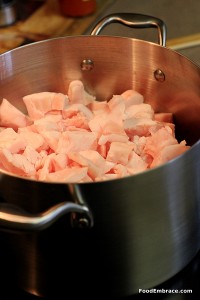
I had five pounds of pork fat that I cut up into small pieces.  In a large heavy pot (8QT stainless steel stock pot), I added in a half cup of water and then the lard pieces on top.

Rendering LardWith the burner temp on the stove set to 1, I let it get busy rendering.  I stirred it every few minutes to make sure the lard didn’t stick to the bottom.  It took a while for it to get going but soon the fat started melting.

Yes there was a smell but it smells like pork and isn’t overpowering at all.

I let the lard render for a couple of hours, stirring occasionally.

It finally got to a point where I thought it had rendered enough, removing it from the stove, I started ladling the liquid through a cheesecloth lined strainer.

Lard Cooling
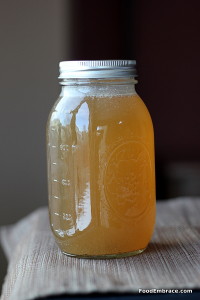
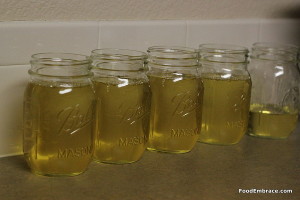
Five pounds of pig fat resulted in just a little over 4 pints of lard.  I let the lard cool on the counter over night, sealing them up with lids in the morning.

lard
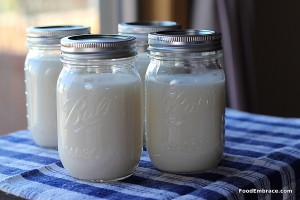
Gorgeous white pig gold!

Unfortunately I did let the fat render a little too long which resulted in a lard that had a slight pork chop smell to it.  It’s a very slight smell and despite that I have still used the lard in baking.  Thankfully it does not result in pork chop tasting baked goods!

There is a slight savoriness to the biscuits and crusts that I’ve made but it’s delicious and not off putting.

Lard freezes really well which means there’s no worry about how to get through 4 pints of the stuff quickly.

If you have the opportunity to get your hands on some fresh pork fat, I highly recommend making your own lard.  It’s easy, you probably already have all the tools in your kitchen, and you’ll be swimming in pig gold which makes everything taste better.


Thanksgiving 2012 Theme: Lard-licious

In my Thanksgiving recap post, I briefly hinted that there was a theme this year to our feast.

And no the theme wasn’t related to the decor or a color scheme or anything like that.

It was food related, as almost every dish we ate had it incorporated somehow.

This year the focus for our Thanksgiving feast was around lard.

Yes, you read that right.  LARD.

Or Pig Gold as I refer to it.

I purchased half a hog this year and with the fat that came with it, I rendered that down into lard.

I knew I wanted to use lard in the pie crust but also wanted to use it in different ways with the other parts of the meal.

I made biscuits using lard instead of butter and they turned out a lot better than I expected!  My expectations were low only because I’m still getting used to baking at elevation.  These rose beautifully and were very flaky.

I was also surprised by how full they kept me! We ate these for breakfast Thanksgiving morning and they kept me full and satisfied all the way until about 3pm. Which was just in time for the big meal.

Lard was also used in the pie crust and I’m sorry I have no picture of that.  We were too busy eating it for me to snap a picture.

Along with using lard instead of butter on the turkey, I also used it to make the roux for the gravy.  Scott declared that as the best gravy we’ve had yet and I’ve been making gravy for a while folks!

The only items that did not have lard in them in some way were the collard greens and the stuffing.

Everything came out tasty and I definitely plan on using it again next year for Thanksgiving!

Have you used lard in cooking before?


Braised Pork Ribs

Scott and I love ribs and great barbecue is tops on our list of favorite eats.

When we made our travel across the country earlier this year, stopping for barbecue was on our “must do” list. And we succeed in finding some top eats!

I currently don’t have a smoker and do not have the know-how to turn my grill into a smoker at this point.  Eventually I want to learn how to smoke meats and try my hand at some pork!

For now I go with the braising method of cooking ribs; low and slow in the oven with just a little bit of liquid.

I started off following Alton’s method for ribs but have since moved to my own method.  It works for now and produces juicy ribs that satisfy the craving for a little bbq rib action.

Here’s how I approach braising ribs:

Andrea’s Braised Pork Ribs

  • 1 slab of ribs cut in half
  • 1-1 1/2 C Dark or Pilsner Style Beer
  • Foil or metal cooling racks
  • Large baking dish or roasting pan

Prep your ribs using a dry rub.  I prefer a good 12-24 hours for the rub to be on the ribs.  Store the ribs in the fridge and pull them out at least 15 minutes before putting them in the oven.

Preheat the oven to 300 degrees.

You need to elevate the ribs in the baking dish/roasting pan.  You can do this either with metal cooling racks or the rack that came with your roasting pan.

If you have neither of those, you can roll up foil lengthwise, making what looks like a foil log.  Lay three to four foil logs in the baking dish/roasting pan and place the ribs on top of the foil. Click on the first picture to see an example of this.

Pour the beer in the bottom of the baking dish.  Cover the ribs with more foil and poke a few holes into the foil to allow steam to escape.

Place in oven and cook covered for about 45 minutes.  Remove cover, check on ribs.  The should be looking almost cooked through.  Cook uncovered for about 10 -15 minutes.

It really doesn’t take long for ribs to cook through.  You can use a meat thermometer to double check for doneness.

Brush with your favorite bbq sauce or put some out and let everyone add it themselves!

We recently had ribs with the hatch green chili barbecue sauce but if you’re looking for sauce with a little something extra, I’ve got a bourbon barbecue sauce as well.

I’ve got a great coffee and cocoa dry rub recipe that would be perfect for the ribs.

So far this method is working well and I can quickly whip up some ribs when the mood strikes.

Have fun guys, and remember, always play with your food!  Enjoy!

On The Road: Oklahoma Joe’s Barbecue, Kansas City Kansas

After leaving St. Louis and heading west we drove through Kansas City and you can guess that BBQ was once again on our mind.

Scott did some research and came upon Oklahoma Joe’s Barbecue.  Touted as the best in Kansas City and listed as Anthony Bourdain’s “top places to eat before you die”, we knew that we’d be stopping there.

We pulled up on a Saturday afternoon just in time for lunch and just in time to stand in line. Thankfully we arrived right between waves so our wait in line wasn’t nearly as long as it was at Pappy’s. (FYI: that link plays music)

Again we loaded up because, well, we love BBQ and we were on a road trip across the country. Leftovers are a great luxury to have!

First up was pulled pork and coleslaw.

The pulled pork was tender, juicy, and packed with flavor.  I realize that is a very stereotypical food blogger description but really that just sums it up well.

The coleslaw was mayo based but it was so light on mayo it was hardly offensive.  Crispy, clean, and cool, it went well with the pulled pork.

A full rack of ribs.  Since this was Kansas City style BBQ this meant that the ribs had a rub and some sauce on them while they smoked.  Perfection and my rib style of choice.  These had a little less meat on them but still were tender with great flavor.

There were two sauces at the table to use, the house sauce and then a spicy version.  I stuck with the house sauce which had a sweet tang to it.  I loved putting it on the ribs, making myself a complete mess in the process.  I was thankful for the roll of paper towels at the table!

We also got:

  • 1/2 pound of Burnt Ends
  • Side of Baked Beans
  • Order of Fries
  • 1/2 a Smoked Chicken

We were super excited to try the burnt ends, which were tasty but not quite as stellar as we hoped.  Both of us agreed that it would probably be better on a sandwich, which is the preferred option.  We wanted to dip them in sauce which is why we got them as a side.

The baked beans seemed to be made either with pork or possibly a chili as a base for the sauce.  They also used different kinds of beans which brought a nice change and texture to the side.

The french fries were amazing and I highly recommend ordering them.  They were super crispy and seasoned with BBQ style spices.

But the chicken? I’m still dreaming about the chicken.

It was a last minute decision.  I saw a plate of it come out and knew that I needed to get some!  It’s rubbed down with seasoning mix and smoked to perfection.  It’s full of flavor,   tender, juicy, and falling apart goodness.

I ate most of the chicken and Scott had to fight me for some bites.  Looking back we should have ordered a whole chicken!

If you are in Kansas City, KS and looking for some great BBQ, check out Oklahoma Joe’s! And don’t be put off about eating in a gas station because great food can come from anywhere!

On The Road: Pappy’s Smokehouse, St. Louis

My husband and I love barbecue. I’m a little more picky about it than he is but we both enjoy the smokey goodness.

So it should be no surprise that during our trip out to Colorado that we specifically sought out barbecue joints along the way.

We hit St. Louis, Missouri sometime in the early afternoon and we were starving.  A little research before hand led us to Pappy’s Smokehouse, which states that they do a Memphis style BBQ.

It’s a small joint down in the St. Louis University area and there is a parking lot beside it to park in.

As with all good BBQ places, there will be a line.  That’s how you know you’re in the right spot.  So expect to stand in line and wait.

We waited for probably an hour and a half in line before placing our order.

Staff pass out menus while you wait so that you’ll know exactly what you want by the time you place your order.

You place your order at the cash register, pay, and grab a drink along with a table.  You cannot get a table until you place your order.

Waitresses will yell for you when your order is ready and they’ll bring it to your table as you flag them down.

We loaded up!

  • Green Beans
  • Baked Beans
  • A full rack of ribs
  • Smoked turkey

The green beans and baked beans were both excellent!  The green beans weren’t cooked to death and seasoned just right.  The baked beans had a little bbq sauce added to the mix and were the perfect balance of sweet and tangy.

The smoked turkey was alright but the star of the show was the ribs.  HEAVEN.

They were thick with plenty of meat on them and no fat.  The fat had rendered off during the smoking process and you were left eating tender juicy pork.  There were rubbed down with a seasoned rub and bbq sauce was provided at the table for you to use.

There were three sauces to pick from:

  • Pappy’s Original
  • Sweet Baby Jane
  • Holly’s Hot Sauce

Sweet Baby Jane was my favorite.

We also had:

  • Cole slaw
  • Sweet Potato Fries
  • Smoked Sausage
  • Pulled Pork

The cole slaw was right up my alley!  It was a mustard and vinegar based slaw, no mayo here!  With just a hint of some onion added in as well.  I pretty much inhaled the slaw, I loved it so much.

The sweet potato fries were thin cut and crispy which is hard to achieve with the sweet potato.

The smoked sausage was alright but it had a very prominent smoke ring to it which means it was done right.

The pulled pork was delicious and I topped mine half with some Sweet Baby Jane.

Naturally Scott and I couldn’t eat all of this and Pappy’s was prepared. They know that you’re going to order more than you can eat.  There are take-out boxes available and they’ll also give you some to-go cups of your favorite sauce.

If you’re in the St. Louis area, definitely check out Pappy’s Smokehouse and get yourself some barbecue!

Pulled Pork Tacos

Pork is probably our favorite meat source here at the HQ. Ribs, sausage, and chops, oh my!

We’ve been having pulled pork tacos a lot recently.  It’s easy to make and provides plenty of leftovers for the next day and portions to freeze.

With how busy we’ve become on the weekends lately (house renos and new jobs), on Sunday it is really easy to toss a roast in the crockpot and let it do it’s thing all day long.

The smell and the anticipation of having pork tacos for dinner later in the evening makes the Sunday Blues a little more tolerable.

Andrea’s Pulled Pork

  • 3-5 pound pork butt
  • 1 Onion, thinly sliced
  • 1Green pepper, thinly sliced
  • 1 Jalapeno Pepper, cut in half (if you want)
  • 1C your favorite salsa
  • 1/4C-1/2C Stock (chicken or veggie)
Add everything but the pork into the crockpot and stir.  Then add the pork butt (fatty side up) turn on low and let cook for 6 hours.
At around the six hour mark, remove the roast from the crockpot.  Remove the fatty layer and discard.  Shred all the pork and place the pork back in the crockpot, mixing it with the juice and veggies for another 45 minutes to an hour.
Then serve up however you like!
We’ve had these on soft flour tortillas, corn tortillas, and even hard corn shells.  All work beautifully!
I purposefully do not add seasoning to the roast as it cooks because we top our tacos with salsa, guacamole, and slaw.  So there’s plenty of flavor to be added.  However if you would like to add some extra kick, feel free to add in some chili powder, red pepper flakes, and some garlic powder.
This usually will make enough for us to have for three meals.  I highly recommend making sure to cook enough for leftovers or you’ll be really disappointed in yourself.

Making Stock

Recently I’ve taken to making my own stocks. I’ve made chicken and a pork and beef combo stock. I haven’t tried veggie although I should start since I always have a bunch of leftover trimmings.

I use stock a lot in cooking, everything from cooking rice to making soups.  I have it on hand at all times and it’s a pantry staple.

We don’t eat enough meat to keep us supplied with stock but I’ve been saving the bones after meals and storing them in the freezer.  Once I’ve got enough, I’ll make a pot of stock.

I admit that I was initially intimidated about making stock because people always stress (to the point of almost freaking out it seems) about making sure to properly cool the stock.

Most recommend sticking a bowl of the stock either in a sink full of ice or another bigger bowl full of ice.

I don’t have that much ice.

And truth be told, I’m not buying or making that much ice just to cool some liquid.

Sorry.

I talked to others, ones that make stock all the time, and no one mentioned the ice method.  Most people it seems just allow the stock to cool on it’s own.

Well I can do that.

And so I’ve started making stock as soon as I’ve got enough bones and scraps on hand.  It always smells amazing and tastes way better than store bought variety.

Not enough to warrant an increase in our meat consumption though!  Right now this works perfectly.

In a follow-up post I’ll tell you my approach to making stock and how easy it actually is!

Country Ribs with Sauerkraut

Where I come from, pork and sauerkraut is what you eat on New Year’s Day to welcome in the New Year and hope that it brings you some luck.

Homes all over will smell like kraut that day and grocery stores have sales on the stuff starting a few weeks before New Year’s.

It’s just not New Year’s if you don’t have pork and kraut. Scott embraced this tradition with open arms.  Not really surprising since his previous tradition was boiled cabbage and ketchup.

Um.

I would wager a guess and say that this dish is probably a little tastier than that.

It’s also made with beer, onions, and peppers. Plus being tossed in a crockpot.  Winner!

Andrea’s Country Ribs With Sauerkraut

  • 4-6, Country Style Pork Ribs
  • 1 32oz Jar of Sauerkraut, drained (but not rinsed!)
  • 1 Onion, sliced thin
  • 1 Green pepper, sliced thin
  • 1TBSP Brown Sugar
  • 1C Dark Lager Style Beer (I used Great Lakes Eliot Ness)
  • Big Pinch Red Pepper Flakes
  • 1tsp Garlic Powder
  • 1/2tsp Smoked Paprika

In the crockpot, add in beer and brown sugar, and stir.  Then add in the kraut, onion, and pepper along with the spices, then mix.  Place ribs in crockpot on top of the kraut mixture.  Cover and cook on low for about 8 hours.

Serve immediately!

Typically this dish is served with a large helping of mashed potatoes on the side and the kraut mixture on top.

If you don’t have any beer or would like to use something else, I would recommend some beef stock.

You could swap out the ribs for a pork butt roast.  Once that’s cooked, just shred the pork into the kraut mixture.  Would be great for a party or game day because you could serve this as sandwiches.

Have fun guys, and remember, always play with your food!  Enjoy!