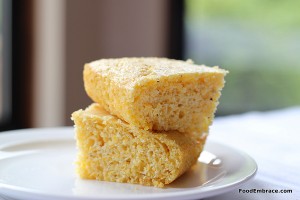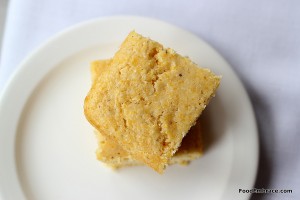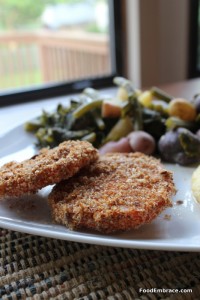
Buttermilk Cornbread

It didn’t even occur to me to make cornbread until Brandi mentioned it as I was deciding on how to use up the buttermilk.

I’m so glad she did because I probably won’t make cornbread with out it now!

My version of cornbread could not be any simpler to make. All you have to remember is 1 because all the ingredients except for the sugar are 1 in size.  The sugar is a quarter.

Andrea’s Buttermilk Cornbread

  • 1C Cornmeal
  • 1C White Whole Wheat Flour
  • 1 Egg
  • 1C Homemade Buttermilk
  • 1TBSP Butter, Melted and cooled
  • 1tsp Baking Powder
  • 1/4C Organic Cane Sugar

Preheat oven to 375 and grease an 8×8 baking dish.  In a large mixing bowl combine the cornmeal, flour, sugar, and baking powder.  Whisk until everything has combined.  In a medium sized mixing bowl, combine the buttermilk, butter and egg.  Whisk until that is combined.

Slowly add the liquid to the flour mixture and gently mix until everything is incorporated.

Pour mixture into baking dish and bake until a toothpick inserted in the center comes out clean.  About 10-15 minutes.

Allow to cool for five minutes before slicing and serving.

I told you, easy peasy!

You can make this in cast iron skillet if you have one handy.  Next time I’m going to do that, I totally forgot until after I baked this up!

I like my cornbread sweet and buttery. If you like yours savory, feel free to reduce the sugar amount or omit it entirely.

Because this is so simple, the recipe can be fiddled with to suit your tastes.

This cornbread also freezes really well!

Have fun guys, and remember, always play with your food!  Enjoy!


Buttermilk French Toast

First up in my Cooking With Buttermilk Series, is Buttermilk French Toast!

French toast is quickly becoming my new favorite breakfast.  Before it was pancakes but this is starting to win my heart.

Crispy eggy bread with butter and syrup?  Yes please!

What a perfect way to use up some of that buttermilk as well, making a nice filling breakfast!

Andrea’s Buttermilk French Toast

  • 6 Slices of Whole Grain Bread, Dried out (either leave out on the counter the night before or quickly toast up in the toaster)
  • 4 eggs
  • 2/3C Homemade Buttermilk
  • 2tsp Vanilla
  • 1tsp Cinnamon
  • Pinch Brown Sugar

Heat a griddle up over medium heat and place a dollop of coconut oil on top.  In a large mixing bowl combine eggs, buttermilk, vanilla, cinnamon, and brown sugar.  Whisk until everything is blended together.

Dip in one slice of bread and place on griddle.  Depending on the size of your griddle will determine how many slices you can cook at a time.

Cook toast on each side for about 4 minutes.  Repeat with all slices of bread.

Remove and serve!

Sweet, fluffy, filling, and perfect for a lazy Sunday breakfast.

If you don’t have buttermilk you can sub in any dairy or nondairy milk of your choice (I would recommend full fat coconut milk from a can).

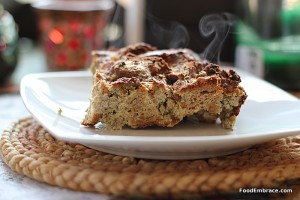
Breakfast Casserole

This is one of those dishes that Scott and I have on occasion, usually around a holiday.

I’m not sure why, I think it’s because we like it so much we want to keep it special.

Our most favorite time to have it is on Christmas morning.  This casserole gets prepped the night before and baked the next morning.

I put it in the oven as we sit down with our first mugs of coffee and dive into our stockings.  While we open gifts the aroma of the casserole floats in from the kitchen increasing the excitement in the air and causing our bellies to rumble in anticipation.

It’s easy to make, the hardest part is waiting the hour or so for it to bake!

Andrea’s Breakfast Casserole

  • 1lb Ground Breakfast Sausage, cooked and drained
  • 6 Eggs
  • 1 3/4C Unsweetened Coconut Milk (From the dairy aisle, not the can)
  • 6C Cubed Bread Pieces or About 1/2lb loaf of bread cubed up
  • 1tsp Dry Mustard
  • Salt and Pepper to taste
  • 2C Shredded Sharp Cheddar Cheese, plus extra for a topping

In a large mixing bowl add in the bread cubes and the cooked sausage.  In a smaller mixing bowl, combine eggs, coconut milk, dry mustard, salt, and pepper.  Whisk until the eggs are well incorporated into the coconut milk.

Pour egg mixture over top of the bread and sausage, add in the two cups of cheese and combine until the bread is coated with the egg mixture.

In a greased baking dish, I used a 9×13 (or 2 1/2 QT) dish, pour in the bread and egg mixture.  Make sure it’s evened out, cover with foil and place in fridge over night.

Preheat oven to 375, poke a few holes in the foil, and place baking dish in the oven.  Bake covered for about 40 minutes.  Remove foil and bake uncovered for about another 30 minutes or until the center is set and cooked through.  Sprinkle with a bit more cheese if desired, till it’s melted.

Allow to cool for 5 minutes before serving.  Serve and enjoy!

We love this casserole and it provides plenty of leftovers for the next few days.  It’s also a great dish to make if you’re having guests over.  It serves a lot and pleases just about everybody.

I like to use a whole grain bread in this dish which I think makes it a bit more heartier and filling.  You can use whatever kind of bread you enjoy.

You can also use milk or another nondairy milk of your choice (though I do recommend unsweetened) if you don’t like or don’t want to use coconut milk.

Have fun guys and remember, always play with your food!  Enjoy!

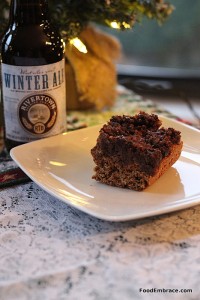
Fig and Date Coffee Cake

It’s no secret that I like cooking with beer but I also like baking with beer. And experimenting with different ways to use beer in the kitchen.

One of my most recent experiments resulted in what is now my favorite coffee cake of all time. This coffee cake uses dried figs, dates, and nuts as part of the crumble topping.

This helps keep the cake moist while baking and gives a slight nod toward the fig newtons of my childhood.  I wasn’t a huge fan of fig newtons as a kid but when I got older I enjoyed them a great deal.

Having found dried figs at the store, I knew that I wanted to use them in something.  With seasonal beers out right now, the idea of making a coffee cake with one seemed like a natural fit.

I’ve made this cake several times since the first experiment and it always makes me squee with happiness when I get a chance to nibble on it.

Andrea’s Fig and Date Coffee Cake

For the Batter:

  • 1 1/4C Dark Winter Ale
  • 1C Oats
  • 2C White Whole Wheat Flour
  • 2tsp Vanilla Extract
  • 2tsp Ground Cinnamon
  • 1tsp Baking Soda
  • 1TBSP Maple Syrup

For the Topping:

  • 8 Dried and Pitted Dates
  • 1C Dried Figs, stems removed
  • 1C Pecans, Heaping
  • 2TBSP Brown Sugar, Packed
  • 2tsp Vanilla Extract
  • 1/2tsp Cinnamon

In a medium sized mixing bowl, add in dates and figs and cover with very hot water.  Allow to steep for at least half an hour.  Drain water from dates and figs.

Preheat oven to 375 degrees.  Spray a square baking dish with nonstick spray or olive oil.  About a 9×8 dish is what I used.

In a food processor, combine all ingredients for the topping.  Pulse until everything is broken up and a crumble forms.  It will be sticky and will stick together.

In a large mixing bowl, combine all dry ingredients for the batter and whisk.  In a medium sized mixing bowl combine wet ingredients, beer, maple syrup, and vanilla and whisk.  Slowly add the liquid mix to the dry mix.  Gently stir until everything is combined.  Pour mixture into baking dish.  Top batter with fig and date crumble.  You’ll have to use your hands to crumble it and spread it around.  The crumble mixture should cover the entire top of the batter.

Bake in oven for about 10 minutes.  A toothpick inserted will come out clean.  Don’t over bake as that will result in a dry coffee cake.

Remove from oven and allow to cool for a few minutes.  Slice and serve!

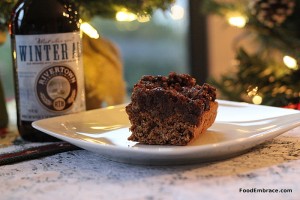
I used Rivertown’s Winter Ale for this coffee cake.  It’s brewed with molasses and cinnamon.  The cinnamon is very prominent in this beer and I knew that it would work well in the coffee cake.  It’s also a dark colored beer which provides a nice caramel color to the coffee cake.

We had this coffee cake over the Thanksgiving holiday and I’m already dreaming about when I can have it again! That’s how much I love it!

The fig and date topping help keep the cake moist while also making it a very filling cake.  This isn’t your grandma’s coffee cake.  This baby is hearty!

Have fun guys, and remember, always play with your food! Enjoy!

French Onion Soup For Two

I adore French Onion soup. It’s warm and loaded down with caramelized onions. It’s got bread that helps thicken it up and then it’s topped with melty cheese. Plus served to you in a little crock pot! Can it get any better?

When Scott and I were dating, I would order this soup as a starter whenever I saw it on the menu.  It wasn’t the best “date” soup to be eating but Scott never minded me slurping away or when I had cheese dangling from my chin.

He’s a keeper!

Once I started making it at home, I stopped getting it out at restaurants.  For some reason I have not made this soup in ages and recently decided that I needed to change that.

My version is not traditional at all but it gets the job done.  When I’m craving French Onion soup, this is where I turn.

Andrea’s French Onion Soup For Two

  • 1QT Beef Stock
  • 1/3C Merlot (or another dry red wine)
  • 2-3TBSP Worcestershire Sauce
  • 1 1/2 Medium Onion, sliced thin
  • 1 Large Shallot, sliced thin
  • 2C Frozen, chopped greens
  • Salt and pepper to taste
  • Large Pinch of Red Pepper Flakes
  • Dash of Sage
  • Sprinkle of Garlic Powder
  • Olive Oil for sauteeing, about 1-1 1/2 TBSP
  • 1/2 of a baguette
  • Olive Oil for baguette, about 1TBSP
  • Swiss Cheese Slices, about four thick slices
  • Chopped Parsley for garnish

Preheat oven to 400 degrees.  Slice baguette on an angle and place on a baking sheet either lined with parchment paper or silipat.  Brush slices with a bit of olive oil and place on baking sheet.  Slide baking sheet into oven and bake until the slices are toasty and golden in color.  May take between 7-10 minutes.  Keep an eye on them so they do not burn.

Heat a soup pot over medium heat and add in the olive oil.  Once that is heated, add in the onion slices and the shallot.  Stir, add in salt, pepper, and red pepper flakes.  Stir again and reduce heat to medium low.  Cook onions and shallot for about 15-20 minutes, stirring occasionally.  They will soften and start to caramelize.  Once they have reached a nice light brown color, add in the sage, garlic powder and stir.  Add in worcestershire sauce, and stir. Cook for two minutes. Add in the merlot and stir.  Let cook for about three minutes.  Then add in the beef stock, the greens, and bring up to a simmer.  Simmer the soup for about 20 minutes.

While the soup is simmering, prep your soup crocks.  Brushing the tops of them with a bit of oil will help keep the cheese from sticking too much to the outside.

Once soup has simmered, ladle soup into the soup crocks.  Add in a few of the toasted baguette slices and top with slices of swiss cheese.

Place crocks on a baking sheet and very carefully place in the oven.  Let heat just until the cheese is melty and bubbling.  About 5-10 minutes.

Very carefully remove from oven and very carefully place soup crocks on a small serving plate.  Sprinkle tops with chopped parsley and add a few more baguette slices on the side.  Serve immediately and enjoy!

It was a cold Saturday afternoon and this soup made the perfect lunch.  It was warm and very filling!

Swiss cheese isn’t traditional but it was what I had on hand at the time.  I have made this with a lovely aged provolone as well, which gives the soup a nice little sharp bite to it.  The swiss was very creamy and melted perfectly over the crock.

The addition of the greens is because I wanted this soup to have a vegetable added to it, but not something that would over power or take away from the main flavor.  The greens gave it a little more umph and a little more balance.

Parsley on top just because it makes for a nice garnish!

Have fun guys, and remember, always play with your food! Enjoy!

Double Stuff Squash

Not long ago at the grocery store, I saw some new-to-me squashes and decided to pick some up.  The one I ended up using first was a Sweet Dumpling squash.

I went back and forth about stuffing it because I wasn’t quite sure what I wanted to stuff it with, rice or…?

If I had had goat cheese on hand, I would have made a rice concoction.  Since I didn’t, I decided to go with stuffing to stuff the squash.

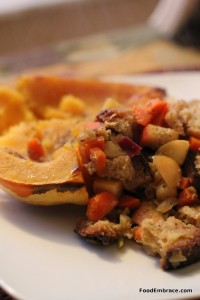
I used my apple stuffing recipe to keep things very fall-ish feeling.

I cut the squash in half and removed the seeds.  I saved those though because I can roast them!

I preheated the oven to 400.  I filled a baking dish with a little bit of water to create a steam.  I put butter on the exposed squash and sprinkled it with a little all purpose seasoning (similiar to poultry seasoning).

I roasted the squash for about 20 minutes and then flipped it over for another 15 or so.

While that roasted I made the stuffing.  When everything was done, I put the stuffing on top of the squash and called it dinner.

They are not kidding when they call this squash sweet.  Goodness!  It is crazy sweet, like I felt my teeth curl up, kind of sweet.

Scott loved it, I could only handle so much of the sweet before I tapped out.

The texture is amazingly buttery though and oh so creamy.  This would make an excellent casserole or pie.

Next time, I’m definitely going to try and make a rice mixture to go in it.  One that’s really savory and maybe a little spicy to combat all that sweetness.

Have you ever had a sweet dumpling squash before?  Do you eat much squash in the winter?

Whole Wheat Drop Biscuits (Vegan)

I love biscuits. They’re warm and they make me want to eat jam. I’m not a jam person at all but when I have a biscuit, there’s only two things that go with it, gravy or jam. Okay sometimes butter but I would rather have gravy than butter on my biscuit.

Growing up, we didn’t have traditional biscuits.  My mom made drop biscuits.  Drop biscuits are made without having to knead the dough and adding in butter.

They’re really easy to make and are a nice addition to a meal.

My mom always made them with Bisquick and in the beginning I did as well.

As I started paying more attention to ingredients and eliminating processed food, Bisquick had to go.

Since drop biscuits are so simple to make, there’s no need to use a boxed mix.

Andrea’s Whole Wheat Drop Biscuits

  • 1 1/2C White Whole Wheat Flour
  • 1/2tsp Baking Soda
  • 1/2tsp Baking Powder

A Pinch Of:

  • Salt
  • Ground Black Pepper
  • Ground Sage

Liquid:

  • 1C Unsweetened Coconut Milk

Preheat oven to 375 degrees.  Line a baking sheet with parchment or a silicone liner.  In a medium sized mixing bowl, add all dry ingredients and whisk.  Slowly add in the coconut milk and stir.  This will be a thick batter, keep mixing until all the dry mixture is incorporated in with the coconut milk.

Drop mixture by the spoonful onto the lined baking sheet.  Size is up to you, smaller biscuits will have a faster cooking time.  Larger biscuits take about 5-7 minutes.

Remove when biscuits are browned on top and a toothpick inserted comes out clean.

These don’t take long at all to cook, so keep an eye on them.

Remove from oven, allow to cool for about a minute and serve.

This is a basic biscuit, once you get the concept and technique down, feel free to play with the flavor!  I was pairing these biscuits with something that had a sage flavor to it, hence the sage in the mix.  However you are free to use what you like!

If you feel the dough is a bit dry, you can add in more coconut milk but not much, start with a tablespoon.

Naturally you can use milk (though they will not be vegan any longer) or your nondairy beverage of choice, I tend to have coconut milk on hand.

These are begging for some jam or gravy!

Do you make biscuits?

Unfried Green Tomatoes

The first time I ever heard about fried green tomatoes was because of the movie by the same name.  Before that they had not crossed my radar.  Like most things from the south, I was not exposed to them until much later in my adult life. Thank goodness for college, traveling, and cooking shows!

The idea of a fried green tomato intrigued me. The closest thing to it I did have was fried zucchini.  There was good fried zucchini and then there was horrible fried zucchini. If you’ve ever had fried zucchini, you know exactly what I’m talking about. I looked into making fried green tomatoes and realized the technique between the two was very similar.

Plus what a great way to use up unripe tomatoes! They are always in abundance come the end of summer, right?  Breaded warm tomatoes are amazing, maybe with a little cheese on top and you’ve got a really great side dish.

However I wanted to lighten them up a bit because I don’t like a lot of fried things.  I can handle a little but not too much.  Since I didn’t want to fry up the tomatoes, how could I make fried green tomatoes unfried?

The solution is simple; a metal cooling rack and a really hot oven.

Andrea’s Unfried Green Tomatoes

  • 2 Large Green Tomatoes, sliced thick
  • 1/4C Unbleached All-Purpose Flour, plus another 1/4C
  • 1/4C-1/2C Breadcrumbs (or cornmeal)
  • 1 Large egg, beaten plus some water
  • Hot sauce
  • Garlic Powder
  • Chili Powder
  • Salt and pepper

Preheat oven to 400 degrees.  Line a baking sheet with foil and place a metal cooling rack on top of that.  Spray the cooling rack with oil or nonstick spray.

Get out 3 large bowls and set up a breading station.  In one bowl goes 1/4C AP Flour.  In another bowl goes the beaten egg with water.  To the egg add your hot sauce, and mix a little more.  As much hot sauce as you like, just not so much that it makes the egg too liquidy.  In the last bowl add in the 1/4C AP flour along with breadcrumbs.  Add in seasonings to this bowl, to taste.  I like a lot of garlic powder and a touch of chili powder.  Mix.

Dip the tomato in the AP flour, then the egg mixture, then the AP flour and breadcrumb mixture.  Place on cooling rack.  Repeat until all the tomato slices have been breaded. If you need more of any of the ingredients, add along as you go.

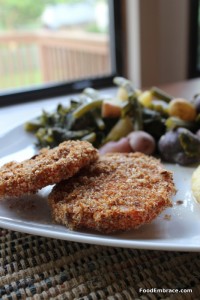
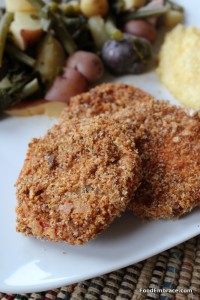
Once all the slices are breaded, spray or lightly brush the tops with olive oil.  Place in oven and allow to bake for about 10 minutes or until the breadcrumbs are nice and crispy.  Remove baking sheet from oven, plate the tomatoes and serve immediately.  Enjoy!

They come out crispy every time! They are slightly tangy from the green tomato but have a very savory note because of the seasoned egg mixture and seasoned breadcrumbs.  You can use this same method with zucchini as well.

The next time you find yourself with an abundance of green tomatoes give the unfried version a try, I think you’ll be pleased!

Homemade Bread Crumbs

Most of us are accustomed to seeing that canister of “Italian Style” breadcrumbs in the grocery store.  Most of us have probably even purchased it a time or two.

Or several times.

I’m as guilty as the next person, I used to have them on hand all the time.  Then a light bulb went off and I realized I could make my own at home with the bread that I liked.

Making breadcrumbs couldn’t be easier, you only need two things:

  • Bread
  • Food Processor

That’s it!  I like to use the end pieces of bread to make bread crumbs but you can use whatever you like.  After I slice up bread that I brought home, I usually put the end pieces in their own bag.  Unless I eat one right away!  I take the bag of end pieces and tuck them in the freezer until I’m ready or until I gather enough to make bread crumbs.

When the time comes, I pull the bread out and let them sit out in the kitchen for about a day so they get nice and stale.  Then I plop them in the food processor and pulse until I get the desired consistency for my bread crumbs.  I like them small and fine, so I pulse quite a few times.

You have the option of seasoning the breadcrumbs at that point or waiting until you use them and season them to accent the dish you are using them for.  Dried herbs like oregano and basil with some garlic powder will get you the “Italian Style” breadcrumbs that you see at the market.

When you make breadcrumbs at home you are in the driver’s seat and have control of the situation.  You know what bread was used and what it was made of. If you bought local, you know where it was made as well! Plus you know when exactly those breadcrumbs were made and you know exactly what’s in them.

This can provide great peace of mind when you are trying hard to provide healthy meals to your family and friends.

Then you can use your breadcrumbs to make fabulous dishes like “unfried green tomatoes”.  Recipe for those tomorrow!

Leftover Idea: Veggie Stuffing Bowls

What do you do when the only leftovers you have from a roast dinner are stuffing and gravy? This is the task I faced the other night when I was deciding on our dinner options.

I love stuffing and gravy, both of which are treats that we don’t have very often. I’ll be darned if I was going to let it go to waste!

But what to do with it?

That evening was a very cold and rainy night. Complete with freezing rain and then snow, all of which screamed for a big bowl of something warm and comforting.  Then the idea came to me, why not make a stuffing bowl?

I had veggies and decided to combine that with the stuffing.

I didn’t measure anything, so the following are guesstimates.

Andrea’s Veggie Stuffing Bowls

  • Leftover Stuffing
  • Leftover Gravy
  • 1 Small Head of Cauliflower, chopped up into bite size pieces
  • 1 Yellow Squash, chopped into bite size pieces
  • Leftover roast veggies if you have them
  • 1/2 TBSP Olive Oil
  • Salt and Pepper to taste
  • 1/2tsp All Purpose or Poultry Seasoning
  • 1tsp Garlic Powder

In a sautee pan, add the olive oil and heat over medium heat.  Toss in the squash and cauliflower, season with seasonings and stir.  Sautee until the squash starts to soften. Add in the leftover stuffing and heat through. Spoon into bowls and serve! Top with heated up leftover gravy.

Super easy, right? Very comforting and yummy as well! The cauliflower stays crunchy which provides a nice texture since everything else is on the softer side.  This is really just a concept idea more than an exact recipe because you can use whatever veggies you have on hand in this dish. Even adding in some beans would be a great idea and give you a little protein boost.

This also might be great done casserole style. Combine everything in a casserole dish (except the gravy) and add in a little liquid of choice.  Bake for about 1/2 and hour to let the veggies soften up, then serve!

Perfect bowl of delicious on a cold wintery evening!

Do you like leftovers? I like being able to get creative with them!

Have fun guys, and remember, always play with your food! Enjoy!