Curry Butternut Squash Mac And Cheese

Butternut Squash Mac and CheeseIt’s cold out and winter is officially here, at least in our neck of the woods.  Which means all I want is the most comfortable of comfort foods.

Mac and cheese totally hits the spot but I wanted a little something different.  A little way to toss in some veggies and make it taste slightly more indulgent.

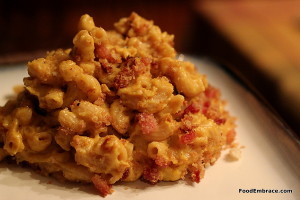
I thought if I pureed up some butternut squash and some coconut milk this might work to form a really creamy sauce.  It worked beautifully and we had a creamy cheesy dish to to eat while we snuggled on the couch in our jammies watching TV.

Andrea’s Curry Butternut Squash Mac and Cheese

To Roast:

  • 1 2 1/2 pound Butternut squash, peeled, seeded, and cut into chunks.
  • 1 Small onion, cut into chunks.
  • 1/2TBSP Olive Oil
  • 1tsp Curry Powder
  • 1tsp Garlic Powder
  • Sprinkle of salt and pepper
  • 3C Elbow Pasta

Preheat oven to 400 degrees.  Put the onion and squash in a bowl and toss with the olive oil and seasonings.  Place on a greased baking sheet and roast in the oven for about 25 minutes.

You can also cook the pasta at this time as well, 3C of elbow pasta.  Bring a large pasta pot to boil and cook pasta for 3 minutes. Don’t cook the pasta all the way, only take it to where the pasta is just beginning to soften just a bit.  It will finish cooking in the oven when the dish is fully together.  Drain pasta, put back in pasta pot, and set aside.

For the Sauce:

  • 1 Can Coconut Milk, full fat (you can use reduced fat if you like)
  • 1 1/2C Water
  • 1/2 tsp Curry Powder
  • 1/2tsp Garlic Powder
  • Pinch Red Pepper Flakes
  • Roasted squash and onion
  • 1 1/2C Shredded Jack Cheese
  • 2C Shredded Sharp Cheddar

Place the first five ingredients in a blender and blend till mixed.  Then add in the squash and onion and blend until everything is creamy and smooth.  You might need to stop along the way and use a spoon to help break things up.

In a large sauce pot, add the sauce and heat over low-medium heat.  Slowly add in the cheese until all the cheese is used and melted into the sauce.

Grease a 12×8 casserole dish. Add the sauce to the pasta in the pasta pot and stir until everything is mixed.  Then add that mixture to the casserole dish.

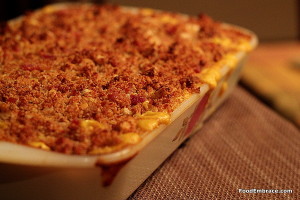
Place in the 400 degree oven and let bake for about 15 minutes.  Stir and bake for another 15 minutes.  Sprinkle the topping (see below) all over the top of the dish, give it another 5 minutes and remove from oven.

Topping:

  • 1C Breadcrumbs
  • 1/2C Grated Parmesan
  • 4 Slices of crispy cooked bacon, crumbled
  • 4TBSP Olive Oil

Mix all ingredients in a small bowl.

Allow the mac and cheese to cool for two minutes then serve and enjoy!

Butternut Squash Mac and Cheese

It’s going to seem like a lot of sauce but it will cook down once it’s in the oven.  That’s the reason for not cooking the pasta all the way.  The pasta will finish in the oven and absorb some of that sauce.

Creamy and slightly different with the curry powder.  Yeah, ok I used a lot of cheese and if you’d like to reduce that amount you can.  I used the jack for melty goodness and the cheddar to give it some bite.

The coconut milk provides the perfect base for the sauce because you don’t need to use any thickeners like flour.  You don’t even need to take the time to make a roux!  It also isn’t noticeable in the taste, no one is going to suspect you used coconut milk in this dish.

I had bacon on hand so why not?  You can omit that too if you’d like to keep it veggie friendly.

This makes a good bit of mac and cheese and is perfect for leftovers the next day.  It won’t last longer than that though so make sure to eat it up!

I was pleased how this dish turned out though I think I might tweak with it a little more and see what else I can do with it.  That’s the best part of cooking, just playing around with recipes and methods!

Have fun kids, and remember, always play with your food! Enjoy!


Pimento Cheese Macaroni Salad

Pimento Cheese Macroni SaladWe have been in the middle of a heat wave here in The Fort.  School was even cancelled today due to intense heat.

When you live in a house with no air conditioning, all you want to eat is cold stuff.

Very. Cold. Stuff.

We had some mayo on hand and I asked Scott if he wanted old school potato salad or old school macaroni salad.

He picked pasta.

Once I opened the pantry and saw some pimentos sitting there, I asked Scott if he would mind if I experimented with the macaroni salad.  He’s such a good sport and always indulges my creativity,  so I got to work right away on a new macaroni salad.

Now this isn’t macaroni salad with some pimentos added.  And it’s not pimento cheese with some pasta tossed in.

This is indeed a combo of the two and it’s delicious.

Andrea’s Pimento Cheese Macaroni Salad

  • 8oz Diced Pimentos (drained)
  • 2 1/2C Elbow Macaroni, uncooked
  • 1/4 Of A Small Red Onion, diced
  • 1 Small Green Pepper, diced
  • 2 Ribs of Celery, diced
  • 2C Shredded Sharp Cheddar (I like Tillamook)

For The Dressing:

  • 1/2C Mayo
  • 2TBSP Yellow Mustard
  • 1/4tsp Celery Salt
  • 1tsp Garlic Powder
  • 1/2tsp Onion Powder
  • 2TBSP Dill
  • 1/2tsp Sweet Smoked Paprika

In a small mixing bowl, add everything for the dressing and combine.  Set aside.  In a large glass or non-reactive mixing bowl, add in the pimentos, onion, green pepper, and celery.

Bring a large pot of water to a boil and add the macaroni.  Cook until pasta is al dente.  The goal is to cook the pasta till it’s just short of being fully cooked.  The pasta should still have a little bite and chew to it.

Once pasta is cooked, remove from heat and drain.  Then run cold water over the pasta to stop the cooking process.  Drain well and add pasta to the veggie and pimento mixture.

Toss veggies and pasta.  Add in the dressing and gently combine.  Then add in the cheese and also gently combine until everything is mixed well.  Cover and refrigerate for at least 2 hours before serving.

Pimento Cheese Macaroni SaladPlease note that for two people this makes a lot of macaroni salad and that’s exactly what I was going for.  I wanted a side dish that would last for a couple of days in the fridge.  This is the kind of dish that just gets better the longer it sits and the flavors have time to develop.

Both of us loved this version of macaroni salad and I’m not sure if I could go back to regular after this.  You’ll notice that this version isn’t drowning in mayo dressing.  If you like your macaroni salads to have more dressing, you can certainly up the mayo and seasoning amounts to suit your tastes.

The pimentos and cheese add a nice twist to the dish, providing some sweetness and some tang.  If you’re looking for something different to take to a potluck or BBQ, this is the dish for you!

Have fun guys, and remember, always play with your food!  Enjoy!

Beef with Udon Noodles

Beef with Udon Noodles I love leftovers. I know they get a bad rap but I think that just stems from people not being creative with what they have in the fridge. Leftovers have the ability to turn into something totally new. It’s all about how you view the food before you.

I was rummaging around in the freezer earlier this week when I spied a package of leftover prime rib roast chunks.  We had that for Christmas dinner.

Knowing that I needed to use that right now or it was history, I pulled the package out and started brain storming what I could make.

I asked Scott if he would rather have stir fry or an Asian inspired noodle dish.  He went with noodles and Beef with Udon Noodles was born.

It was easy to put together, the longest prep was waiting for the water to boil for the noodles.

I cooked one 8oz package of udon noodles first, drained and let those hang out while I sauteed up some chopped:

  • Carrots
  • Red Onion
  • Broccoli

The leftover prime rib was already in chunks that I then cut up into smaller pieces to make them more bite size.

I created a sauce like the one for Pad Thai.  Once the veggies were warmed through, I added in the beef and noodles.  Poured the sauce over top, tossed and served.

Beef with Udon Noodles.Not bad for some leftovers, right?  Bonus, it was a weeknight meal that came together really quickly.

See, leftovers don’t have to be boring.  Now what are you going to make with your leftovers this week?


Memorial Weekend Eats

Memorial Day weekend is coming up and it’s time to start planning all the grub that you’re going to put out! If you are in need of some ideas, I’ve got some coming your way!

Tequila Brined Chicken can easily be made on the grill.  Either go the beer can route or you can quarter it up and grill it in pieces.

Got leftover chicken? Use it to make some mayo-less chicken salad!

Want a veggie dish that can stand up next to all the potato salads and baked beans?  Bring something a little different to the table with some Asian Noodles in a Coconut Peanut Sauce.

And don’t think I forgot the dips because that would be crazy talk.

Horseradish Onion Dip better than anything that requires you to use dehydrated onions from a packet.

And just for fun:

Beer Mustard Dip, cheesy creamy goodness.

Have fun this holiday weekend! Stay safe, drink some beer, and eat a little too much!

Noodles with Coconut Peanut Sauce

Warmer weather has me thinking of make ahead meals that can be eaten chilled or at room temperature.

When it’s hot and most especially when it’s humid, I don’t want to be stuck in a hot kitchen. Then eating a hot meal on top of that? Ick.

Pasta salads and roasted veggie salads almost become a summer staple here at the HQ.

I wanted to do something a little differently and decided to play around with some Asian inspired flavors.

I first made this dish last year to bring to a potluck (theme for the potluck was PB&J and this was my contribution) and made it again for us recently to have for dinner.  It’s a keeper.

Andrea’s Noodles with Coconut Peanut Sauce

For The Sauce:

  • 1/4C Water
  • 1/4C + 1TBSP Unsweetened Coconut Milk (Either canned or from the dairy aisle)
  • 1TBSP Chili Garlic Sauce (found in the Asian section at the grocery store)
  • 1tsp Soy Sauce
  • 1 Garlic Clove
  • 1/4C All Natural Peanut Butter (no added sugar, the kind you have to stir)
  • 1TBSP Honey
  • Juice from 1/2 a Lime

For the Pasta:

  • 1/2lb Whole Wheat Spaghetti
  • 1/2 Large Cabbage, cut in thin slices
  • 1/2 Red Pepper, thinly sliced
  • 1/2 Green Pepper, thinly slice
  • 2 Large Carrots, Shredded
  • 2 Green Onions, chopped
  • Roasted peanuts, crushed for garnish

In a blender, combine all ingredients for the sauce and blend until smooth.

Heat a skillet over medium heat, and add about 1/2tsp of olive oil.  Lightly saute the peppers until they just start to soften, about 2-3 minutes.  This is just to remove some of the excess liquid they have.

In a large stock or pasta pot, fill with water and bring to a boil. Cook pasta until just shy of being al dente.  You want it to have a little bite to it.

Drain pasta and add back into pot.  Add in all the veggies and toss.

Pour sauce mixture overtop and toss until everything is well combined.

You could serve immediately or place mixture in a bowl, cover and store in fridge until you’re ready to eat.

No need to heat this up, serve chilled.

Sprinkle with crushed peanuts if desired.

This dish completely hit the spot for us!  It was light, full of veggies, and with a slightly spicy heat in the background.

On a hot day when you don’t feel like cooking much, this is the perfect recipe!

The crushed peanuts give it a little bit more texture and some crunch to the dish.  You could get a little fancy and season the peanuts before roasting them with a little oil, chili powder, and garlic powder.  Roast at 350 for about 5 minutes.

I happened to have the whole wheat spaghetti on hand so that’s what I used but soba noodles would work well here as well.

Rice noodles, like the kind used for Pad Thai might also work though you may need a little bit more sauce if you use those.  You’ll have to play around with it and see what you come up with.

I’ve also used cilantro in this dish.  A handful added into the sauce and then some for garnish.  I left it out this time because I didn’t have any but feel free to toss that in if you like!

Have fun guys, and remember, always play with your food!  Enjoy!

Haluski

Haluski is a Polish dish made with cabbage, onions, and noodles. Like most Polish dishes, it’s simple to make, hearty, and comforting.

I sadly did not get a chance to have my Grandmother’s version of this dish but like with everything she made, I’m sure it tasted amazing.

My first experience with this dish was several years ago, and came from a little food booth at a craft show.  I was visiting my mom and we attended a craft fair over in Washington, PA. There was a Polish food booth there and you know I beelined right over as quick as my legs would take me.

Haluski was on the menu and I gobbled some up!

Basically the dish is sauteed cabbage and onions in butter and then tossed with some egg noodles.  Very traditional means that the egg noodles are homemade, but now a days most people use store bought egg noodles.

I kick mine up a notch by adding in some peppers, lots of garlic, roasted potatoes, and kielbasa.  I also use whole wheat egg noodles.

Scott likes to refer to this dish as Polish In A Pot.  Clever fella.

Andrea’s Haluski, aka Polish In A Pot

  • 1 Very Large Head of Cabbage, cored and thinly sliced
  • 1 Large Onion, thinly sliced
  • 1-2 Peppers, red or green, thinly sliced
  • 1 Link of Kielbasa, chopped
  • 1, 12-15 oz Package of Whole Wheat Egg Noodles
  • 1/2lb red skinned potatoes, chopped
  • Red Pepper Flakes
  • Kosher Salt
  • Ground Black Pepper
  • Garlic Powder
  • Olive Oil, 2 TBSP, plus some for potatoes and kielbasa
  • Butter, 1/2-1TBSP

Preheat oven to 425 degrees.  Spray a large baking sheet with olive oil or nonstick spray.  Wash and cube up the potatoes. Make the cubes small, about bite sized.  Toss with some olive oil (about 1/2 TBSP) and sprinkle lightly with salt, pepper, and garlic powder.  Place in oven and bake for about 20-25 minutes until browned and crisp on the outside. Remove from oven when done.

In a very large pasta pot, bring water to boil and cook the whole wheat egg noodles according to package directions.  You want them to still have some bite to them.  Drain and set aside.

In a very large skillet, add in the olive oil, about 2 tsp and heat over medium heat.  Add in the chopped kielbasa and cook until kielbasa is crisp and browned around the edges.  Remove from skillet and set aside.

Add in 2 TBSP of olive oil and butter into the skillet and continue to heat over medium heat.  Add in the cabbage and toss till it’s coated with the oil and butter.  Satuee for about two minutes.  Add in the onions and peppers, toss. Sprinkle with seasonings, light on salt and then as much garlic, pepper, and red pepper flakes as you want. Continue to satuee and tossing until the cabbage is fully cooked through and soft.

If you feel that the bottom is getting a bit burnt or needs more moisture, add in no more than a 1/4 of either chicken or vegetable stock.  When veggies are cooked, add in the potatoes, and pasta.  Gently combine.

Serve immediately!

This makes a HUGE batch of haluski which is good because you want leftovers.  It tastes even better the next day!

You might be thinking that it seems like a lot of oil for the dish but keep in mind this noodle dish has no “sauce”.  The veggies are what help to coat the noodles and provide flavor.

I like my super peppery and super garlicky, so I use a bunch of those seasonings.  Your tastes may vary, taste as you go along to get the right flavor for you.

You can keep this dish vegetarian friendly by omitting the kielbasa, and using veggie stock if needed.

While my adjustments certainly aren’t traditional, it does help to bring the dish up to meal status and provide some extra veg love.

I think my Grandmother would have approved and for me, that’s all that matters.

Have fun guys, and remember, always play with your food! Enjoy!

Johnny Marzetti With A Twist

Recently, my friend John, contacted me and a few other local food bloggers about doing a blog post on the Johnny Marzetti dish.  We each would create our version of the dish and then all post about it on the same day.

I immediately said I was in! Then I asked what the Johnny Marzetti dish was.  Not being a Columbus, or even an Ohio native, this was completely new to me.

John directed me to this link explaining the dish.  I knew exactly what it was once I read the description.  Where I grew up, it was called Goulash.  Some folks, mostly those from the New England area, refer to it as Chop Suey.

It’s elbow pasta with ground beef in a tomato sauce.  We had this all the time growing up and it was one of the few ways I would be willing to eat ground beef.  I made it for Scott when we started dating and he fell in love with it.

I recently got back from a long weekend in NYC and the food supplies are in an emergency state here at the HQ.  I committed to the dish and needed to pull something together.  The question was, how and with what?

I decided to keep it simple by upping the flavor factor just a bit by roasting veggies and using a smoked sausage.

Andrea’s Johnny Marzetti With A Twist

  • 2 Links of Smoked Spinach and Feta Chicken Sausage, finely chopped
  • 1 Green Pepper, chunked
  • 1 Medium Onion, chunked
  • 2 Cloves Garlic
  • 2C Frozen Chopped Greens
  • 2C Whole Wheat Elbow Pasta
  • 1 28oz Can of Fire Roasted Crushed Tomatoes
  • 1 14oz Can of Diced Tomatoes with Garlic and Olive Oil
  • 1 15oz Can of Cannelline Beans, drained and rinsed. (Optional)
  • 1/2C Dry Red Wine (I used Chianti)
  • Big Pinch of Red Pepper Flakes
  • 2tsp Dried Basil
  • 2tsp Dried Oregano
  • 1tsp Italian Seasoning (I like Mrs. Dash Brand)
  • Olive Oil for Sauteeing
  • Shredded Mozeralla
  • Shredded Pecorino Romano

Preheat oven to 400 degrees.  In a large pot, fill with water and bring to a boil.  Cook pasta according to directions on box.  Cook just shy of being “done”.  Drain and set aside.

Line a baking sheet with foil and place onion, green pepper, and garlic on it.  Drizzle with a bit of olive oil, toss to coat.  Place in oven and roast for about 10 minutes until the veggies get soft and start to brown along the edges.  Remove from oven.

In a blender add in the can of crushed tomatoes along with the roasted veggies.  Blend until veggies are completely broken down and pureed in with the sauce.

In a sautee pan, drizzle in a little olive oil and heat over medium heat. Add in the sausage and sautee until the sausage starts to crisp up a bit.  Add in the red pepper flakes and then the red wine.  Add in the wine slowly and carefully.   Stir and let the wine deglaze the bottom of the pan.  Cook for about 3 minutes.  Add in the blended tomato sauce and the can of diced tomatoes.  Add in the frozen chopped greens and the beans. Then stir and bring to a simmer.  Allow to simmer for about 5-10 minutes.

When the flavors have come together, turn off the heat and slowly add in the elbow pasta.  Gently combine and top with shredded cheese.  How much is up to you.

Place pan in oven (remember it’s still heating from roasting the veggies) just long enough for the cheese to melt and get gooey.  About 5-10 minutes.

Remove from oven using pot holders, serve and enjoy!

As I mentioned, just getting home from a trip, the ingredients were slim pickings around here.  Thankfully I had a few staple items and things in the freezer that I could use for this dish.

I knew right away that I would be using the smoked sausage and I decided to play off of that flavor.  By roasting the veggies first for the sauce and using fire roasted tomatoes as the base, I think this really complimented the smoked sausage flavor.

This made a TON of food.  Plenty for leftovers or for a large party.  This dish freezes very well.

The beans got lost in the dish, so they are completely optional.  If I made this again, I think I would rather use more sausage in place of the beans.

Columbus Locals, I purchased the sausage at The Anderson’s over behind Sawmill.  They have great locally sourced sausages.

Chopped frozen greens give the dish some color while also bumping up the veggie intake.

Not a bad dish for trying to scramble for ingredients! The entire time I was making it, Scott kept commenting on how good it smelled.  He had two full servings so I think he was pleased.

This was my Johnny Marzetti dish with a twist!

Go and check out the other takes on this Ohio dish!

Rachel’s Homegrown Version

Debra’s Texan Version

John’s Classic Version

Have you had Johnny Marzetti or Goulash style dish before?

Have fun guys, and remember, always play with your food! Enjoy!


Spaghetti and Eggs

When one arrives back home from a trip away, I fully believe that a warm and comforting meal is a must. Whatever food is your favorite, whatever dinner makes you content, that’s what you should be eating.

When Scott got back home from being gone for a week, he said he was ready to eat some good food.  He said he missed my cooking and couldn’t wait to sit down to a lovely dinner.

Is he fab or what?

And because of my belief mentioned above, I knew he needed something comforting.  Scott has a lot of comfort foods and two of them happen to be pasta and fried eggs.  I was going back and forth about what to make him.

Breakfast?  Or a pasta dish?

Then it occured to me, why not combine them?

The measurements aren’t exact because this is a recipe that can easily be adjusted to serve one or 20.

Andrea’s Spaghetti and Eggs

  • Thin Whole Wheat Spaghetti, enough for two people
  • Eggs
  • 1/2 A Medium Onion, chopped
  • 1 Large Tomato, chopped (do not seed, keep the insides)
  • About 1 Large Bunch of Finely Chopped Greens of Your Choice (I used Kale and Collards)
  • 2 Cloves of Garlic, grated (or finely chopped)
  • 1/2 Dry White Wine
  • Olive Oil for sauteeing

Bring a large pot of water to a boil and cook pasta till just shy of being done.  Drain, reserving some pasta water, about 1/2C and set pasta aside.

In a sautee pan, heat oil over medium high heat and add in the onions.  Sautee for just about two minutes and then add in the greens.  Cook until the greens have cooked down, now add in the tomato and garlic. Sautee for about a minute.  Add in the white wine and simmer for about 2 minutes.  Add in just a touch of the pasta water, maybe 2 TBSP.  Simmer for another 2 minutes.  Add in the pasta, stir and reduce heat to low.

In a small frying pan, add in some olive oil, maybe 2 tsp, just a touch.  Heat over medium heat and fry up the eggs to your preferred done-ness.  Don’t forget to crack each egg in a small bowl first just to be on the safe side.

Plate up pasta, top with a fried egg or two, sprinkle with parm, drizzle on a little bit more of the pasta sauce and serve!

Would you have thought that such simple ingredients would make such a gorgeous dish?

What I love about this meal is that it really doesn’t take long to make at all.  Waiting for the water to boil for the pasta is what takes the most time, everything else is really quick.

I didn’t seed the tomato because I want that juice to help create a “sauce” for the pasta.  It’s a very light pasta dish without a heavy sauce.  I did this on purpose because I wanted the egg to shine. And if you’re like Scott, who enjoys runny eggs, that will help coat and “sauce” up the pasta.

I listed eggs with no amount because that’s up to you.  I ate mine with one egg while Scott had his with two eggs.  Do what you like and it’ll work out.

This dish, uses few ingredients and all of them are budget friendly.  You certainly don’t have to use wine but can use stock of your choice or a small can of diced tomatoes would work just as well.

Most grocery stores now carry chopped frozen greens, if you can’t find any fresh.  I love frozen chopped greens! While I do use fresh when I can, having the frozen on hand is a must for me now.

Scott loved this dish, which was good because I created it specifically with him in mind!  It was part of the “Welcome Home” week I planned out for him.

Now I have a dish in my recipe box that is quick to put together and very filling!

Have fun guys, and remember, always play with your food! Enjoy!

Skillet Burger Mac

Both Scott and I grew up with those meals that had a big hand as a mascot and wanted to “help” you out with dinner.  You know what I’m talking about. The meal ended up looking like runny cat vomit on a plate.

There’s a great image for ya!

But let’s be serious, that is totally true. It was also yummy once you stopped looking at it too closely.  In fact it was one of the few ways I would actually eat beef growing up.  I wasn’t much of a fan and ground beef was yucksville as far as I was concerned.

But add in some crap pasta and cheap powder preservative laden cheese sauce and I was all over it!

Years ago, when I started cooking full time for Scott and I, most boxed items went out the window. Once I learned the technique for making a basic cheese sauce, making a homemade version of “helper” anything became easy peasy.

Now we have an upscale, much healthier version that I bust out from time to time.  Or when Scott asks.

Andrea’s Skillet Burger Mac

  • 1lb Ground Sirloin (or ground meat of your choice)
  • 3C Whole Wheat Elbows
  • 1/2 Large Onion Chopped
  • 1 Green Pepper, 1 Red Pepper, chopped
  • 2C Shredded Carrot
  • 4 Huge handfuls of spinach
  • 4 TBSP White Whole Wheat Flour
  • 1/2C Unsweetened SO Delicious Coconut Milk
  • 1 1/2C Chicken Stock
  • 2TBSP Worcestershire Sauce
  • Salt and Pepper to taste
  • Big Pinch of Red Pepper Flakes
  • 2tsp Garlic Powder
  • 2tsp Chili Powder
  • 1 1/2C Shredded Cheddar
  • Olive Oil for cooking

In a large pot, bring water to a boil and add in the pasta.  Cook until just half way down, drain and set aside.  In a medium sized, high sided skillet, add in olive oil, about 1/2TBSP and heat over medium heat.  Add in the ground beef and cook until done.  As it’s cooking sprinkle with a touch of salt, pepper, and garlic powder.  When it is done cooking, remove by putting in a bowl lined with some papertowels.  If the skillet has a bunch of oil in it, drain in a glass heat proof container.  Put back on medium heat and add in some fresh olive oil, about a TBSP.  Add in the onions, peppers, and carrots.  Stir and add in the seasonings, salt, pepper, red pepper flakes, garlic powder, and chili powder.  Cook until the onions and peppers soften.  Add in the worcestershire sauce and stir.  Add the ground meat back into the skillet.  Sprinkle in the flour and combine until everything is coated.  Allow to cook for about 2 minutes then add in the chicken stock, slowly.  Stir and add in the coconut milk.  Bring this mixture to a simmer and add in the spinach.  Stir until the spinach is wilted, then add in the cheese.  Stir until the cheese is melted.  Add in the pasta and combine.  Remove from heat, dish into bowls and serve!

I ran out of elbows so I had to improvise with some shells! Still got the job done though.  This also makes a lot resulting in plenty of leftovers for the next day or you can freeze and reheat for later.

The dish isn’t heavy or overly sauced like the old school inspiration nor is it a very heavy dish.  You would think with pasta, beef, and cheese it would feel and sit a little hard in the stomach but I promise it’s a light pasta dish.

You can use whatever ground meat you like, we have access to some great local beef so that’s what I stuck with to keep it more traditional.

Feel free to use milk or another nondairy liquid of your choice in place of the coconut milk.  Totally up to you! You can play around with the veggies too, maybe you want some corn or even some asparagus tossed in. Your call!

Perfect one pot dinner that takes a short time to make and pleases just about everyone!

Have fun guys, and remember, always play with your food! Enjoy!

2011 Super Bowl Party Foods

Need some party food ideas for your Super Bowl Party?  OHC has you covered!

Beer and Bacon Mac ‘N Cheese will definitely be a crowd pleaser!

Spicy Chex Mix is easy to make and even quicker to replenish when the snack attack hits.

Pasta and Lentil salad to get some veggies in on Game Day!

Quick coleslaw, great as a side or as a topping to some pulled pork or a burger!

This Chipotle Glaze would go lovely on some wings!

Chipotle not your style? Try these Garlic Teriykai Wings instead.

Cheddar Beer Bread for carbs so you can party all day long, cheese for staying power!

Just for the Steeler fans, you better get some chipped ham right quick and get a crockpot of Ham BBQ going to make sandwiches.  Have some Iron City on ice too while you’re at it!

GO STEELERS!