Pepperoni Stromboli Roll

pepperoni stromboli rollSince I’m still not done eating things from my childhood, I busted out an oldie but goodie a couple weekends ago.

Pepperoni rolls were common and super popular where I grew up.  I don’t really see them out anywhere else and that kind of bums me out because they are so delicious.

Basically it’s pizza dough with pepperoni slices and then rolled up and baked.  My mom used to make a huge one layered with lots of sandwich pepperoni and shredded cheese.

It was awesome and it was even better cold the next day.  When I moved in with Scott, it was something I would make for us on occasion.  Except I kicked mine up a little bit more and added sauce and some toppings.  This makes it extra gooey and delicious.

We haven’t had one in ages and when we were stuck inside one snowy Saturday, it seemed like a great time to bust it out.

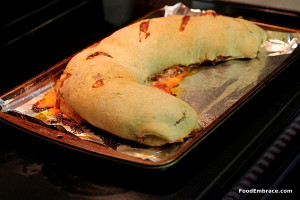
I call it a stromboli roll because it has sauce and instead of just folded over dough, I roll it up like a log.

There’s no measurements because you use as much as you want in terms of toppings and cheese.  This is what I used when I made it:

Andrea’s Pepperoni Stromboli Roll

  • Pizza Crust
  • Pizza Sauce, just a little bit
  • Shredded Mozzarella
  • Sandwich pepperoni
  • Chipped (shaved) Ham
  • Olive Oil

Preheat oven to 400 degrees.  Grease or line a baking sheet.  Roll out the dough until you get a rectangle-ish shape about 1/4 inch in thickness.

First layer is sauce, then sprinkle on some cheese.  Add in the pepperoni and ham.  Sprinkle on some more cheese and then start to roll up the dough.  Shape into a log and gently place on the baking sheet.  Brush the top with olive oil and cut a few slits in the top to allow steam to escape.

Bake for about 20 minutes.  If you used a lot of toppings, then go a little bit longer possibly 30 minutes.

Remove from oven and let sit for about 5 minutes.  Slice and serve!

pepperoni stromboli roll


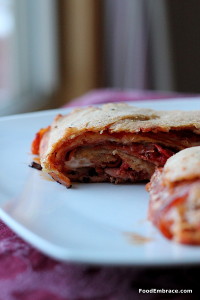
It’s gooey and delicious. You have to eat it with a fork and knife. In other words, it’s awesome.

I’ve done onions, peppers, sausage, and mushrooms before as well.  If you do any veggies, I suggest giving them a quick sauté first to help remove some of their water content.  Otherwise you’ll end up with a really soggy roll and nobody wants that.

Thankfully we have leftovers stored away for another weekend dinner!

Have fun guys, and remember, always play with your food! Enjoy!


Keep It Simple: Zucchini and Tomato Saute

Zucchini and tomatoes are my two favorite summer time veggies. Well corn is up there too but zucchini and tomatoes take top spots.

They also go well together and I use them to make a simple side dish that takes only minutes to prepare.

I eat this often at lunch and sometimes again at dinner.  I know that summer and it’s bounty only stick around for a short time so I try to get in as much as I can.

Especially tomatoes!  A fresh summer tomato is better than candy.

I used little wee cherry tomatoes but you can certainly use whatever tomato you have on hand, just chop it up!

Measurements are guesstimates because amounts can be adjusted to suit your tastes and what you have on hand.

Andrea’s Zucchini and Tomato Saute

  • 1 Medium Zucchini, chopped into bite-sized peices
  • 1/2 Pint of Cherry Tomatoes, halved OR 1 Large Tomato, chopped
  • 2 tsp Olive Oil
  • Salt
  • Pepper
  • Red Pepper Flakes
  • Italian Seasoning
  • Grated Parmesan

In a medium sized skillet heat olive oil over medium heat.  Add in zucchini and seasonings. Saute until the zucchini starts to get tender, then add in the tomato. Saute for about two minutes until the tomato is just heated through.

Remove from heat and serve. Sprinkle each portion with the parmesan.

Remember the seasonings are up to you!  You can make a lot or a little.  It’s also great cold and spooned onto some lovely bread.  If you want, you can even add a little chopped onion in there for some kick.

A simple and quick way to use up some of that produce leftover from summer’s harvest.

Keep It Simple: Kale Salad with Walnuts and Parmesan

I love having salads at lunch but sometimes I need to mix things up a little bit to keep from getting bored.

Salads are great but can get a little stale after a while.

Since I love greens and they have been plentiful at the farmer’s market lately, I decided to use some kale to make a simple salad for lunch.

I don’t have exact measurements for the dressing because the amount is dependent on how much kale you have and how much dressing you prefer.

We lean more towards “lightly dressed” salads verses heavier dressed salads so the amount I used for this dressing wasn’t much.  The amounts listed below are guesstimations.

Andrea’s Kale Salad with Walnuts and Parmesan 

  • 1 Big Bunch of Kale, stemmed and ripped into bite-sized peices
  • Walnuts
  • Grated Parmesan

For the Dressing:

  • 1/4 C Balsamic Vinegar
  • 1 TBSP Whole Grain Mustard
  • 1 TBSP Maple Syrup
  • 1 TBSP Olive Oil
  • Salt and pepper to taste

In a large deep bowl add the kale.  Mix the dressing ingredients together and pour over the kale.  Toss to coat, cover, and place in fridge for at least an hour.

Portion out into bowls, sprinkle with crushed walnuts and grated parmesan.  Serve and enjoy!

It’s best to let the kale sit in the dressing for a good bit of time.  The vinegar helps break down the kale (which can be quite chewy when raw) and remove some of the bitterness from the leaves.

I tend to put this salad together early in the morning and then when lunchtime rolls around all I have to do is portion it out!  It’s ready to go when we are ready to eat.

It’s even better as leftovers!

You certainly can up the protein by adding in some salmon, an egg, or even leftovers from a previous meal.  The kale provides a nice base for whatever you would like to add to it.  A favorite addition here is salmon and white beans.

Remember meals don’t have to be complicated or time consuming in order to be satisfying!

Peach and Goat Cheese Ice Cream Sandwiches

I’m not quite sure how I got the notion but the idea to create goat cheese cookies popped into my head and I could not leave it be.

I started dreaming of a lovely cookie that was sort of like a shortbread and sort of like a sugar cookie.

But with goat cheese.

Once the idea was there it was not to be ignored and I soon found myself in the kitchen making some cookies.

My idea worked and I was rewarded with golden cookies that are perfect with tea and as a late night little munch.

Considering I’m not a huge baker, I’m considering this a triumph!

Earlier this summer, I was contacted by Yagoot Frozen Yogurt Company asking if I would be willing to create a recipe using their yogurt.  Yagoot is based out of Cincinnati and also has a store in the Easton Shopping Center near Columbus, OH.

I knew right away that I wanted to make ice cream sandwich cookies using my new goat cheese cookie recipe.  I headed over to Yagoot in Easton to pick up some pints of frozen yogurt.  I spied the Summer Peach flavor and immediately knew I would be using that.

Andrea’s Goat Cheese Cookies

  • 4oz of Goat Cheese, room temperature
  • 4TBSP Butter, at room temperature
  • 1 Egg
  • 3tsp Vanilla Extract
  • 1C White Whole Wheat Flour
  • 1/2C Unbleached All-Purpose Flour
  • 1/3C Organic Cane Sugar
  • 1tsp Baking Powder

In your stand mixer bowl, add in the goat cheese, butter, egg, sugar, and vanilla.  Beat on low until everything is smooth and creamy.

In a medium size mixing bowl, add in the flours and baking powder.  Whisk until everything is blended and airy.

Put the stand mixer on low and slowly add in the flour mixture until everything is combined.  The dough should be a little stiff.

On a lightly floured surface, place dough and start to roll out into a log shape.  Roll it till it’s about a foot long and 1/2 inch in diameter.

Wrap in plastic wrap and place in the fridge for about 2 hours.

Preheat oven to 350 and line two baking sheets with parchement or silpat.  Slice the log into slices about a 1/4 of an inch thick.  Place on cookie sheet and bake for about 10 minutes or until the cookies start to crisp up and brown on the edges.

If you can only fit one cookie sheet in your oven, place the remaining cookies back in the fridge until you are ready to slice and bake.

Allow about 4 minutes to cool and then serve.


Ice Cream Mixture:

  • 1/2 pint of Yagoot’s Peach Flavored Frozen Yogurt
  • 2oz of Plain Goat Cheese at room temperature
  • 1/2 tsp Ground Cinnamon
  • 1/2 tsp Vanilla Extract
  • 1/2 TBSP Organic Cane Sugar

With a hand mixer or stand mixer, place all ingredients in a bowl and mix until the goat cheese is combined.

Sometimes goat cheese has a tendency to break down into little balls of goat cheese when it combines with something cool.  This is okay!


Assembling the Ice Cream Sandwiches:

  • Cookie Sheet
  • Parchment Paper to line the cookie sheet

Scoop a little bit of the frozen yogurt onto a cookie and top with another cookie.  Gently press down and place the ice cream sandwich on the cookie sheet.

Repeat until all the frozen yogurt is used.  This will make between 8-10 sandwiches depending on how much frozen yogurt you use for each sandwich.

Work quickly because the frozen yogurt melts fast!

Once you’re finished, place the cookie sheet with the sandwiches in a freezer and freeze for at least two hours giving the frozen yogurt a chance to set back up.

Serve as a cool treat or a sweet ending to a summer meal!


The goat cheese freezes a bit when the cookies go back in the freezer and so you get little crunchy tangy bites of goat cheese while eating the ice cream sandwiches.

A great little summer treat with a twist!

Yagoot is graciously giving away a $20 gift card to readers of Food Embrace!  Keep in mind Yagoot is only available in Columbus and Cincinnati right now.  If you’d like to enter to win the gift card all you have to do is:

Comment, telling me what flavor if yogurt you’d like to try!

Contest ends on Friday, August 24th, at 5pm EST.  I’ll contact the winner by email so make sure you leave a valid email address in the comment!

WINNER: Random Number Generator picked Comment Number 3! The winner is Joe!  Thanks for commenting Joe!

Have fun guys, and remember, always play with your food!  Enjoy!


Disclaimer: Yagoot Yogurt contacted me and asked me to create a recipe using their product. They supplied me with a gift cards in order to purchase the product and for supplies needed to create the recipe.

Potato and Parsnip Parmesan Mash

If you know me then you know my deep love for mash potatoes. Of course I couldn’t have buttermilk in the house and not make some!

I’m pretty sure that is against the Homecooking Law and I didn’t want the council to come after me.

I decided to spiff things up a bit by adding in some parsnips that needed used up along with some cheese and lemon.

Andrea’s Potato and Parsnip Parmesan Mash

  • 1 Very Large Parsnip (or 2 med sized), peeled and chunked
  • 1/2lb Golden or Russet Potatoes (about 4 med sized), peeled and chunked
  • 2TBSP Butter
  • 1/4-1/3C Buttermilk (homemade, or noncultured)
  • 1/2TBSP Lemon Zest
  • 1/4C-1/3C Grated Parmesan Cheese
  • Salt and ground black pepper

Place the potatoes and parsnip in a large pot of cold water.  Bring to a boil, reduce to a simmer and cook until the parsnip is tender.  About 15 minutes.

Drain veggies, and place back in the hot pot.  Gently stir just to remove any extra liquid.  Place potatoes and parsnips in your stand mixer bowl.

Fit stand mixer with the paddle attachement.

Add in a large pinch of salt, and a generous amount of black pepper.

Add in the butter and the buttermilk, starting with 1/4C of buttermilk.

Mix until everything is combined.  Add in more buttermilk if needed.  At this point add in the lemon zest and the parmesan cheese.  Mix until everything is well combined.

Taste and adjust seasoning if needed.  Serve warm!

Creamy and full of cheesy goodness!  Parsnips have a touch of a lemon flavor to me which is what inspired me to add in the zest.  Next time I’m going to add in a little bit more zest for a little more umph.

Great the first time around and even better as leftovers.  Adding an egg and creating potato pancakes out of the leftovers would taste lovely!

If you don’t have a stand mixer, a large bowl and hand mixer will work just fine.

Have fun guys, and remember, always play with your food!  Enjoy!

Buttermilk Cheddar Grits With Greens

I have fallen in love with grits. Hard.

I used to make us polenta all the time but skipped over the grits.  One fateful day the store was out of polenta so I bought grits instead.

No biggie right, they’re basically the same?

Oh well. Lesson learned because they are not the same (though cooking them is the same), grits are creamier and smoother.  Polenta can be a little rough and grainy, and grits are having none of that.

While I don’t dislike polenta, I’m pretty sure that I’m going to be Team Grits from here on out.

Andrea’s Buttermilk Cheddar Grits with Greens

  • 1 1/2C Chicken Stock
  • 1/2C Grits
  • 1TBSP Butter
  • 1/2C Buttermilk (homemade, or uncultured buttermilk)
  • 1/2C Shredded Cheddar (get the good stuff)
  • 3C Chopped Kale (regular or baby, you pick)
  • Salt, pepper, olive oil for sauteeing (about 1/2TBSP)

In a medium sized sauce pot, add in the stock and bring to a boil.  Add in the grits, reduce heat to medium and whisk until the grits start to thicken up.  About 5 minutes.  Turn off heat, put a lid on the pot and set aside.

In a sautee pan, add in the olive oil and heat over medium heat.  Add in the greens, sprinkle with salt and pepper, and sautee until the greens are wilted and cooked through.  Turn off heat.

Back to the grits, heat over low and add in the butter, buttermilk, and cheese.  Stir until everything is combined.  Add in the greens and stir again.  Heat over low for about 5 minutes to let everything come together.

Turn off heat and serve immediately.

 I highly recommend serving this with a fried egg (or two) on top.  That combo is my new favorite breakfast item.  Also my new favorite dinner item.

The greens give a nice bit of texture and bite to the otherwise super creamy grits.  The cheddar gives it a kick while the buttermilk sweetens and takes some of the bitter out of the kale.

Grits won’t ever be the same once you add in some greens.

If you’re feeding more than two people or if you really love grits, I would up the amounts of everything.

1C of grits with 3 C of stock.  Adjust greens and cheese to your tastes.

Have fun guys and remember, always play with your food!  Enjoy!

Memorial Weekend Eats

Memorial Day weekend is coming up and it’s time to start planning all the grub that you’re going to put out! If you are in need of some ideas, I’ve got some coming your way!

Tequila Brined Chicken can easily be made on the grill.  Either go the beer can route or you can quarter it up and grill it in pieces.

Got leftover chicken? Use it to make some mayo-less chicken salad!

Want a veggie dish that can stand up next to all the potato salads and baked beans?  Bring something a little different to the table with some Asian Noodles in a Coconut Peanut Sauce.

And don’t think I forgot the dips because that would be crazy talk.

Horseradish Onion Dip better than anything that requires you to use dehydrated onions from a packet.

And just for fun:

Beer Mustard Dip, cheesy creamy goodness.

Have fun this holiday weekend! Stay safe, drink some beer, and eat a little too much!

Breakfast Casserole

This is one of those dishes that Scott and I have on occasion, usually around a holiday.

I’m not sure why, I think it’s because we like it so much we want to keep it special.

Our most favorite time to have it is on Christmas morning.  This casserole gets prepped the night before and baked the next morning.

I put it in the oven as we sit down with our first mugs of coffee and dive into our stockings.  While we open gifts the aroma of the casserole floats in from the kitchen increasing the excitement in the air and causing our bellies to rumble in anticipation.

It’s easy to make, the hardest part is waiting the hour or so for it to bake!

Andrea’s Breakfast Casserole

  • 1lb Ground Breakfast Sausage, cooked and drained
  • 6 Eggs
  • 1 3/4C Unsweetened Coconut Milk (From the dairy aisle, not the can)
  • 6C Cubed Bread Pieces or About 1/2lb loaf of bread cubed up
  • 1tsp Dry Mustard
  • Salt and Pepper to taste
  • 2C Shredded Sharp Cheddar Cheese, plus extra for a topping

In a large mixing bowl add in the bread cubes and the cooked sausage.  In a smaller mixing bowl, combine eggs, coconut milk, dry mustard, salt, and pepper.  Whisk until the eggs are well incorporated into the coconut milk.

Pour egg mixture over top of the bread and sausage, add in the two cups of cheese and combine until the bread is coated with the egg mixture.

In a greased baking dish, I used a 9×13 (or 2 1/2 QT) dish, pour in the bread and egg mixture.  Make sure it’s evened out, cover with foil and place in fridge over night.

Preheat oven to 375, poke a few holes in the foil, and place baking dish in the oven.  Bake covered for about 40 minutes.  Remove foil and bake uncovered for about another 30 minutes or until the center is set and cooked through.  Sprinkle with a bit more cheese if desired, till it’s melted.

Allow to cool for 5 minutes before serving.  Serve and enjoy!

We love this casserole and it provides plenty of leftovers for the next few days.  It’s also a great dish to make if you’re having guests over.  It serves a lot and pleases just about everybody.

I like to use a whole grain bread in this dish which I think makes it a bit more heartier and filling.  You can use whatever kind of bread you enjoy.

You can also use milk or another nondairy milk of your choice (though I do recommend unsweetened) if you don’t like or don’t want to use coconut milk.

Have fun guys and remember, always play with your food!  Enjoy!

Monster Veggie Burgers

I adore veggie burgers and my love affair with them started a few years ago.  They are dense with crispy caramelized bits from being heated up in a skillet.  Sometimes they are loaded down with grains and they are always packed with protein.

They are also difficult to make.  I tried and tried but no matter what, I couldn’t find a combo that would hold together nicely.  It was too mushy and fell apart.

One day I was watching Guy make some veggie burgers (Yes I watch his show. Yes I think he’s fab. I fully embrace that with no shame.) and he used oats as a binder.

Well now.  I hadn’t done that before! I’ve also seen other versions of burgers have nuts and other grains added in so I decided to get back to experimenting and see what I could come up with.  I stumbled upon a combo that works for me and is now my favorite veggie burger.

Andrea’s Monster Veggie Burgers

  • 1 15oz Can of Chickpeas, drained and rinsed
  • 1/2C Walnuts
  • 1/4C Pumpkin Seeds (optional)
  • 1C Oats
  • 3 Cloves of Garlic
  • 1 Large Green Pepper, chunked
  • 1/2 Large Red Onion, chunked
  • 1 Jalapeno, sliced in half
  • 2tsp Garlic Powder
  • 2tsp Chili Powder
  • Big Pinch of Red Pepper Flakes
  • Pinch of salt and pepper
  • 1/2TBSP of Olive Oil + extra for a quick brush

Preheat oven to 400 degrees and grease a baking sheet with some nonstick spray or olive oil.  Toss the garlic cloves, red onion, and green pepper with the 1/2TBSP of olive oil and place on baking sheet.  Roast in oven for about 10 minutes or until the veggies start to soften up.  Remove from oven.

In a food processor, place the beans, oats, walnuts, and pumpkin seeds and process for a couple of pulses.  Add in the seasonings, and the roasted veggies.  Pulse until you get  a smooth consistency.

Pour mixture into a bowl and start to form patties with it.  This should make four HUGE patties or six medium sized patties.  Place on a platter or plate, cover with plastic wrap and place in fridge.  Allow the patties to set up for at least 2 hours.

When you’re ready to cook them, preheat oven to 400 degrees and spray a baking sheet with nonstick spray or oil.  Place patties on sheet and brush with a bit of olive oil on top.  Bake for about 15 minutes, till the tops are crisp and browned.

Serve immediately and enjoy!

I call these “Monster Burgers” because they are huge.  I used chickpeas because I think they provide a better texture to the burger and also give it more umph.  These are still soft and will smash down as you eat them but with the chickpeas they do hold their shape a little better.

The walnuts and seeds also provide texture and if you want to leave those out, you can.  The burger amounts will be smaller in size and not quite as dense.

You can bake them like I suggested or you can cook these in a skillet.  Just heat some oil over medium heat and cook the burgers about 4 minutes on each side.

We top ours with sharp cheddar, caramelized onions and green peppers, and BBQ sauce.

Yum yum!

Have fun guys, and remember, always play with your food! Enjoy!

Leftover Idea: Rice Stuffed Zucchini

The other night Scott and I had some rice with dinner and we ended up with some leftovers.

I wanted to use the leftovers for dinner the following evening but there wasn’t enough for each of us to have a regular portion size.  I wasn’t about to throw it away and started searching my fridge and pantry trying to decide how to use it.

That’s when I saw the big zucchini I had just purchased at the store and knew I could combine the two.  This was a super easy dish put together and ready to go in about 20 minutes.

Andrea’s Rice Stuffed Zucchini

  • Leftover rice
  • 1 Large Zucchini, cut in half lengthwise
  • 1/2C Shredded Cheddar Cheese
  • Salt and Pepper

Preheat oven to 400 degrees and line a baking sheet with foil.  Spray with oil or nonstick spray.  Scoop out the insides of the zucchini and discard.  The zucchini half should look hollow and be able to support a stuffing.

In a medium sized mixing bowl combine the rice with the cheese and a little salt and pepper (how much is up to your preference).  Place zucchini halves on baking sheet and begin to stuff them with the rice mixture.  They will be overflowing with mixture.

Place in oven and heat for about 15 minutes or until the zucchini starts to soften.

Remove from oven and serve immediately.

The leftover rice was already seasoned from the night before, I cooked it in chicken stock with a little butter and saffron.  I also added in a touch of soy sauce and green onions at the end.  This is why I didn’t need much in the way of seasoning for making the leftover dish.

I also discarded the insides of the zucchini because it was mostly large seeds.  If you would prefer to use the filling, go ahead and add it to the rice mixture.

The top of the rice got a little crispy as these baked in the oven which was a texture I really liked.  If this isn’t your cup of tea, add about 1TBSP of olive oil to the rice mixture before stuffing the zucchini with it.

I LOVED this side dish and could not get enough of it! You know those seasoned rice packets that are flavored like “broccoli and cheese” and are horrible for you?  This tasted exactly like that!  But you know, homemade and loads healthier.

This is on our list to make again soon!

Have fun guys, and remember, always play with your food! Enjoy!