Spring Clean Eats, Day 9: On The Run

Fried eggs, avocado, mandarin orangeOne of the struggles with this challenge so far has been breakfast.  I’m trying to keep it different because I do get tired of the same thing all the time. But with semi-sorta-kinda-Paleo that has been the biggest hurdle for me.

If you have any fun breakfasts that are protein or veggie based, please share!

Yesterday’s breakfast was two eggs fried in ghee, topped with half a sliced avocado and hot sauce (Choloula, no sugar).  Also with a side of mandarin oranges.

We are still having milk with our coffee in the mornings.  I forgot to decrease the amount for this week’s delivery so we are trying to get through it.

I’m in the process of deciding to give it up or stick with it.  Still not sure!  The biggest draw is that we get it delivered fresh from a local dairy which is very convenient.

Exercise:

Running!  Ahhhh and it was glorious!  I probably could have pushed through the whole run but my legs started getting tired.  Mostly my quads so I had one walk break.  I wasn’t too surprised, they have been getting fatigued during kickboxing as well.

Lunch meetings and afternoon dog walks meant it was another Linner day.  This one was fantastic and totally hit the spot!

Taco salad

Taco salad!

Baby greens and chopped romaine topped with ground beef, shredded carrots, and a little cheddar.  I also made pico de gallo (tomatoes, jalapeno, onion, cilantro and lime juice) and some guacamole on the side.  I topped my salad with the pico for “dressing”.

The couch and I had a date yesterday which is why this post is late.  I really needed a couch and Law and Order moment to zen out.  I have a feeling that I’m going to need more today.  That definitely wasn’t enough of a recharge!

Spring Clean Eats: Day 4, Management

Mugs of chicken brothIn yesterday’s post we left off with my need for a snack. I looked around my kitchen but nothing was Spring Clean Eats friendly. It was also later evening and my desire to cook something or even heat something up was non-existent.

Then I remembered that I just made a fresh batch of chicken broth! So Scott and I sipped big mugs of hot broth while we watched Helix. That show is batshit crazy but I have a very strong need to find out how it ends.

After a bit I headed off to bed to read for a little while.  Give me a moment while I shout that, I slept great last night!  I’ve been sleeping like crapola for a couple of years at this point (thanks shit diet and too much beer!) that a great night sleep is totally worth celebrating!  I would have run first thing but we had an early morning appointment so I needed to get to breakfast quickly and get some work done first.

Plus I was hungry!

Scrambled eggs, fresh from a friend’s backyard.  Hooray, backyard chickens!Scrambled Eggs, Mandarin Oranges

With a side of the norm, mandarin oranges.

We were running low on veggies, most especially greens, so after our appointment today, I headed to the store to get supplies our fridge.  I found some paleo “snacks” that I’m pretty excited to try.  They should be making an appearance this weekend!

I was starving and it was way past lunch time, so I picked up some sushi for us to have when I got back home.  Scott had spicy tuna and I just had a veggie roll.

Sushi

It had carrots, avocado, and cucumber with white rice.  I also had two chicken wings (from home) on the side for the protein portion.  Unpictured, is a half apple that I also decided to eat after I realized I was still hungry.

I picked up two portions of sushi but only ate one.  I wasn’t feeling the sushi really.  I also noticed that, for me personally,  it didn’t make for a very great lunch.  It didn’t fill me up or leave me satisfied at all.  I also had the mid-afternoon crash afterwards.  I haven’t experienced that in some time so that surprised me.  Was it the rice? Do I need a much better veg to protein ratio?  Not sure but I’ll keep experimenting and see what works.

I think that I would prefer salads with protein added (like chicken, eggs, or fish) than the combo I had today.

I didn’t get very much water in before lunch either so I feel like that could have played a large part as well.

Mental note, get more water in before lunch! And make sure you eat a proper lunch!

All I kept thinking about after lunch was dinner!

Burger and fries

Burgers and fries, oh yeah!

The burgers were seasoned with salt, pepper, onion powder, and garlic powder.  I cooked them in my cast iron skillet in some ghee.  I prefer to cook burgers and steaks in lard, but I currently need to make some more.  Ghee works just as well!

Topped with tomato, onion, and wrapped up in lettuce.  Oh I also put mayo on mine!

The fries were seasoned with:

  • Olive Oil
  • Salt
  • Garlic Powder
  • Chili Powder

And roasted in the oven at 425 for about 20-25 minutes.

I made some Fry Sauce for dipping.  I found some Paleo ketchup at the store today, made by The Paleo Chef. I used this instead of traditional ketchup (which has sugar) to make the fry sauce.

I ended up not getting a chance to work out today.  I was going to go to kickboxing but time ran away from me today and I didn’t make it.

Lessons learned from today:

I need to work on meal and time management.  I should have had lunch planned out a little better and I need to make sure that I manage my errands better so I can hit the gym.

Well tomorrow is another day! This whole challenge is supposed to also be a learning experience and I am definitely learning the new needs and wants of my body.


Slow Cooker Chuck Roast with Red Wine Sauce

Chuck Roast with Tomato Wine SauceI had an open bottle of red wine and a little two pound chuck roast, both of which needed to be used up.

I decided to try to combine the two and see what I could come up with.  I added some tomato sauce to the wine to help extend it, added some veggies, tossed everything in the slow cooker and hoped for the best.

It turned out delicious!

I love using the slow cooker especially on days when I’m at work all day long.  Coming home to dinner practically ready and serving itself is a huge time saver.

Andrea’s Slow Cooker Chuck Roast with Red Wine Tomato Sauce

  • 1 2lb Chuck Roast
  • 1 8oz Can of Tomato Sauce (your favorite brand)
  • 1C Red Wine (Whatever you have on hand)
  • 1/2 Medium Onion, cut in chunks
  • About 4 Large Carrots, also cut in to chunks
  • About 5-6 Small-Medium Potatoes, chuck in to chunks
  • 1/2tsp Salt
  • 1/2tsp Ground Black Pepper
  • 1tsp Ground Garlic
  • 2tsp Italian Seasoning

Pour the tomato sauce and red wine in the slow cooker and mix.  Add in the chuck roast followed by the veggies.  Sprinkle with the seasonings and cover with the slow cooker lid.

On low, cook for about 6-7 hours.

If you’re home, every few hours bast the veggies and roast with the sauce.  If you’re not around, don’t worry about it.

When the roast and veggies are done, strain as much of the juice from the slow cooker as possible.  Add to a medium sized sauce pan and bring to a simmer.  Reduce by half.

Cut the meat into portions and serve along with the veggies.  Use the sauce on top and enjoy!

Chuck roast with root veggies

This dish really couldn’t be easier and it’s totally adjustable.  You can use a bigger roast, just add in more wine and sauce.  You can add in as much veggies as you like.  I didn’t really keep track of how much I used, my goal was to have enough for leftovers.  The above amounts are guesstimates.

I served up the leftovers as sandwiches.  I shredded the roast, added that to the sauce and heated.  Placed that on buns with a little swiss and heated it up in the oven till the cheese was melty.  Served with leftover veggies, it was a great meal!

Easy slow cooker meal that looks and sounds fancy!

Have fun guys, and remember, always play with your food!  Enjoy!

Kale Pesto Meatballs

Kale Pesto MeatballsA little delayed but here is the last version of how I used the Kale Walnut Pesto, in meatballs!

I was trying to think of different ways to use pesto and while I know it’s a common topper/sauce for pasta, there had to be something else to do with it.

And that’s when I realized we haven’t had spaghetti and meatballs in ages and why not put the pesto in the meatballs?

So I did and the dish turned out fabulous!

Andrea’s Kale Pesto Meatballs

  • 1lb Ground Beef
  • 1lb Ground Pork
  • 1C Kale Walnut Pesto
  • 2 thick slices of crusty white bread, cubed
  • 1/4C Red Wine (can use milk or stock instead)

Preheat oven to 400 degrees.  Either grease/line a baking sheet or a long casserole dish.  In a small bowl soak the bread in the wine and let sit for a couple of minutes.  Once the bread is soaked, add it to a large mixing bowl along with the beef, pork, and pesto.  Mix until everything is well combined.

Form into balls and place on the baking sheet or casserole dish.  I made them about tennis ball size.  Place in the oven and bake for about 20-25 minutes or until they are fully cooked through.

Serve immediately as a main dish or along with some pasta.

Kale Pesto MeatballsI served this with spaghetti dressed in a really basic tomato sauce.  I added some of the pesto to the sauce (about 1/2C).  When I plated the pasta I also added a little pesto on top for color and extra flavor.  Topped the whole dish with more grated Parmesan cheese.

We had this two nights in a row!  The meatballs are also great for sandwiches or crumbled on top of pizza.

Depending on what size you decide to make the meatballs will determine how many you get.  I did about tennis ball size so that yielded around 6, give or take.  It will also determine cooking time, so if they are smaller they will have a shorter cook time.

It’s a great make-ahead dish and the cooked meatballs freeze really well.

A nice little twist on spaghetti and meatballs for a weeknight dinner.

Have fun guys, and remember, always play with your food!  Enjoy!

Roast Beef Dip Sandwich

Roast Beef Sandwich with JusDeli style roast beef wasn’t something we had a lot of growing up. Our family was “on a budget” and roast beef was pricey so it was only purchased for special occasions.

I did love it though.  Back in the day, when I ate fast food, Arby’s was my favorite.  Yuck now! But at the time it was heaven.

If I ever ordered a hoagie, I usually got a hot roast beef sandwich.

Despite all of that, I never had a roast beef dip sandwich.  Ever.  I don’t know why either because it’s totally up my alley.

I recently was able to enjoy a prime rib dip sandwich from Common Link (my fave food truck in Fort Collins) and fell in love.  I’ve been dreaming of having another one very soon! Since I’ve been without, I had to make do and create one on my own.  Complete with homemade jus!

I didn’t use prime rib but did use some roast beef deli meat and while it wasn’t Common Link’s sandwich, it definitely hit the spot.

It’s super easy to put together too!

I don’t have measurements for the sandwiches because you can adjust the amount to fit your needs.  I do have measurements for the jus (dipping sauce) though!

Andrea’s Roastbeef Dip Sandwich

  • Deli Roastbeef, sliced thin
  • Swiss Cheese
  • Caramelized Onions (technique is explained here)
  • Long Rolls (I used brat rolls)
  • 1TBSP Butter or Olive Oil

For the Jus (dipping sauce), Makes Enough For Two Servings

Preheat oven to 425 and grease or line a medium sized baking sheet.  Split the rolls and place them on the baking sheet.

In a medium sized sauce pan, add in all the ingredients for the jus.  Bring to a simmer and allow to simmer for about 10 minutes.

In a medium sized skillet, heat the butter or oil over medium heat and add in some roast beef.  Lightly sauté and add in the caramelized onions.  Add in about a tablespoon of the jus and combine.

Put the beef and onion mixture on one half of the roll.  Top with swiss cheese and place baking sheet in oven.  Heat for about 10 minutes or just until the cheese is nice and melted.

Remove from heat, top with the other half of the bun.  Cut sandwich in half and plate.  Pour the jus into little bowls and place on the plate.  Serve and enjoy!

Roastbeef Dip SandwichPretty simple, right? And it’s so very tasty! Perfect if it’s a busy day and you need to quickly get dinner together.  The onions can be sautéd to soften them up instead of taking them all the way to caramelization, if you’re short on time.

I used homemade stock but you can used store bought if you don’t have homemade on hand.  Still add the extra seasonings though because that makes a big difference!

If you have leftover beef from a roast, this would be a great way to utilize the leftovers!

I’ll definitely being making this again if I can’t swing over to Common Link!


Caramelized Onion Burgers

Caramelized Onion BurgersScott and I made a vow that we were going to spend more time outside this year and that we were going to spend more time grilling.

I’m pleased to say that when Fort Collins gets a streak of warm weather, we have been grilling like crazy!

I had a craving for a lovely grilled burger but I wanted to dress it up a little bit.  Nothing too fancy but I did want the burger to have a little bit more flavor to it.

I used two kinds of meats and added in some caramelized onions.  The burgers smelled amazing as they cooked and had the exact depth of flavor that I was looking for.

Andrea’s Caramelized Onion Burgers

  • 1lb Ground Beef (fat ratio of your choice)
  • 1lb Ground Pork
  • 1 Medium Onion, sliced thin
  • 1TBSP Dijon Mustard
  • 1/2TBSP Worcestershire Sauce
  • 1tsp Garlic Powder
  • 1/2tsp Ground Sage
  • 1TBSP Olive Oil for sauteeing
  • Pinch of salt and pepper

In a large mixing bowl, place the beef and the pork.  In a medium sized skillet, heat the olive oil over medium-low heat.  Add in the onions and sprinkle with a little bit of salt and pepper.  Stir and continue to stir occasionally as the onions cook down and start to caramelize.

This will take some time! Around 45 minutes for the onions to caramelize.

Once the onions have caramelized, remove from heat and add in the mustard, worcestershire sauce, garlic powder, and sage.  Stir and allow mixture to cool, about 5 minutes.

Add onion mixture to the beef and pork mixture and combine well.

Form into hamburger patties.  The size and thickness is up to you.  I made medium sized burgers and ended up with 5 medium size and one on the small side.

Store patties in fridge for at least an hour to allow the flavors to combine.  Remove from fridge at least 1/2 hour prior to cooking.

Heat a grill or skillet over medium heat.  If using a skillet, add in some oil or lard, about 1TBSP.  Place patties on grill/skillet and cook for about 5 minutes on each side.

Because this uses ground pork, you have to cook the burger all the way through.

Remove from heat and top with your favorite toppings, and enjoy!

Caramelized Onion Burgers

The burgers turned out great!  The pork along with the caramelized onion mixture kept the patties nice and juicy.  The flavor was subtle, the onions in no way over power the burger.

I topped with some swiss cheese along with some Quick and Dirty Beer Ketchup but feel free to top with your favorite sauces!

Will you be grilling more this summer?

Beef with Udon Noodles

Beef with Udon Noodles I love leftovers. I know they get a bad rap but I think that just stems from people not being creative with what they have in the fridge. Leftovers have the ability to turn into something totally new. It’s all about how you view the food before you.

I was rummaging around in the freezer earlier this week when I spied a package of leftover prime rib roast chunks.  We had that for Christmas dinner.

Knowing that I needed to use that right now or it was history, I pulled the package out and started brain storming what I could make.

I asked Scott if he would rather have stir fry or an Asian inspired noodle dish.  He went with noodles and Beef with Udon Noodles was born.

It was easy to put together, the longest prep was waiting for the water to boil for the noodles.

I cooked one 8oz package of udon noodles first, drained and let those hang out while I sauteed up some chopped:

  • Carrots
  • Red Onion
  • Broccoli

The leftover prime rib was already in chunks that I then cut up into smaller pieces to make them more bite size.

I created a sauce like the one for Pad Thai.  Once the veggies were warmed through, I added in the beef and noodles.  Poured the sauce over top, tossed and served.

Beef with Udon Noodles.Not bad for some leftovers, right?  Bonus, it was a weeknight meal that came together really quickly.

See, leftovers don’t have to be boring.  Now what are you going to make with your leftovers this week?


Making Stock Better

Stock simmeringOne of my goals that I had last year was to make more stock at home.  I use a ridiculous amount of stock each week for cooking.  Everything from soups to rice.  Because of that I wanted to rely less on store bought stock and more on homemade stock.

Since our move here I’m happy to say that I have been using homemade stock exclusively! Since local meats are super abundant and because I bought a meat share this year, bones have been plentiful for stock making.

I’ve also found two things to take my stock from average to perfection.  Before my homemade stocks, while tasty, were missing something.  I had no idea what but they didn’t seem to have the depth and rich flavor that I expected from homemade stock.

Trick 1:

Reading different homesteading blogs and food blogs I noticed that most people add some sort of acid, usually in the form of cider vinegar to their pot of stock.

I found this really interesting and did a quick search to see why folks were adding vinegar. Westin A. Price says that adding vinegar to the stock helps to extract calcium from the bones. Several other sites merely said that adding vinegar helps pull out more minerals and nutrients from the bones and meat.

Curious, I decided to try it out.

My preference is Bragg’s Unfiltered Apple Cider Vinegar so that’s what I’ve been using. I add anywhere from 1/4 to 1/3C of it to the stock pot.

Trick 2:

Salt and lots of it. Previously I did not season the stock as it simmered.  It would eventually get seasoned when I cooked with it so in my mind, seasoning it as it simmered seemed unnecessary.

Oh how wrong I was.  Salt is a must!

By “lots of it”, I’m referring to a good 2 to 3 big pinches of kosher salt adding to the stock water.

These two tricks have elevated my homemade stock from alright to dazzling.  Perhaps this is all common knowledge? If so I missed that memo.

homemade stock

Adding the vinegar provides depth and richness in flavor that I was looking for but wasn’t getting before.  It also helps the stock become a lovely golden brown in color for poultry and pork stocks.  For beef stocks it ensures a glistening dark brown stock.

The salt basically just makes things more tasty. It’s a lot easier to pick up the meat and veggie flavors of the stock when the stock is salted.  It makes the stock standout instead of just being a background ingredient.

I definitely won’t be making stock without these two ingredients again!

Do you make stock at home? Any tips or tricks to share?

Sunrise Ranch Pastured Beef

I’m not so slowly falling head over heels in love with Northern Colorado. The weather is mild, plenty of sun, and the access to farm fresh pastured meat is amazing.

I’m still learning about local farms and where to purchase meat.  I was researching ranches for some pastured beef and came across Sunrise Ranch.

I saw they had a twitter account and reached out to them about their beef.  That’s how I met Bryce, who works at Sunrise Ranch.  After a few exchanges on Twitter about their products, our conversation moved to email where we discussed a visit out to the ranch.

Sunrise often provides tours of their farm but currently didn’t have anything scheduled.  However Bryce mentioned that he would be happy to show us around the farm anyway so that we could hear about their sustainable farming practices and learn more about how they raise their animals.

Since I was considering purchasing meat from them, taking a tour of the farm was very important to me.

I fully believe in learning where your food comes from and meeting your farmer. This was a great way for me to put that belief to practice.

Scott and I headed out one Saturday afternoon to spend some time in the mountains!

Sunrise Ranch is also an Intentional Community and there are several members who work and live there.  It’s also a conference center and spiritual retreat, this means that the ranch sees many vistors throughout the year.

We first stopped by the organic garden where we learned about Permaculture and how the ranch approaches organic gardening.  I had heard about Permaculture before but getting a chance to learn more and see it first hand was pretty impressive.

Next stop was to check out the chickens.  They have laying hens and hens that are used for meat.  They are on a rotating pasture schedule and get to roam their designated area however they like.  Their roost was a converted trailer and in the evenings they are put in there to keep them safe from predators.  In the mountains you have to also keep an eye out for bears and mountain lions.  During the day they get to come and go as they please.

They were happy and clucking away like crazy.

Sunrise currently doesn’t sell their eggs or poultry to the public.  The vegetables from the garden, along with eggs and poultry are strictly for the staff and visitors of Sunrise.  Chef Joel Navejas is the head chef and his focus is on sustainability and farm-to-table concepts.

He uses as much as he can from the ranch to provide meals for those at Sunrise.  There are plans to expand their chicken population and provide eggs and meat to the public at some point in the future.

Sunrise is doing a lot in terms of development and research.  They also currently have two breeding pigs (heritage breed) along with some mini goats.  They are hoping to learn more about each in order to provide meats, milk, and cheese to those at Sunrise.  The goal of course is to also be in a position to sell that to the public as well.

Next we went to visit the cows in their pasture and were able to actually be out in the pasture with them.  The cows are also on a rotational pasture routine and there are two months between pastures.  Meaning, once they have grazed, they won’t be back to that spot again for at least another two months.  This provides time for the grasses to grow back and the soil to fertilize.

The cows are happy and quite content to be in the pasture doing what they love best, eating fresh grass!  At this time the ranch has Black Angus, Charolais, and Hereford.  All breeds are used for butchering.

Sunrise is looking to expand their cattle population and start raising their own cattle from birth to butcher.  Currently they purchase organic pastured cattle from other local farmers and finish the cattle at Sunrise for butcher and to sell to the public.

The goal is to sell their own cattle exclusively.

They have two precious calves currently who were just born a few weeks before we toured the ranch.  Cute as can be!

The cows were completely curious about the two newbies walking around their pasture and a couple of them would stalk us no matter where we went.  Scott got to pet one who decided that Scott was amazing and gave him a few cow kisses.  Lucky Scott!

As you can see, the cows are pastured in the mountains breathing fresh clean mountain air!

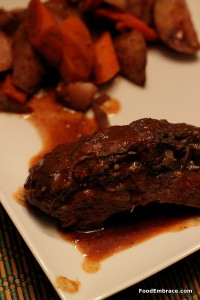
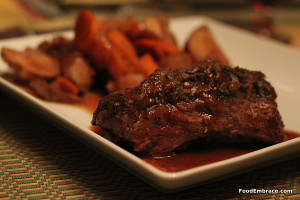
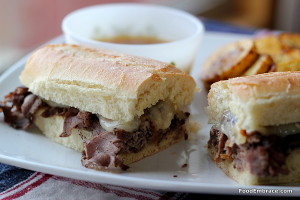
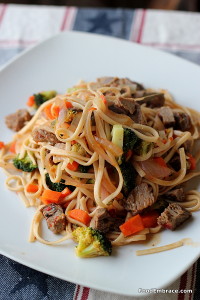
We walked away from this tour knowing more about this great facility that is practically in our backyard.  We purchased some beef products and are very happy with the quality and taste of the beef.

If you are interested in purchasing some as well, please visit their Farm Page which has all the information you need on how to buy their products.

Also visit their website or connect with them on Twitter.  One thing I appreciated about our visit to Sunrise was how open and welcoming everyone was.  They want people to visit and learn more about their products.  They also want to help educate people about the farm-to-table movement and how important it is to know where your food comes from.

They are completely transparent about their goals, how the ranch functions, and how their animals are raised.  They are more than happy to connect with you and answer any questions you have about the ranch and their practices.

A huge thank you to Bryce and to Sunrise Ranch for having us out for a tour and answering all of our questions.  We had a great time!
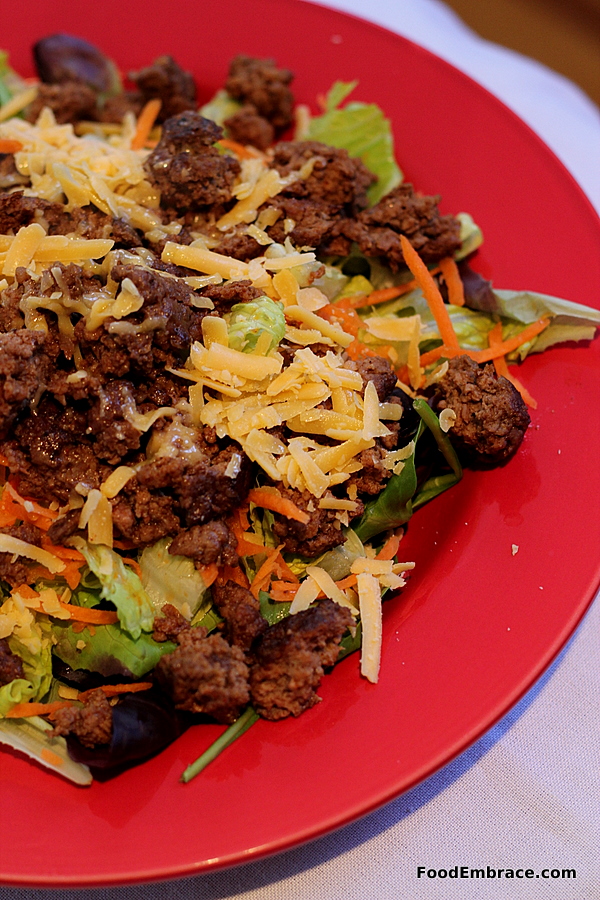
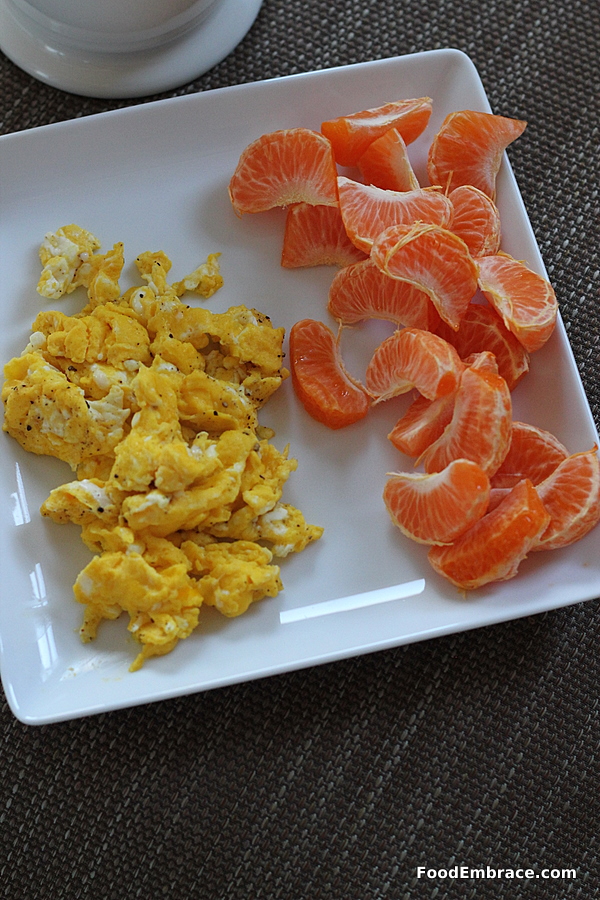
Grinding Meat At Home

We’ve been dabbling with the idea of grinding our own meat for burgers and homemade sausages.

I knew nothing about grinding meat and but luckily my friend Rachel had put on a class all about making sausage at home.

Scott and I went to the class and bought a grinder attachement for the stand mixer right away.

I’m still learning and this year I would like to explore this a little more.

The first thing we did was make burgers!

I forget what cut of meat I bought but I know it was a roast cut from Blues Creek.  I didn’t really know what cut to look for but threw caution to the wind.  I mean, no matter what I used I knew everything would work out.

I chilled the mixing bowl, and all of the parts to the grinder until they were super cold.

I cut up the roast and tossed it with a few spices and placed that in the freezer until it was cold and firm.

Then it was time for the grinder!

We got one good run through the grinder. We tried to put it through again for a finer grind but the meat kept getting caught up and stuck.

Probably related to the cut I picked, perhaps it had too much connective tissue in it?

Regardless the first grinding worked and we had ground beef ready for some patties!

I made some burgers, let them chill in the fridge until it was dinner time, and we enjoyed a nice night of grilling.

The burger was tasty and one of the better ones that we’ve made at home.

It’s still a big learning process for me but hopefully this year I’ll be able to gain more experience with it.