Status

Sweet and Smoky Shishito Peppers

With all the holiday functions and parties that happen during this time of year, I wanted to create a quick and simple appetizer that would be great for entertaining, parties, or as a way to kick off an intimate date night at home. While out shopping I came across some awesome looking shishito peppers and knew they would be perfect to use. Most times the peppers are paired with a dipping sauce but I wanted to wrap the peppers is a sweet and sticky sauce making them easier to prepare and eat.

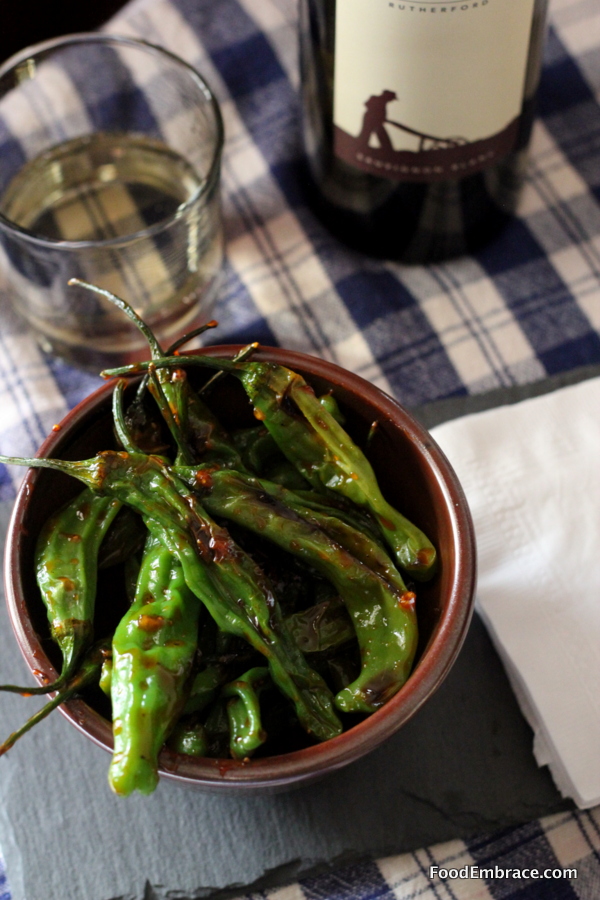
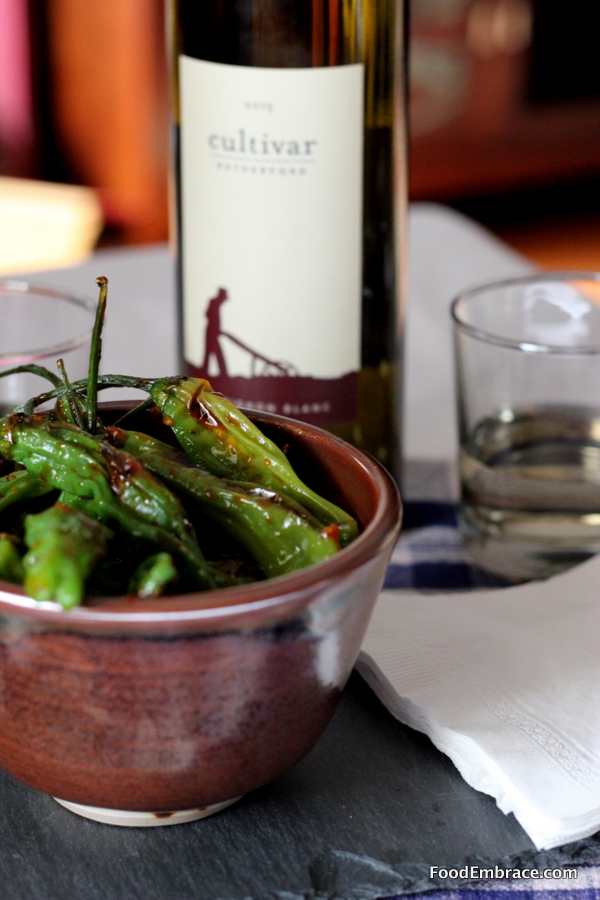
In a recent shipment from Cultivar Wines, I received a 2014 Cultivar Rutherford Sauvignon Blanc that I thought would pair nicely with this dish.

Sweet Smoky Shishito Peppers

Andrea’s Sweet and Smoky Shishito Peppers

  • 6oz Shishito Peppers
  • 1/2TBSP Light Olive Oil
  • Juice of 1 Large Lime
  • 2 Cloves of Garlic (Either use a garlic press or finely chop them)
  • 1 TBSP Honey
  • 1/2 tsp Smoked Paprika
  • Pinch of Salt (no more than 1/4 tsp)

In a bowl, combine the lime juice, garlic, honey, paprika, and salt, whisk until everything is combined and set aside. In a medium sized skillet, heat up the olive oil over medium to medium high heat for about 2 minutes (do not let the oil smoke), then add in the peppers in a single layer.  Cook peppers on each side for about 3 minutes until they blister and start to soften.  Reduce heat to medium and add in the sauce, stir and make sure all the peppers are covered.  Continue to gently stir and cook the sauce for about two minutes.  The sauce should cook down and start to coat the peppers.  Allow to cool for one minute and give another stir before plating.

Plate and serve!


Sweet Smoky Shishito Peppers

These peppers are great hot right out of the pan but can also be served at room temperature, making them perfect for entertaining and parties.

Having the sauce on the peppers means there’s less to handle and turns them into a fabulous finger food appetizer, just right for mingling and eating while standing.

You can make the sauce ahead of time making the cooking time on these even quicker.  I would recommend making a double batch because these will go quick!

These peppers and the 2014 Cultivar Rutherford Sauvignon Blanc really worked well together.  The crisp citrus notes of the wine balances out the smoky sweet sauce while the oaky herby notes compliments the earthy pepper flavor.

Have fun, and remember, always play with your food.  Enjoy!

Disclosure: I’m required to disclose a sponsored partnership between our site, Food Embrace, and Cultivar Wine. I have been compensated in exchange for this post in the form of product. All opinions presented are my own. I receive wine from Cultivar Wine as a member of the Cultivar Wine Bloggers group.

Status

Maple Bacon Wrapped Goat Cheese Stuffed Dates

I wanted to make a snack that would be the perfect little bite. Something that could go before a meal or be a nice treat after. I had some dates and decided to stuff those with creamy earthy goat cheese then wrap them in savory smokey bacon.  These turned out better than I could have hoped and paired so well with the 2013 Calistoga Cabernet Sauvignon that Cultivar Wine recently sent me.

Cultivar Wine with Stuffed Dates


My husband is a HUGE fan of these little dates.  He basically wants them available at all times so he can enjoy a date or two in the evenings. This is very high praise, he doesn’t usually request things to have on hand.

They are super simple to make but give the illusion of being very fancy. Their decadent taste certainly helps support the hype. Perfect for get-togethers and special occasions.  Or just because it’s Tuesday, your choice. No judging from me.

Andrea’s Maple Bacon Wrapped Goat Cheese Stuffed Dates

  • 12 Dates, split and pitted (**See Note)
  • 6 Slices of Bacon, cut in half
  • 4 oz Goat Cheese
  • 1 TBSP Maple Syrup
  • 2 tsp Light Olive Oil

Preheat oven to 375 and line a small baking sheet with foil, brush the olive oil all over the foil. Make sure the dates are not cut in half but just split down the middle lengthwise.  Fill each date with some goat cheese (about 1/2 tsp each) and then wrap in bacon. Make sure the seam side is down when you place the dates on the baking sheet.  Continue until all dates are stuffed and wrapped.

Place baking sheet in oven and bake for about 15 minutes. Watch to be sure the bacon doesn’t burn. Right before removing the dates from the oven, brush each date with maple syrup.  Continue to bake for another two minutes. Remove from oven and allow to cool.  Serve immediately or can be stored in the fridge in an air tight container.

**I used regular dates but you can use medjool dates if preferred. Those are larger so you may need more goat cheese for the filling.

You can get even fancier and used bourbon barrel aged maple syrup if you like.

I highly recommend making a big batch of these if you will be having them at a gathering because they will go quickly! One batch is perfect for date night but you’ll need more for a bigger crowd.

Since these guys are on the sweeter side I decided to pair them with Cultivar Wine’s 2013 Calistoga Cabernet Sauvignon which worked beautifully.  The black pepper and tobacco notes brought out the smokiness of the bacon and maple syrup while the dryer finish helped balance out the sweetness.  The wine also accentuated the creaminess of the goat cheese and complimented its earthy flavor.

You can also make these dates ahead of time and then gently reheat them at 350 for about 5 minutes before serving.

If you’d like to try Cultivar Wine , they are offering a special promotion to my readers. Use the code CultivarWineFoodEmbrace when you order and you’ll receive 10 percent off your purchase.

Disclosure: I’m required to disclose a sponsored partnership between our site, Food Embrace, and Cultivar Wine. I have been compensated in exchange for this post in the form of product. All opinions presented are my own. I receive wine from Cultivar Wine as a member of the Cultivar Wine Bloggers group. 


Shrimp and Scallops with garlic wine sauce

Must have

Must have

I grew up in a very small town in Southwestern PA.  Very. Small.  The kind of small town where the “fancy” restaurant is The Red Lobster (always pronounced as The Red Lobster because there can be only one.) that you had to travel 1/2 an hour to get to.  One of my very favorite things to get at The Red Lobster was the scampi.

I always felt a little decadent and grown up eating scampi.  I mean after all it did have wine in it right?  It said so right on the menu!  You have to be mature to handle a dish like that, or so I told myself.  And when the pathetic little dish of scampi arrived with the overcooked super tiny balls of shrimp, I was in heaven.  And you best believe I ate all that sauce too.  “Come ‘ere cheddar biscuits and help a sister out!”

Please, don’t even front and act like you don’t know what I’m talking about.  You have all been to The Red Lobster and you all can dig on what I’m saying.

As I became older and properly mature (Am too!), I decided it was time to branch out and start making my own scampi-type dish.  Thankfully I have a husband who loves seafood and so he has been my guinea pig for quite some time.  In this dish, I have combined things I love:

  • Garlic
  • Wine
  • Butter
  • Seafood
  • Chopped tomatoes and red onion

However, I like to think my dish is slightly healthier than a traditional scampi because traditional scampi has a load of butter in it (I’m talking sticks of butter here) where mine does not.  Oh there’s butter, because I fully believe that butter and seafood are meant to be together.  I just don’t use sticks of it.

Andrea’s Shrimp and Scallops with garlic wine sauce

  • 10oz of fresh scallops (about 8 medium sized)
  • 12oz of fresh shrimp (about 18 medium)
  • 4-5 cloves of garlic, grated (yes you read that right)
  • 1/4 medium red onion, chopped
  • 2 beefsteak tomatoes, seeded and chopped (or 3-4 romas)
  • 3 peperoncinis, chopped
  • 3/4 C -1C white wine
  • 1/2 TBSP of butter
  • 1 1/2 TBSP of olive oil
  • Sea salt, ground black pepper, pinch red pepper flakes
  • Italian seasoning blend
  • Chopped parsley and grated Parmesan for garnish

Make sure all the seafood is patted dry with papertowels.  Remove the shells, including the tail part, from the shrimp.  Either discard or save for stock purposes.  Remove the little conductor muscle on the scallops.  Sprinkle scallops with ground black pepper and sea salt on each side. Just a pinch.  In a large deep sided skillet, heat 1/2 TBSP of oil over medium heat.  Add the scallops and brown on each side, about 2 minutes per side.  Remove from skillet.  Add the remaining olive oil and the butter to the skillet.  Then add in the red onion, peperoncinis, and a pinch of red pepper flakes (how much depends on how much heat you want).  Season that with a little more salt, pepper, and the Italian seasoning blend.  Just a pinch of salt and pepper, and about 1/2 a tsp of Italian seasoning.  Cook until the red onions just begin to soften.  Add in the grated garlic and stir, then add in the wine. Don’t dilly dally after adding the garlic, as it will burn quickly.  Also, be careful here adding alcohol to heat.  You can remove the pan from the heat source for this and then return it immediately.  Stir the mixture and bring to a simmer.  Add in the shrimp, allowing the shrimp to cook in the sauce. After about a minute, add in the scallops and chopped tomatoes. Let dish simmer for about  3 minutes. Giving the shrimp time to cook and the scallops and tomatoes to heat through.  The shrimp is cooked when it turns pink, this does not take long.  The scallops will finish cooking as they are heating back up.

Remove and serve in a deep wide bowl or large pasta plate.  Garnish with chopped parsley and parm cheese.  Serve immediately and with plenty of crusty bread for dipping.

Shrimp and Scallops with garlic wine sauce

Shrimp and Scallops with garlic wine sauce

This is easily one of our favorite seafood dishes.  It’s quick to make and easy enough that you can chat while you busy away in the kitchen.  It makes for a great “date night” dish as well because you’re sharing a meal out of the same dish.  I do recommend having little plates on hand that you can scoop out portions on to as you’re eating.  Less risk of slopping on the table. Trust me on this! ;)

If you don’t have sea salt, naturally you can use kosher instead.  My preferred blend of Italian Seasoning is the Mrs. Dash variety.  It has no salt, allowing me to control the salt amounts, and it has a decent blend of herbs.  But use whatever you like and have on hand.

Since wine makes up the entire sauce base, pick a nice wine that you will drink.  No cooking wine!  That is loaded with salt and preservatives.  Use regular and a dry one, no sweet wines.  If wine is not your thing or you’re looking to not use as much, chicken stock or seafood stock can be used here as well.

We love garlic which is why I use 4-5 cloves of it but if you do not love it as much as us, feel free to reduce the amount.  Or just add the whole cloves and then scoop them out at the end.  The garlic flavor will be there, just not as intense.  You can easily chop the garlic instead of grating.  I personally feel that grating allows more of the flavor to come through.

Now you can be all mature and have a grownup seafood dish at home too!

Have fun guys!  And remember, always play with your food!