Status

Cherry Jalapeno Simple Syrup

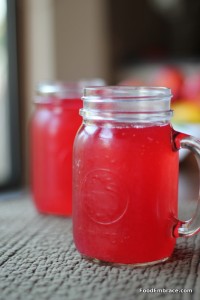
It was cherry season and I was trying to come up with some new way to highlight them.  I have made a cherry simple syrup before (and it’s also great with bourbon) but I wanted to put a little twist on that.  I decided to add in some jalapeño for a little earthiness and heat.  I wasn’t sure if the combo would work but I was hopeful.

Thankfully the combo turned out great! You can use this for margaritas or just to kick up some seltzer water.  It provides an amazing color to drinks and adds some uniqueness to your cocktail menu.

cherry jalapeno simple syrup3

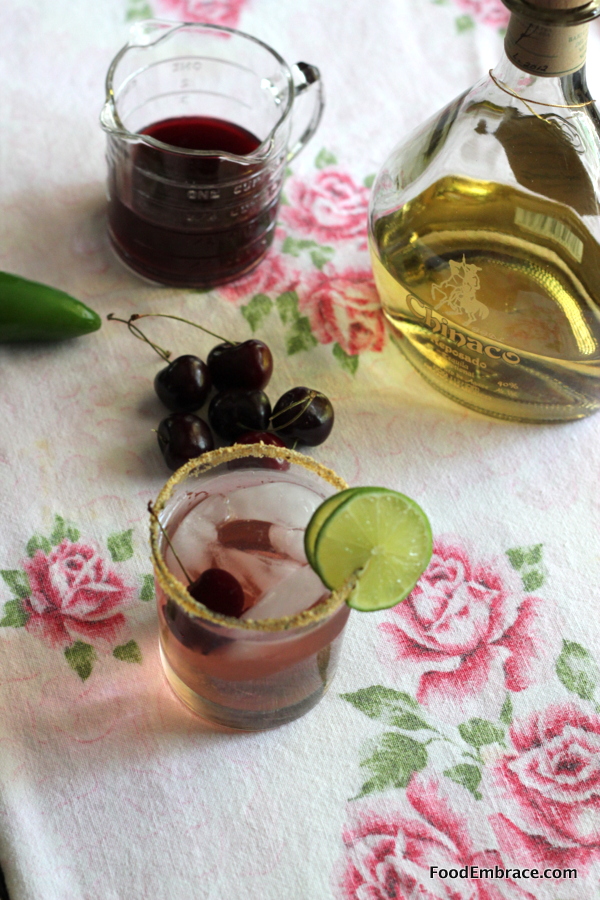
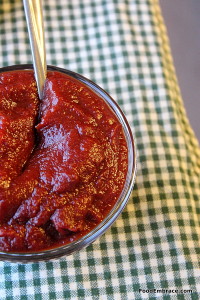
Andrea’s Cherry Jalapeño Simple Syrup

  • 1C Water
  • 1C Sugar (Cane or Coconut works)
  • 15-20 Cherries, pitted
  • 1 Jalapeno, sliced in half

In a medium sized sauce pan, combine all ingredients and bring to a simmer.  Simmer for 5 minutes and turn off heat.  Allow the syrup to cool and the ingredients to steep for about 1/2 an hour.

Pour all ingredients in a blender (See note at bottom) and blend until everything is smooth.  Strain mixture through a fine mesh strainer into a glass jar.  Will keep for two weeks in the fridge.

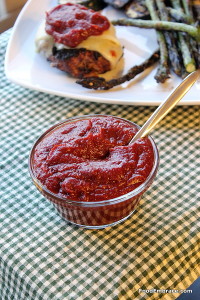
NOTE: You can control the level of heat of this syrup by removing the seeds before simmering.  I wasn’t sure how spicy this would turn out so I only blended in half of the jalapeño.  It was a mild spicy, for more heat blend both halves.  Even more heat, keep the seeds in and blend those as well.

Perfect to bring along to cookouts and gatherings because people can use it to mix their own drinks and it can be at room temperature for a few hours.

You can also try using some frozen cherries to make this syrup in case you can’t find any fresh at the markets.

Enjoy guys, and remember, always play with your food!

Maple Kissed Coconut Cream Sauce

Banana, paleo scone, coconut cream Coconut Cream sauce came about because I needed a substitute for yogurt during the Spring Clean Eats challenge.

I really wanted some kind of accompaniment to go with granola.  Using coconut milk to create a sauce seemed like the natural solution.

This sauce is delicious, super simple to make, and only contains 3 ingredients.  All you need is a blender and then an airtight container for storage.

Easy!

Andrea’s Maple Kissed Coconut Cream Sauce

  • 1 13.5oz Can Full Fat Coconut Milk (365 brand is budget friendly)
  • 1TBSP Pure Maple Syrup
  • 2tsp Vanilla Extract

In a blender, add in all the ingredients.  Make sure to scrape out as much of the coconut milk fat from the can as possible.  Blend all ingredients for about 3 minutes.  You want the mixture to be creamy and fluffy.

Pour into airtight container.  Keeps for about a week to a week and a half.

Grain free scones and baconThis sauce can be used to top granola, poured over a scone or pancakes.  You can even use it as a coffee creamer if you like!  Or you can eat it straight from the jar like I have been known to do.

Once blended the sauce will stay pourable even after being refrigerated.  No need to worry about it solidifying on you.  It’s best to always have some on hand because it goes with so many things!


Happy Fourth!

Blackberry LemonadeIt’s July!  Hooray!  We’re pretty excited for July over here at the HQ.  It’s a holiday week plus we will be celebrating our anniversary.  Along with some other fantastic goodies sprinkled throughout the month.

If you’re looking for some additional deliciousness to add to your holiday week, then I’ve got just the stuff!

Tart and cool Blackberry Lemonade!  Adds a nice touch of color to the party and is cool and refreshing on a warm day.  Add some limoncello for an extra kick!

Wow your guests and make your own mayo for your coleslaw and potato salads this time around!

Braised Pork RibsDon’t have a smoker? No problem! Whip up some quick Braised Ribs and put them on the grill for a few minutes before serving to add some smokey flavor.

If you need some sauce for those bad boys, Hatch Green Chili BBQ Sauce or some Bourbon BBQ Sauce will go perfectly!

Roasted Tomato Salsa Fresh salsa is always a hit!  And Roasted Tomato Salsa will only take a few minutes and can be made a day ahead!

You can never go wrong with beer!  And Beer Brined Pork Chops would be great grilled to perfection!

Need something sweet at the end?

Figgy Bourbon Refrigerator JamFiggy Bourbon Refrigerator Jam would be perfect drizzled over some fresh scooped local ice cream!

Have a great holiday!  Stay safe, drink beer, and eat great food!

Kale and Walnut Pesto

Kale and Walnut PestoA couple weekends ago Scott and I traveled to Boulder for a beer release.  On our way home we stopped by a Whole Foods there (huge and crazy packed!) to pick up a couple of things.

We also grabbed dinner which was pizza.  My pizza had kale pesto on it that I thought was unique and really tasty.

Because I love the concept of pesto and I love kale, this was a match made in heaven.  So of course I had to make my own version a couple of days later!

Andrea’s Kale and Walnut Pesto

  • Two Bunches of Kale**, stemmed and roughly chopped
  • 1C Walnut Halves (Raw or roasted, your choice)
  • 2 Cloves of Garlic
  • 1C Olive Oil
  • 1 Pinch of Kosher or Sea Salt
  • 2tsp Italian Seasoning
  • 1/2tsp Smoked Paprika
  • 1 Big Pinch of Red Pepper Flakes
  • 2tsp Garlic Powder
  • 1C Grated Parmesan Cheese

Place half the kale, walnuts, and oil in a food processor along with all of the seasonings and cheese.  Process until it starts to break down and get creamy.  Add the rest of the kale, walnuts, and oil and continue to process until you have a smooth creamy paste.

Pour out into a glass container with an airtight lid.  Makes about 2-3 cups of pesto and will keep in fridge for at least four days.

Kale PestoThis pesto tastes like summer. It’s grassy, slightly bitter, and feels full of sunshine.

**I didn’t cook the kale and you are free to keep it raw or to blanch it a little first.  If you do blanch it, you’ll have to make sure that you dry the leaves as much as possible.  Otherwise you’ll have a watery and runny pesto.

Since the kale is raw there is a slight grassy bitter taste up front but it soon mellows out with the garlic, walnuts, and cheese.  It’s great as a dip, to use on pasta, or even as a spread on pizza.

I think it would also benefit from a little lemon zest and a little squeeze of lemon juice.  I didn’t have any on hand when I made this but next time I’m going to give it a try.

Pizza sliceI ended up having this pesto three ways, well four, if you count eating that little slice of bread up there with the pesto on it.

Next week, you’ll get to see the other delicious way to have this pesto.


Quick and Dirty Beer Ketchup

Beer KetchupI’m still trying to find my cooking mojo since we moved here.  Part of it is just finding a routine that works for me and part of it is finding where to get the best supplies.  I’m slowly getting there though! Thank you for being patient as I get back into the swing of cooking.

Living in the land of beer, I have access to a lot of great local (to me) brews.  I’m constantly looking for a new ways to incorporate some of the beer in with cooking.

We were enjoying a lovely stretch of warm weather a couple of weeks ago, perfect for patio sitting and grilling.  I experimented with some burgers (recipe soon!) and needed a topping for them.

I originally was thinking of creating some sort of steak sauce but then my experiment morphed into a more ketchup type of sauce.

We had some Fat Tire from New Belgium on hand so I used that in the sauce to make what I’m calling a Quick and Dirty Ketchup because there aren’t many ingredients and it comes together lickity-split!

Andrea’s Quick and Dirty Beer Ketchup:

  • 1 6oz Can of Tomato Paste
  • 1/2C Fat Tire (or amber ale of your choice)
  • 1TBSP Apple Cider Vinegar
  • 1TBSP Brown Sugar
  • 1TBSP Worcestershire Sauce
  • 2tsp Garlic Powder
  • 1tsp Dry Mustard
  • Pinch of salt and pepper

In a small sauce pan, add all ingredients and whisk together.  Heat over medium-low heat, just bringing the mixture up to a simmer.  Simmer for about 10 minutes, stirring occasionally.  Remove from heat and allow to cool in a glass or non-reactive bowl.

Serve as a dipping sauce or use as a topping for burgers!

Beer Ketchup

The ketchup went great with our burgers!  It was tangy with slight sweetness along with a little earthy depth from the beer.

This would also work great as a meatloaf topper!  Or use as a dipping sauce for your favorite fries.

No worries if you don’t have Fat Tire on hand, just use your favorite amber ale!

Enjoy guys, and remember, always play with your food!

Hatch Green Chili Barbecue Sauce

Moving to Colorado, I have been introduced to hatch chilis for the first time.  I had no idea what they were but knew that when hatch chili season arrived, everyone got excited.

I decided to buy some to see what all the fuss was about.  There are mild and hot chilis, I went with the mild.

If you love spice and heat, go for the hot!

It seems that the favored way of eating these chilis is by roasting them first and then using them in recipes.  I stuck with using them raw and cooking them myself.  Mostly trying to familiarize myself with the chilis and their flavor.

I started adding them to everything and one of the first things I made was a BBQ sauce.

Andrea’s Hatch Green Chili Barbecue Sauce

  • 2 Hatch Chilis, seeded and chunked (I used mild but use hot if you like)
  • 1 Medium Sweet Onion, chunked
  • 1 14.5oz Can of Diced Tomatoes with juice
  • 2TBSP Dark Brown Sugar
  • 1 1/2TBSP Apple Cider Vinegar
  • 1/4C Molasses
  • 1/2C Ketchup
  • 1/4C Yellow or Dijon Mustard
  • 2tsp Ground Garlic
  • 1/2tsp Ground Onion
  • 1tsp Chili Powder
  • Pinch of salt and ground black pepper
  • 1/2TBSP Light Olive Oil for sauteeing

In a medium sized sauce pan, heat olive oil over medium heat.  Add peppers and onion, sprinkle with salt and black pepper.  Sautee for about 3-4 minutes until the onions and peppers start to soften.  Add in the diced tomatoes with juice, ketchup, and mustard.  Stir.

Next add in the apple cider vinegar, brown sugar, and molasses. Stir.

Finally add in the garlic, onion, and chili powders.  Stir and let simmer for about 5-7 minutes or until the onions and peppers are fully cooked through.

Once the sauce has simmered, remove from heat and pour the sauce into a blender.  Blend until the sauce is smooth, and return the sauce back to the pot.  Bring to a simmer and allow the sauce to simmer for about another 5 minutes.

Remove from heat and serve immediately or allow to cool and store in an air tight container.

We had the sauce over some ribs but it could be used on chicken, pork, or however you want to serve it up.

It’s a thick sauce with a tangy sweet kick and a slight heat to the finish from the chilis.  They are great to use in sauces!

Of course if you like roasted chilis, those definitely can be used in the sauce to help provide a smokey background flavor.

I love making barbecue sauce at home because I can make it just how I like and I can control the quality of ingredients that goes in.

After experimenting with the chilis this summer, I am now in love with them as well.  I’m sad that I didn’t get a chance to stock up before the season ended.  All the more anticipation for them next year!

Have fun guys, and remember, always play with your food!  Enjoy!

Horseradish Onion Dip

One of my favorite dips is French Onion dip! I loved it with all of it’s spice and tang along with the intense flavor of onions.

Growing up it was always made with soup mix, you know that stuff that doubles as meatloaf and pot roast flavoring?     When I was on my own and responsible for providing my own food, I would purchase premade dip.

That’s alright and it got the job done, of course, but there comes a point when you have to move away from the pre-made stuff.

Once I started cooking more and making my own versions of things, French Onion dip was something I tackled right away.

And failed at.

Oh the dip was tasty but it was way too sweet.  Caramelized onions are intense and super sweet! I was having trouble combating this and finally I put this idea up on the shelf to be revisited at another time.

I recently got inspired to start making dips again (we are a dip loving house!) and decided to give French Onion dip another shot.  This time I reduced the amount of onions and added in horseradish for much needed kick.

This was a winner!

Andrea’s Horseradish Onion Dip

  • 1 Large Onion, thinly sliced
  • 2TBSP Light Olive Oil
  • Pinch of Salt and Ground Pepper
  • 1TBSP Worcestershire Sauce
  • 2TBSP Prepared Horseradish
  • 2TBSP Whole Grain Mustard
  • 1tsp Garlic Powder
  • 1/2tsp Onion Powder
  • 1 1/2C 2% Greek Yogurt

In a medium sized skillet, heat the olive oil over medium-low heat.  Add in the onions and stir.  Sprinkle with salt and pepper, and stir again.

This is the part that takes the longest, caramelizing the onions.  This will take about 45 minutes to get the onions to where they need to be.  Stir on occasion until the onions are browned and soft.

They will look like this when ready:

Be patient! It’s completely worth it!


Allow onions to cool.

In a food processor, combine all of the ingredients including the onions.  Pulse until everything is well combined.  Do not pulse until completely smooth. You want some pieces of onion throughout the dip for texture and color.

Spoon dip into a glass bowl, cover and store in fridge at least 2 hours before serving.

Serve with your favorite veggies and chips!

I was a very happy lady with this dip!  Creamy with just enough onion bite to let you know it is the star ingredient.  The grainy mustard and the horseradish balance out the sweetness of the onions and give the dip that much needed tang and spicy note.

You could add in some red pepper flakes if you wanted to give it even more of a kick.

This makes a good amount of dip perfect for parties or two big dip lovers.

Or you could go bananas, and use this as a spread for shredded beef or thinly sliced ribeye sandwich.  Just a suggestion of course.

Have fun guys, and remember, always play with your food!  Enjoy!

Making Stock

Recently I’ve taken to making my own stocks. I’ve made chicken and a pork and beef combo stock. I haven’t tried veggie although I should start since I always have a bunch of leftover trimmings.

I use stock a lot in cooking, everything from cooking rice to making soups.  I have it on hand at all times and it’s a pantry staple.

We don’t eat enough meat to keep us supplied with stock but I’ve been saving the bones after meals and storing them in the freezer.  Once I’ve got enough, I’ll make a pot of stock.

I admit that I was initially intimidated about making stock because people always stress (to the point of almost freaking out it seems) about making sure to properly cool the stock.

Most recommend sticking a bowl of the stock either in a sink full of ice or another bigger bowl full of ice.

I don’t have that much ice.

And truth be told, I’m not buying or making that much ice just to cool some liquid.

Sorry.

I talked to others, ones that make stock all the time, and no one mentioned the ice method.  Most people it seems just allow the stock to cool on it’s own.

Well I can do that.

And so I’ve started making stock as soon as I’ve got enough bones and scraps on hand.  It always smells amazing and tastes way better than store bought variety.

Not enough to warrant an increase in our meat consumption though!  Right now this works perfectly.

In a follow-up post I’ll tell you my approach to making stock and how easy it actually is!

Bison Red Sauce

One of my most fondest and vivdest memories I have of my grandmother is her making a meat sauce to go over pasta.

A little straight up Polish lady who made pasta and red sauce often.  Her pasta of choice was rigatonis or “sewer pipes” as she called them.

Not the most attractive nickname, I know, but they are big pasta tubes so it makes sense.

The house always smelled so amazing with the sauce simmering away and it made the atmosphere warm and inviting.

Whenever I smell a similiar red pasta sauce, it brings me right back to my Grandma’s house and her telling us that sewer pipes were for dinner.

I was feeling very nostalgic one evening and decided to create my own.

Andrea’s Bison Red Sauce

  • 1lb Ground Bison (Can use beef if you cannot get bison)
  • 3/4 Large Onion, chunked
  • 1 Green Pepper, chunked
  • 1 Red Pepper, chunked
  • 2 Cloves of Garlic
  • 1 28oz Can of Crushed Tomatoes
  • 1 15oz Can of Tomato Sauce
  • 1 14.5oz Can of Diced Tomatoes
  • 1 6oz Can of Tomato Paste
  • 1C Red Wine
  • 1C Beef Stock
  • Big Pinch of Red Pepper Flakes
  • 2TBSP of Italian Seasoning
  • 1tsp Garlic Powder
  • 1TBSP Worcestershire Sauce
  • Pinch of salt and pepper
  • 2 TBSP Olive Oil

In a food processor, combine onion, garlic, and peppers and pulse until finely chopped.  In a large soup pot, add in 1TBSP of olive oil and heat over medium heat.  Add in the bison and cook for about two to three minutes, just to get some color on the meat.  Remove from pan and drain if there’s a lot of liquid in the pan.  If not, add in remaining 1TBSP of oil and the chopped veggies.

Sprinkle veggies with salt, pepper and red pepper flakes.   Saute for about five minutes, stirring occasionally.  Let the veggies start to soften and reduce the amount of moisture they have.  Add bison back in along with the tomato paste.  Combine and saute for about 3-5 minutes.  Add in the red wine and scrape up any bits on the bottom of the pan.  Cook for about 2-3 minutes.  Add in the other tomato products at this point.  Combine. Add in the Italian seasoning, garlic powder, and worcestershire sauce.  Combine and then add in the beef stock.  Gently combine and bring mixture up to a simmer.

Simmer sauce for 45 minutes to an hour, stirring occasionally.

Remove from heat and serve over pasta.

Oh this sauce!  It was just how I hoped it would turn out.  It’s a thick and rich meaty sauce perfect for a hearty pasta and scooping up with garlic bread.

This makes a good bit of sauce so you’ll have plenty leftover for freezing.

You can stick with rigatonis or branch out and use a ribbon style pasta.

We also had this over some fettucini and it worked beautifully!

This summer when I can get some fresh tomatos, I’m definitely making this again.  For the time being the canned tomatoes worked well.

Have fun guys, and remember, always play with your food!  Enjoy!

Beer and Mustard Dip

While on our most recent break, Scott and I had “snackies” one night for our evening meal. Since we were on vacation, I wanted to make snackie night a little bit more special by adding in a few dips to the mix.

On a recent episode of Triple D (because I love it so), I saw mention of a beer and cheese dip.  This got me thinking about creating a beer dip that you could have with snacks and that doesn’t need to be kept warm.

By eliminating the need to keep this dip warm, it becomes perfect for having out for parties and get togethers.

I wanted the beer flavor to come through while also having a little bit of a kick to it.  What goes great with beer? Mustard!

Once I knew mustard was going into the mix, the rest of the recipe fell into place.

Andrea’s Beer and Mustard Dip

  • 1C Dark Lager Style Beer (I used Great Lakes Eliot Ness)
  • 2TBSP Whole Grain Mustard
  • 3TBSP Dijon Mustard
  • 2 Cloves of Garlic
  • 1/4 Small Onion, chunked
  • 1TBSP Prepared Horseradish
  • 1/2TBSP Unbleached All-Purpose Flour
  • 1/4tsp Garlic Powder
  • Big Pinch Red Pepper Flakes
  • About 1/2tsp each, salt and ground black pepper
  • Couple Dashes Your Favorite Hot Sauce
  • 1tsp Olive Oil
  • 1C Shredded Cheddar

In a small mixing bowl, combine the cheddar and flour.  Set aside.  In a small food chopper or food processer, add in the onion and garlic cloves and pulse until finely chopped.  In a medium sized sauce pan add in the olive oil and heat over medium heat.  Add in the onion and garlic and sautee for about 2 minutes stirring constantly so the garlic doesn’t burn.  Add in the salt, pepper, red pepper flakes, and garlic powder. Add in the beer, mustards, and horseradish.  Stir and allow to come to a simmer.  Simmer for about 5 minutes.  You should notice the sauce starting to thicken up at this stage (not a lot, it thickens just a tad).  Turn heat down to low and slowly whisk in the cheddar and flour combo.  Keep whisking until the cheddar is melted and fully incorporated into the sauce.

Remove from heat and pour dip into a glass bowl.  You can serve this immediately or allow to cool, cover, and store in fridge till you need it.

This dip is great warm and it’s great cold.  It can also be served at room temperature making it a perfect party dip!

It’s creamy with a strong flavor of beer and mustard.  It goes well with veggies, chips, or even sausage bites!  It can also be used on top of sandwiches as a spread or sauce.

The cheddar helps thicken it up just a little more while providing some background sharpness that brings some depth to the dip.  Horseradish makes it demand to be noticed.

I’m already looking forward to making some more of this and seeing what else I can add it to!

Have fun guys, and remember, always play with your food! Enjoy!